Modules prêts pour CMS
Si vous utilisez pour votre site l'un des systèmes de gestion de contenu (CMS) énumérés ci-dessous, nous vous proposons d'examiner la possibilité
d'utiliser des plugins de paiement spéciaux, qui ont été préparés spécialement, afin de commencer à accepter les paiements le plus rapidement possible.
Choisissez simplement le plugin pour le CMS nécessaire et suivez les instructions d'installation.


WordPress
Avec ce plugin pour WordPress, vos clients pourront effectuer des achats via notre page de paiement.
Pour que ce plugin fonctionne, vous devez installer WooCommerce pour WordPress. Ce plugin a été testé avec les versions suivantes de WordPress et WooCommerce (voir le tableau ci-dessous).
| Version WordPress | Version WooCommerce | Lien de téléchargement |
|---|---|---|
| 4.x et plus | 3.x |
Télécharger le plugin WordPress 5.3.10
Oct. 17, 2025
|
Version WordPress recommandée : pas antérieure à 4.8.3. Pour ce guide, les composants et versions suivants ont été utilisés :
- WordPress 4.7.3
- WooCommerce 3.0
Vous pouvez télécharger la version nécessaire de WooCommerce sur github.com (lien vers l'historique des versions WooCommerce).
Nous recommandons de consulter la documentation suivante sur WordPress et WooCommerce :
WooCommerce n'est pas compatible avec tous les thèmes WordPress. Dans ce document, nous utilisons le thème Storefront (lien externe), créé par les développeurs WooCommerce.
Installation
- Connectez-vous à votre panneau d'administration.
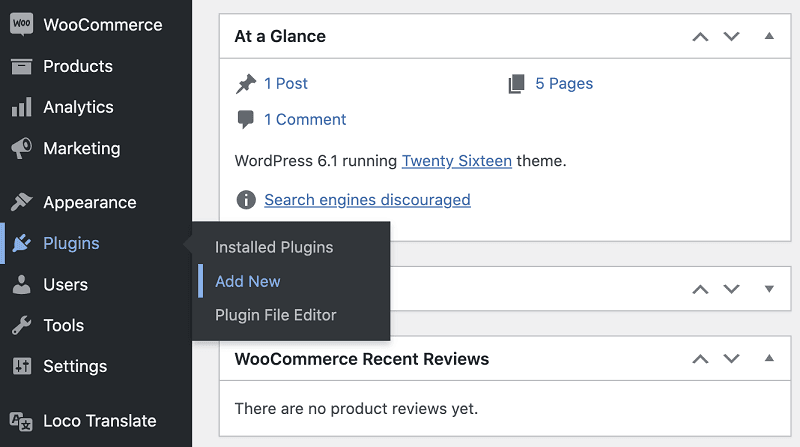
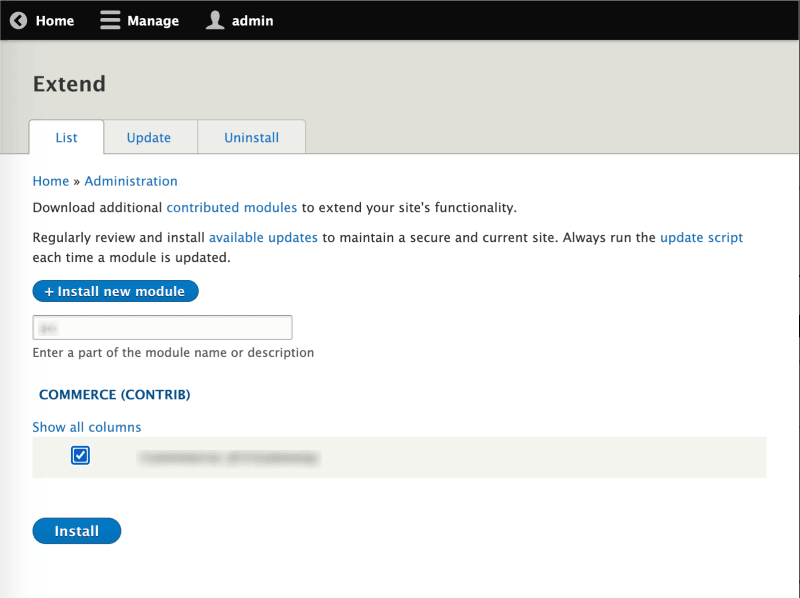
- Dans le panneau de gauche, sélectionnez Plugins > Ajouter nouveau (voir figure ci-dessous).
La page Ajouter des plugins s'ouvrira. - Cliquez sur Téléverser un plugin en haut de la page.
- Sélectionnez le fichier du plugin que vous avez téléchargé précédemment et cliquez sur Installer.
- Une fois l'installation terminée, dans le panneau de gauche, sélectionnez Plugins > Installés (voir figure ci-dessous).
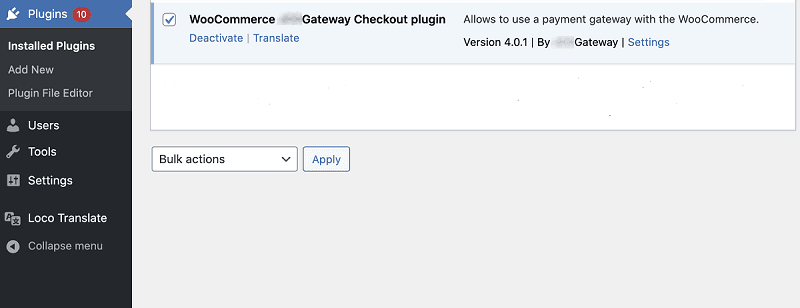
- Dans la section WooCommerce cliquez sur Activer.
Configuration
Pour configurer le plugin de paiement pour WordPress, procédez comme suit.
- Connectez-vous à votre panneau d'administration.
- Dans le panneau de gauche, sélectionnez Plugins > Installés (voir figure ci-dessous).
- Dans la section WooCommerce cliquez sur Paramètres.
La page suivante s'affichera.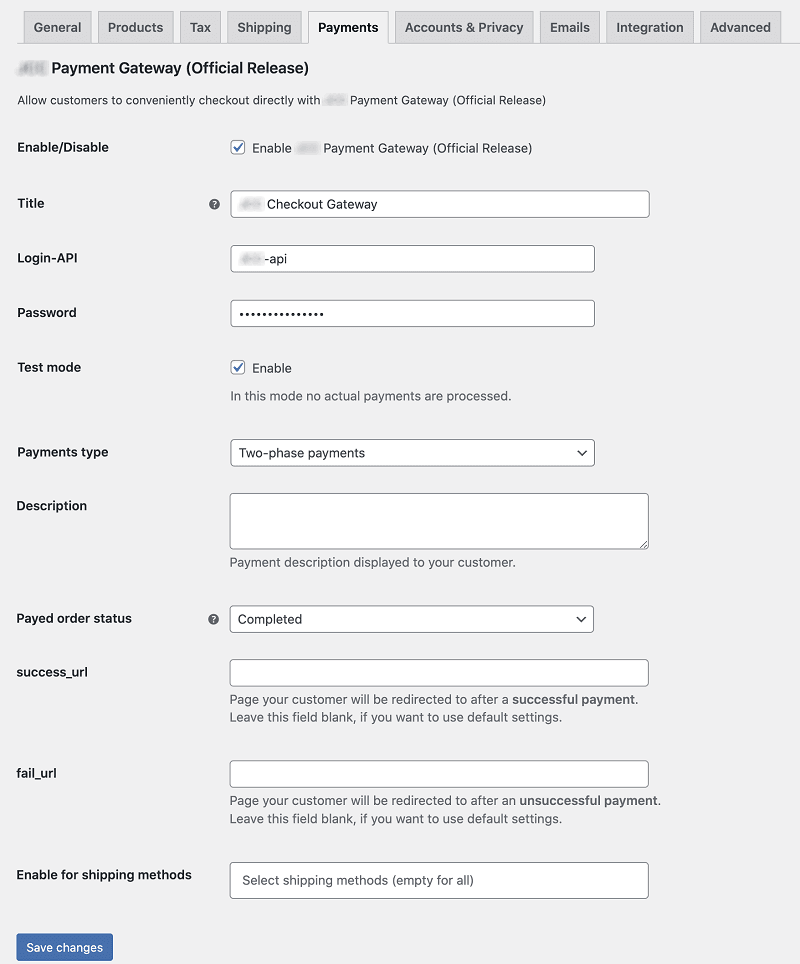
- Définissez les paramètres en vous guidant sur le tableau ci-dessous.
| Paramètre | Description |
|---|---|
| Activé/Désactivé | Permet d'activer ou de désactiver le plugin. |
| Title | Nom du mode de paiement, par exemple : Carte bancaire. |
| Login-API | Login du compte API. Si le plugin fonctionne en mode test, saisissez le login de test. Si le plugin fonctionne en mode production, saisissez le login de production. |
| Mot de passe | Mot de passe du compte API. Si le plugin fonctionne en mode test, saisissez le mot de passe de test. Si le plugin fonctionne en mode de production, saisissez le mot de passe de production. |
| Type de paiements | Active/désactive les paiements en deux étapes. |
| Mode test | Définit le mode de fonctionnement du plugin : test ou production. |
| Description | Entrez la description du paiement qui sera affichée pour le client. |
| Statut de la commande payée | Sélectionnez le statut de la commande payée. |
| success_url | URL pour rediriger le client après un paiement réussi. |
| fail_url | URL pour rediriger le client après un paiement échoué. |
| Activer pour les méthodes de livraison | Sélectionnez les méthodes de livraison, si elles sont disponibles. |
Cliquez sur Sauvegarder les modifications.
Dans la zone de notifications s'affichera Vos paramètres sont sauvegardés. Vous pouvez maintenant accepter les paiements.
Magento
Avec ce plugin pour Magento, vos clients pourront effectuer des achats via notre page de paiement.
Le fonctionnement stable du plugin est garanti pour les versions suivantes de Magento. Si vous utilisez d'autres versions (par exemple, après mise à jour), le plugin peut fonctionner incorrectement.
| Version Magento | Lien de téléchargement |
|---|---|
| 2.3.x et supérieur |
Télécharger le plugin pour Magento 1.6.7
Sept. 29, 2025
|
Installation
Pour installer le plugin de paiement pour Magento, effectuez les actions suivantes.
- Décompressez l'archive du plugin et téléchargez le contenu du dossier
uploadsur votre site. Le chemin résultant sera :<your site>/app/code/BPC/BPC/<plugin files and folders>. - Connectez-vous à votre site à l'aide de l'interface de ligne de commande, par exemple, via l'utilitaire PuTTY.
- Selon le type de votre hébergement, exécutez les commandes suivantes (voir le tableau ci-dessous).
| VPS/VDS | Hébergement virtuel ordinaire |
|---|---|
Serveur privé virtuel/dédié. Les commandes sont lancées sous root.
|
Utilisez la version PHP comme préfixe, par exemple : php-7.1, php-7.2 et ainsi de suite.
|
L'installation est terminée — passez à la configuration du plugin.
Pour supprimer le plugin, effectuez la procédure de suppression.
Configuration
Pour configurer le plugin de paiement pour Magento, effectuez les actions suivantes.
- Connectez-vous à votre panneau d'administration Magento.
- Dans le menu de gauche, sélectionnez Stores > Configuration (voir fig. ci-dessous).
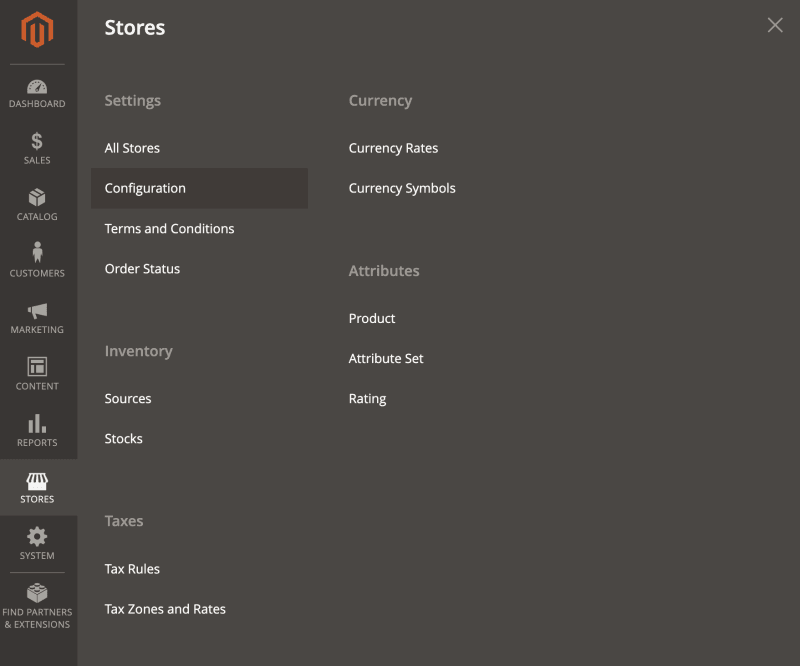
- Dans le menu de la page, sélectionnez Sales > Payment Methods (voir fig. ci-dessous).
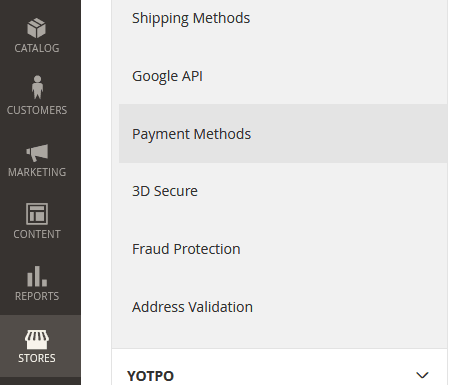
- Sur la page affichée, dans la section Other Payment Methods, passez au point Direct payment with credit/debit card (BPC) (voir la figure ci-dessous).
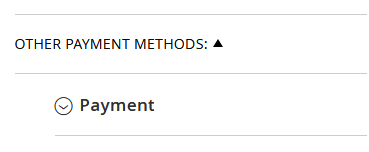
- Cliquez sur
 pour voir la liste des paramètres du plugin (voir fig. ci-dessous).

- Configurez les paramètres en vous guidant du tableau ci-dessous.
| Paramètre | Description |
|---|---|
| Activé | Permet d'activer ou de désactiver le plugin. |
| Titre de la méthode de paiement | Nom du mode de paiement, par exemple : Carte bancaire. |
| Login | Login du compte API. Si le plugin fonctionne en mode test, saisissez le login de test. Si le plugin fonctionne en mode production, saisissez le login de production. |
| Mot de passe | Mot de passe du compte API. Si le plugin fonctionne en mode test, saisissez le mot de passe de test. Si le plugin fonctionne en mode de production, saisissez le mot de passe de production. |
| Mode test | Définit le mode de fonctionnement du plugin : test ou production. |
| Activer le paiement en deux étapes | Active/désactive les paiements en deux étapes. |
| Statut de commande réussie | Sélectionnez le statut dans le CMS qui sera attribué à la commande payée. |
| Méthodes de livraison disponibles | Méthodes de livraison pour lesquelles cette méthode de paiement peut être utilisée. |
La case à cocher "Use System Value" (paramètre Magento) est principalement utilisée pour revenir aux paramètres par défaut. Cliquez sur Save Config.
Suppression
Pour supprimer le plugin de paiement pour Magento, effectuez les actions suivantes.
- Connectez-vous à votre site à l'aide de l'interface de ligne de commande, par exemple, via l'utilitaire PuTTY.
- En fonction du type de votre hébergement, exécutez les commandes suivantes (voir le tableau ci-dessous).
| VPS/VDS | Hébergement virtuel ordinaire |
|---|---|
Serveur privé virtuel/dédié. Les commandes sont exécutées sous root.
|
Utilisez la version PHP comme préfixe, par exemple : php-7.1, php-7.2 et ainsi de suite.
|
Supprimez les fichiers et dossiers des plugins de votre site : app/code/BPC/.
Joomla!
Joomla! et JoomShopping
Avec ce plugin pour Joomla, vos clients pourront effectuer des achats via notre page de paiement. Ce plugin nécessite l'extension JoomShopping installée dans Joomla!.
Le fonctionnement stable du plugin est garanti pour les versions suivantes de Joomla! et des extensions. Si vous utilisez d'autres versions (par exemple, après une mise à jour de Joomla!), le plugin peut fonctionner de manière incorrecte.
| Version Joomla | Version JShopping | Lien de téléchargement |
|---|---|---|
| 3.x, 4.x, 5.x | 4.x |
Télécharger le plugin pour Joomla! 1.5.12
Oct. 16, 2025
|
Installation
Pour installer le plugin, effectuez les actions suivantes.
Connectez-vous au panneau d'administration de Joomla.
Dans le menu de gauche, sélectionnez Composants > JoomShopping > Installation et mise à jour.
Dans la section Télécharger le fichier du paquet, cliquez sur le bouton Parcourir/Browse, indiquez le chemin vers le fichier du plugin de paiement. Puis appuyez sur Télécharger.
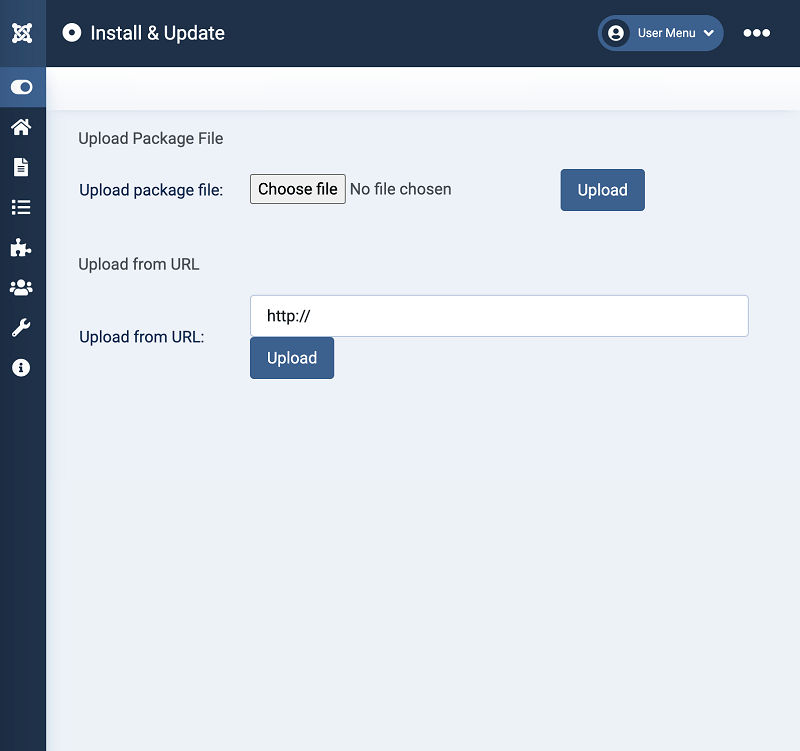
Attendez la fin du téléchargement et l'apparition du message "Opération terminée".
Configuration
Pour configurer le plugin, effectuez les actions suivantes.
Connectez-vous au panneau d'administration de Joomla.
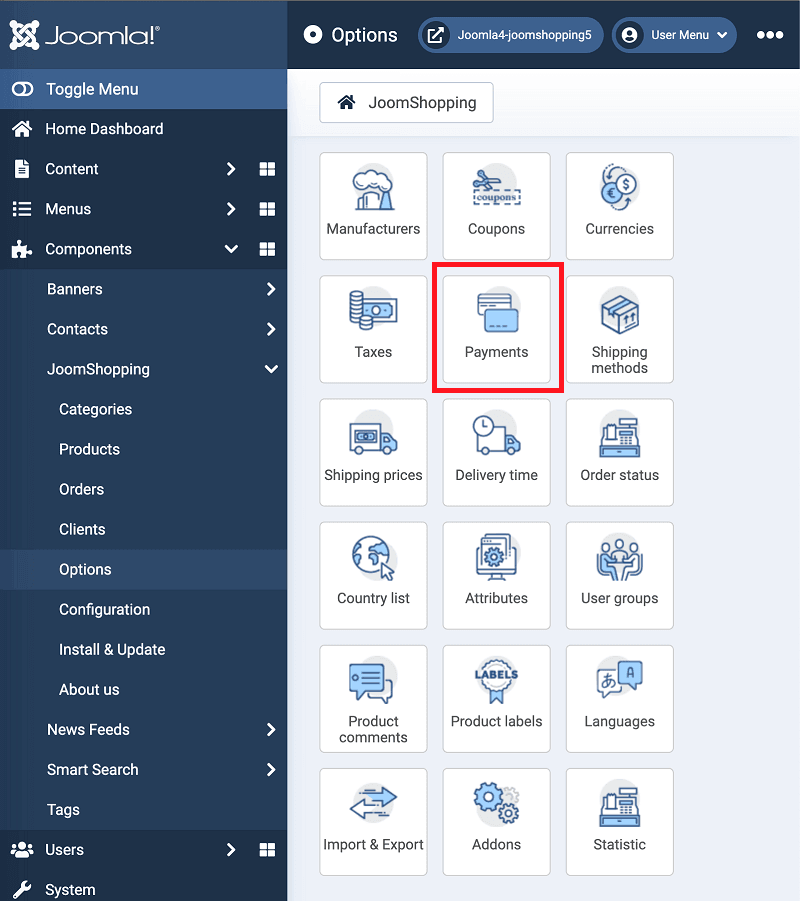
Allez dans Composants > JoomShopping > Options et sélectionnez Paiement.

-
La page Paiement s'affichera avec la liste des solutions de paiement. Cliquez sur le nom du plugin
BPC.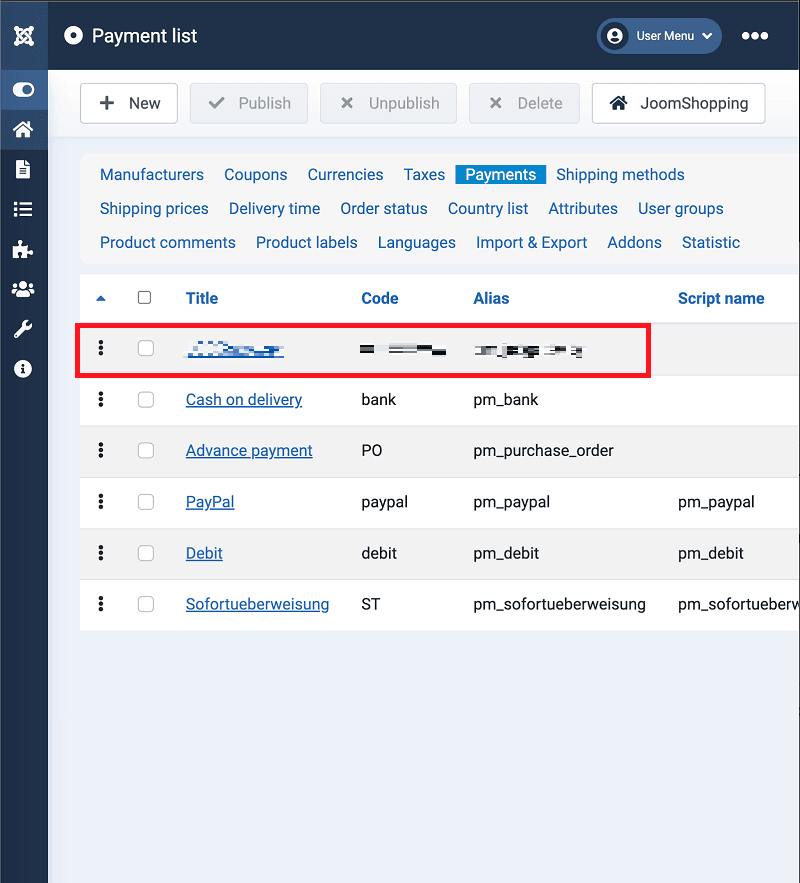
-
La page de configuration du plugin s'ouvrira. L'onglet Principal contient les paramètres généraux du plugin. Ici vous pouvez définir le nom du mode de paiement que le client verra lors de la création de commande, dans le champ Dénomination.

L'onglet Configuration contient les paramètres de connexion.

- Configurez le plugin (voir le tableau ci-dessous) et appuyez sur Enregistrer et fermer en haut.
| Paramètre | Description |
|---|---|
| Statut | Permet d'activer le module. |
| Login vendeur | Login du compte API. Si le plugin fonctionne en mode test, saisissez le login de test. Si le plugin fonctionne en mode production, saisissez le login de production. |
| Mot de passe vendeur | Mot de passe du compte API. Si le plugin fonctionne en mode test, saisissez le mot de passe de test. Si le plugin fonctionne en mode de production, saisissez le mot de passe de production. |
| Mode de fonctionnement du module | Définit le mode de fonctionnement du plugin : test ou production. |
| Étalement du paiement | Active/désactive les paiements en deux étapes. |
| Statut de commande à la fin du paiement | Statut de commande Joomla pour le paiement réussi. |
| Journalisation | Permet d'activer ou désactiver la tenue du journal des événements. |
| Devise | Devise de paiement. |
Joomla! et VirtueMart
Avec ce plugin pour Joomla, vos clients pourront effectuer des achats via notre page de paiement. Ce plugin nécessite l'extension VirtueMart installée dans Joomla!. Le fonctionnement stable du plugin est garanti pour les versions suivantes de Joomla! et des extensions. Si vous utilisez d'autres versions (par exemple, après la mise à jour de Joomla!), le plugin peut fonctionner incorrectement.
| Version Joomla | Version VirtueMart | Lien de téléchargement |
|---|---|---|
| 4.x | 3.8.x |
Télécharger le plugin pour Joomla! 2.4.3
Oct. 16, 2025
|
Installation
Connectez-vous au panneau d'administration de Joomla.
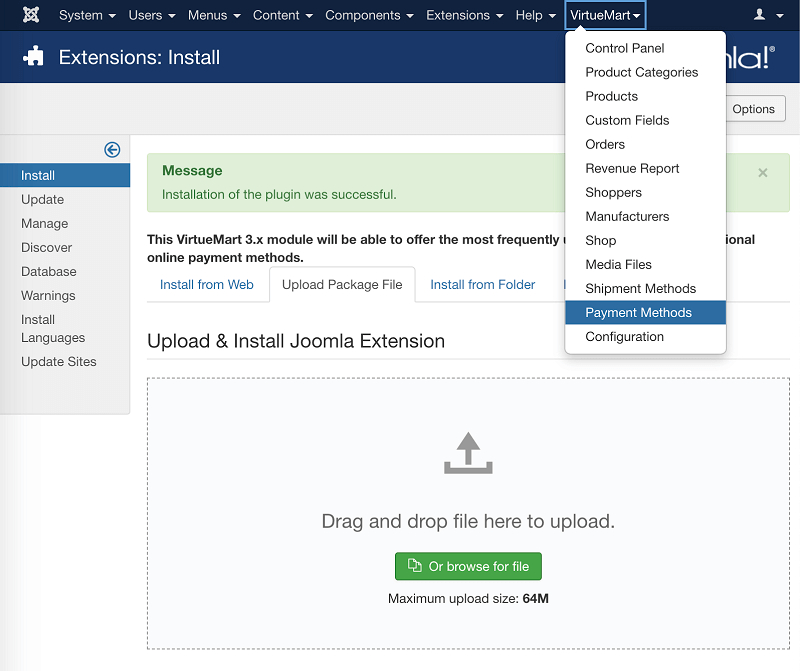
Dans le menu supérieur, sélectionnez Extensions > Gestionnaire d'extensions > Installation.
Sur la page qui s'ouvre, cliquez sur Ou sélectionnez un fichier pour trouver le fichier du plugin, ou faites glisser le fichier pour le télécharger. Puis cliquez sur Télécharger et installer.

Attendez la fin du téléchargement et l'apparition du message "Installation du plugin terminée avec succès".Dans le menu supérieur, sélectionnez Extensions > Gestionnaire d'extensions > Gestion.

Dans la liste affichée, trouvez dans la liste l'élément VM Payment - BPC et cliquez sur Activer.
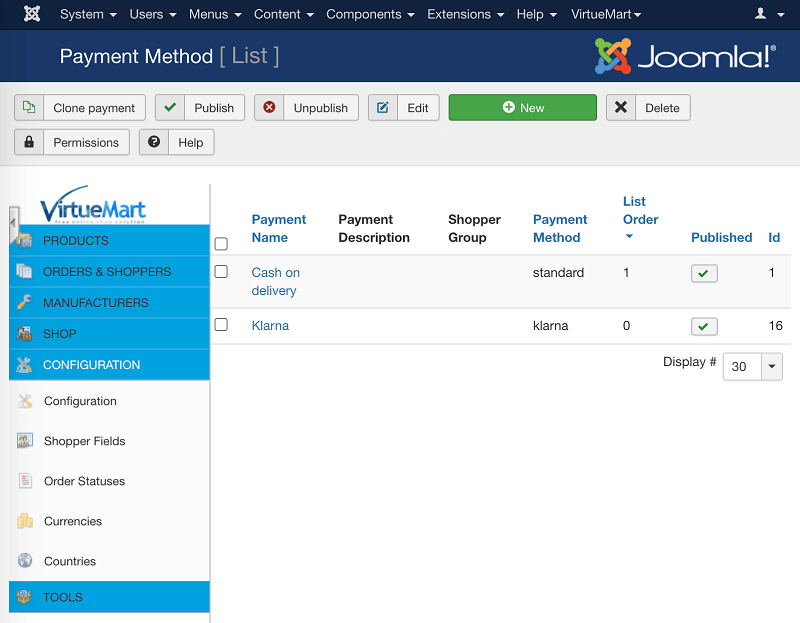
Dans le menu supérieur, sélectionnez Virtuemart -> Payment Methods (Méthodes de paiement).
La liste des méthodes de paiement s'ouvrira. Cliquez sur New (Créer) en haut pour créer une nouvelle méthode de paiement.
-
Dans la fenêtre Payment Method qui s'ouvre, configurez les paramètres de la nouvelle méthode de paiement. Dans le champ Payment Method, sélectionnez
VM Payment - BPC Module.
Configuration
Pour configurer le plugin, effectuez les actions suivantes.
Connectez-vous au panneau d'administration de Joomla.
Allez dans VirtueMart > Payment Methods.
Dans la liste des méthodes de paiement, cliquez sur le nom de la méthode de paiement qui utilise le plugin
BPC. La page de configuration s'ouvrira.

- Configurez le plugin (voir le tableau ci-dessous) et cliquez sur Save en haut.
| Paramètre | Description |
|---|---|
| LOGIN-API | Login du compte API. Si le plugin fonctionne en mode test, saisissez le login de test. Si le plugin fonctionne en mode production, saisissez le login de production. |
| Mot de passe | Mot de passe du compte API. Si le plugin fonctionne en mode test, saisissez le mot de passe de test. Si le plugin fonctionne en mode de production, saisissez le mot de passe de production. |
| Mode test | Définit le mode de fonctionnement du plugin : test ou production. |
| Paiements en deux étapes | Active/désactive les paiements en deux étapes. |
Drupal
Avec ce plugin pour Drupal, vos clients pourront effectuer des achats via notre page de paiement. Pour que ce plugin fonctionne, le module Drupal Commerce doit être installé.
Ce plugin nécessite les versions suivantes de Drupal et Drupal Commerce.
| Version Drupal | Version Drupal Commerce | Lien de téléchargement |
|---|---|---|
| 8.x/9.x/10.x | 2.x, 3.x |
Télécharger le plugin Drupal 8.x/9.x/10.x 2.1.10
Sept. 30, 2025
|
Installation
Pour installer le plugin, effectuez les actions suivantes.
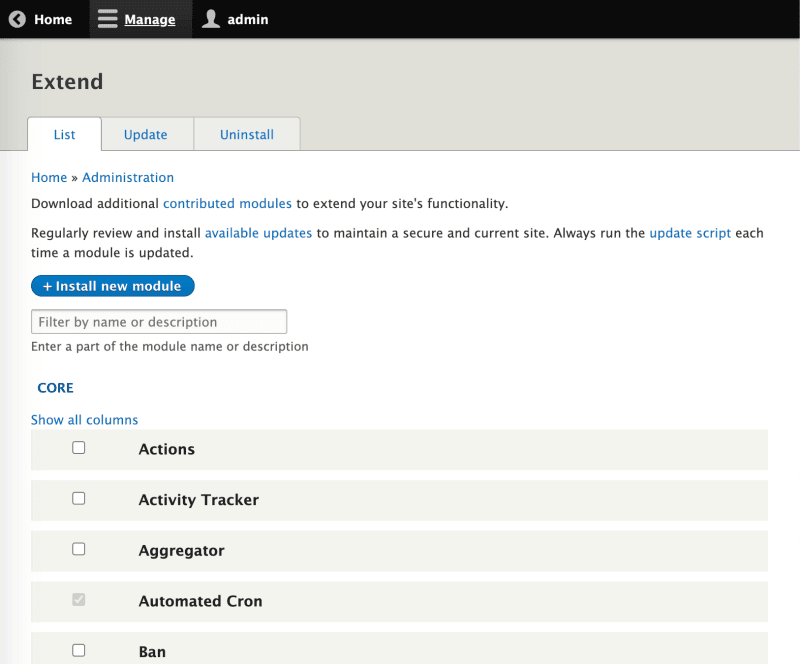
- Dans le menu supérieur, sélectionnez Gestion > Extensions et cliquez sur Installer un nouveau module.
- Dans la zone Télécharger une archive de module ou de thème à installer, cliquez sur Choose file et indiquez le chemin vers l'archive du plugin.
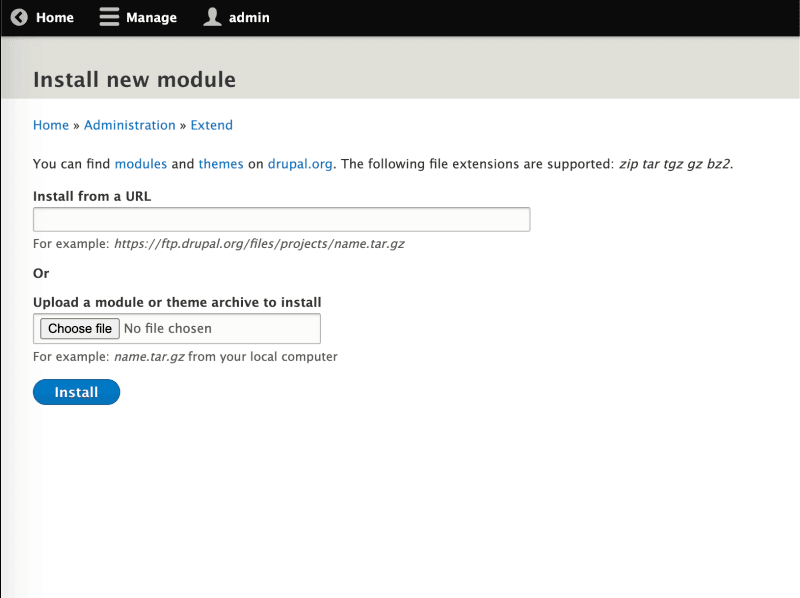
Attendez le message de réussite.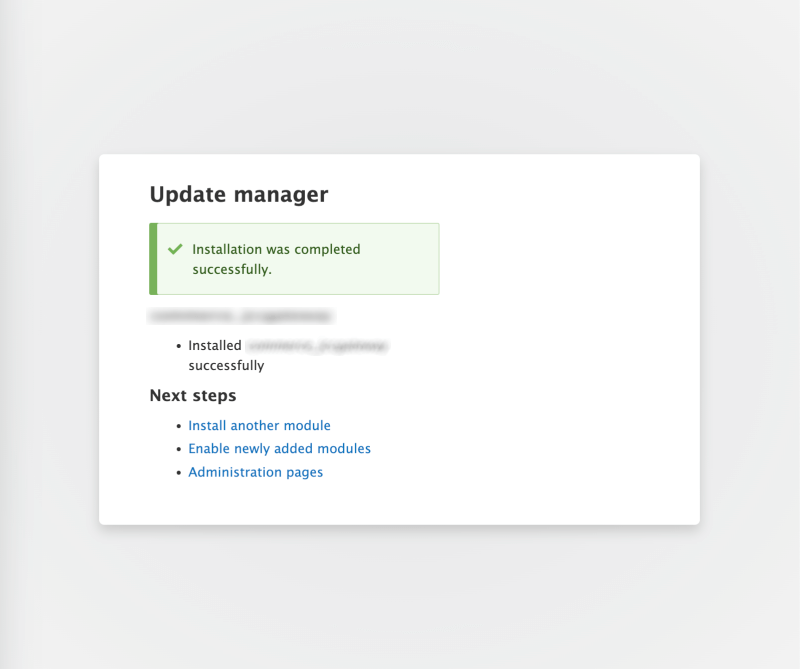
- Sélectionnez le module Commerce BPC et cliquez sur Installer (voir figure ci-dessous).
Attendez l'installation du module.
Configuration
Pour configurer le plugin de paiement, effectuez les actions suivantes :
- Dans le menu supérieur, sélectionnez Gestion > Commerce > Configuration > Paiement > Passerelles de paiement.
La page suivante s'ouvrira.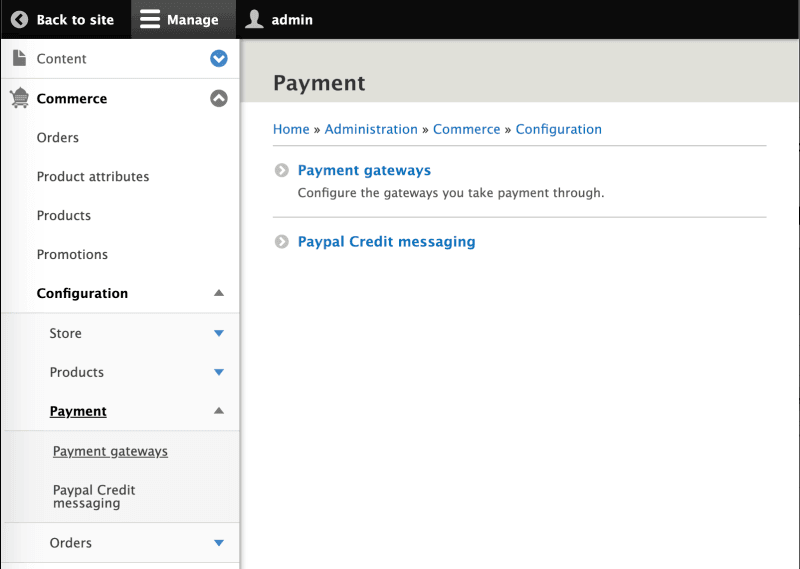
- Cliquez sur Ajouter une passerelle de paiement.
- Sélectionnez BPC.
- Configurez le plugin de paiement en vous guidant avec le tableau ci-dessous.

| Paramètre | Description |
|---|---|
| Nom d'affichage | Nom du mode de paiement, par exemple : Carte bancaire. |
| Mode | Définit le mode de fonctionnement du plugin : test ou production. |
| Login-API | Login du compte API. Si le plugin fonctionne en mode test, saisissez le login de test. Si le plugin fonctionne en mode production, saisissez le login de production. |
| Mot de passe | Mot de passe du compte API. Si le plugin fonctionne en mode test, saisissez le mot de passe de test. Si le plugin fonctionne en mode de production, saisissez le mot de passe de production. |
| Paiements en deux étapes | Active/désactive les paiements en deux étapes. |
| Conditions | Bloc de paramètres ajouté par Drupal Commerce. Les paramètres indiquent les règles et la logique Drupal pour l'affichage du mode d'obtention de fonds spécifié. |
| Tenir un journal des requêtes vers la passerelle de paiement | Activé ou désactivé la tenue du journal des événements. |
| Status | Permet d'activer ou de désactiver le plugin. |
Cliquez sur Enregistrer pour sauvegarder les paramètres.
OpenCart
Avec ce plugin pour OpenCart, vos clients pourront effectuer des achats via notre page de paiement.
| Version OpenCart | Lien de téléchargement |
|---|---|
| 4.x |
Télécharger le plugin pour OpenCart 4.x 1.0.11
Oct. 16, 2025
|
| 3.x |
Télécharger le plugin pour OpenCart 3.x 3.2.10
Oct. 16, 2025
|
| 2.3.x |
Télécharger le plugin pour OpenCart 2.3.x 3.2.6
Oct. 16, 2025
|
Installation
Pour installer le plugin de paiement, effectuez les actions suivantes :
- Connectez-vous sur votre site en tant qu'administrateur et sélectionnez Modules/Extensions > Installation d'extensions.
La page suivante s'affichera.
- Cliquez sur Télécharger et sélectionnez le fichier téléchargé dans la boîte de dialogue standard de sélection de fichier.
- Attendez la fin du processus d'installation.
- Dans le menu latéral, sélectionnez Modules/Extensions > Modules/Extensions. Dans le champ Sélectionnez le type d'extension, sélectionnez Paiement. La page ressemblera à ceci.
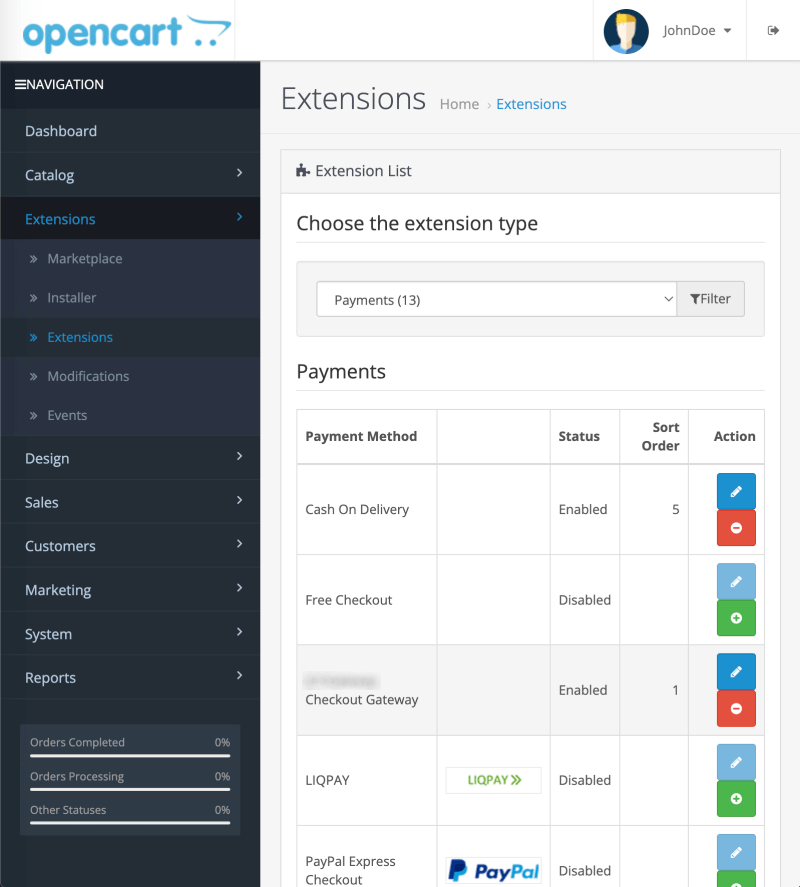
- À côté du nom du module installé cliquez sur
 (Installer).
 - Procédez à la configuration du plugin.
Configuration
Pour configurer le plugin de paiement, effectuez les actions suivantes :
- Connectez-vous sur votre site en tant qu'administrateur et dans le menu latéral, sélectionnez Modules/Extensions > Modules/Extensions.
- Dans le champ Sélectionnez le type d'extension, sélectionnez Paiement.
À côté du nom du module installé cliquez sur
 (Modifier)
La page suivante s'affichera.
Définissez les paramètres en vous guidant avec le tableau ci-dessous.
| Paramètre | Description |
|---|---|
| Statut | Permet d'activer ou de désactiver le plugin. |
| Login du vendeur | Login du compte API. Si le plugin fonctionne en mode test, saisissez le login de test. Si le plugin fonctionne en mode production, saisissez le login de production. |
| Mot de passe du vendeur | Mot de passe du compte API. Si le plugin fonctionne en mode test, saisissez le mot de passe de test. Si le plugin fonctionne en mode de production, saisissez le mot de passe de production. |
| Mode de fonctionnement du module | Définit le mode de fonctionnement du plugin : test ou production. |
| Étapes du paiement | Active/désactive les paiements en deux étapes. |
| Statut de commande à la fin du paiement | Permet de spécifier quel statut le CMS attribuera à la commande après réception de la réponse concernant le paiement réussi de la passerelle de paiement. |
| Devise | Sélectionnez la devise que vous prévoyez d'utiliser, ou laissez la valeur par défaut. |
| Journalisation | L'activation ou la désactivation de la journalisation des événements. |
| Ordre de tri | Permet de spécifier la position d'affichage dans la liste des systèmes de paiement lors de la finalisation de commande par le client. |
- Cliquez sur
 (Enregistrer) dans le coin supérieur droit de la page.
CS-Cart
Avec ce plugin pour CS-Cart, vos clients pourront effectuer des achats via notre page de paiement.
Installation
Pour installer le plugin de paiement, effectuez les actions suivantes :
- Placez le contenu du dossier upload dans le répertoire de votre site.
- Connectez-vous à votre site en tant qu'administrateur et sélectionnez Modules > Gestion des modules. La page suivante s'affichera.

- Cliquez sur Afficher tous les modules disponibles. Dans la liste des plugins disponibles, trouvez BPC et cliquez sur le bouton Installer.
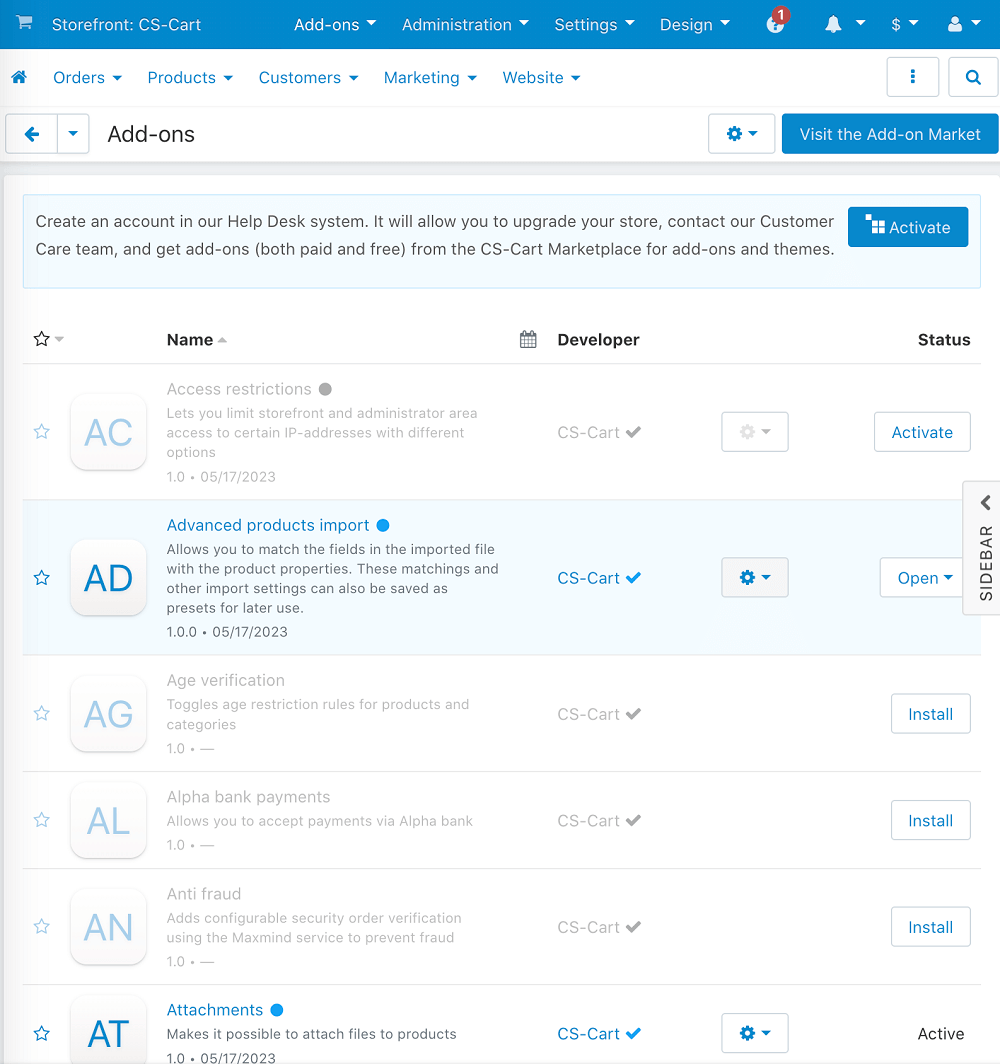
- Procédez à la configuration du plugin.
Configuration
Pour configurer le plugin de paiement, effectuez les actions suivantes :
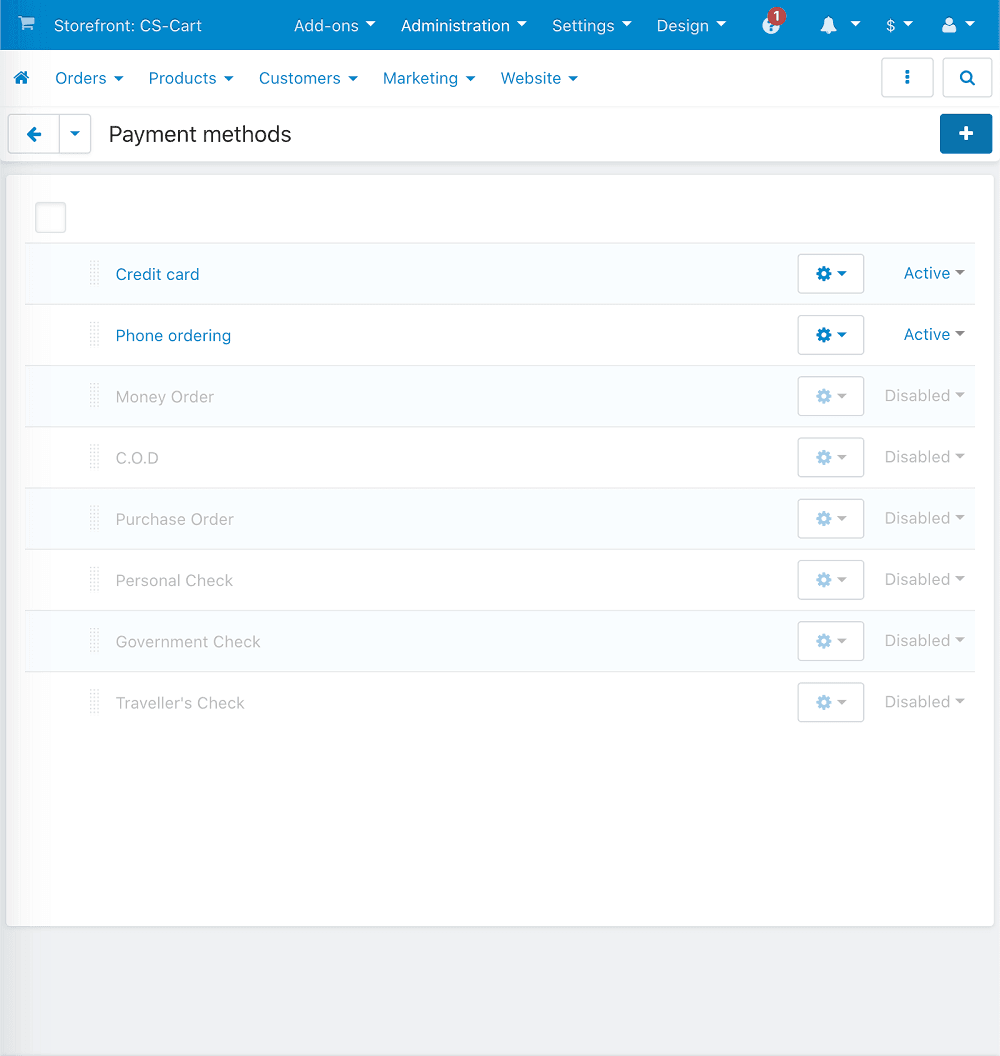
- Connectez-vous à votre site en tant qu'administrateur et sélectionnez Administration > Méthodes de paiement.
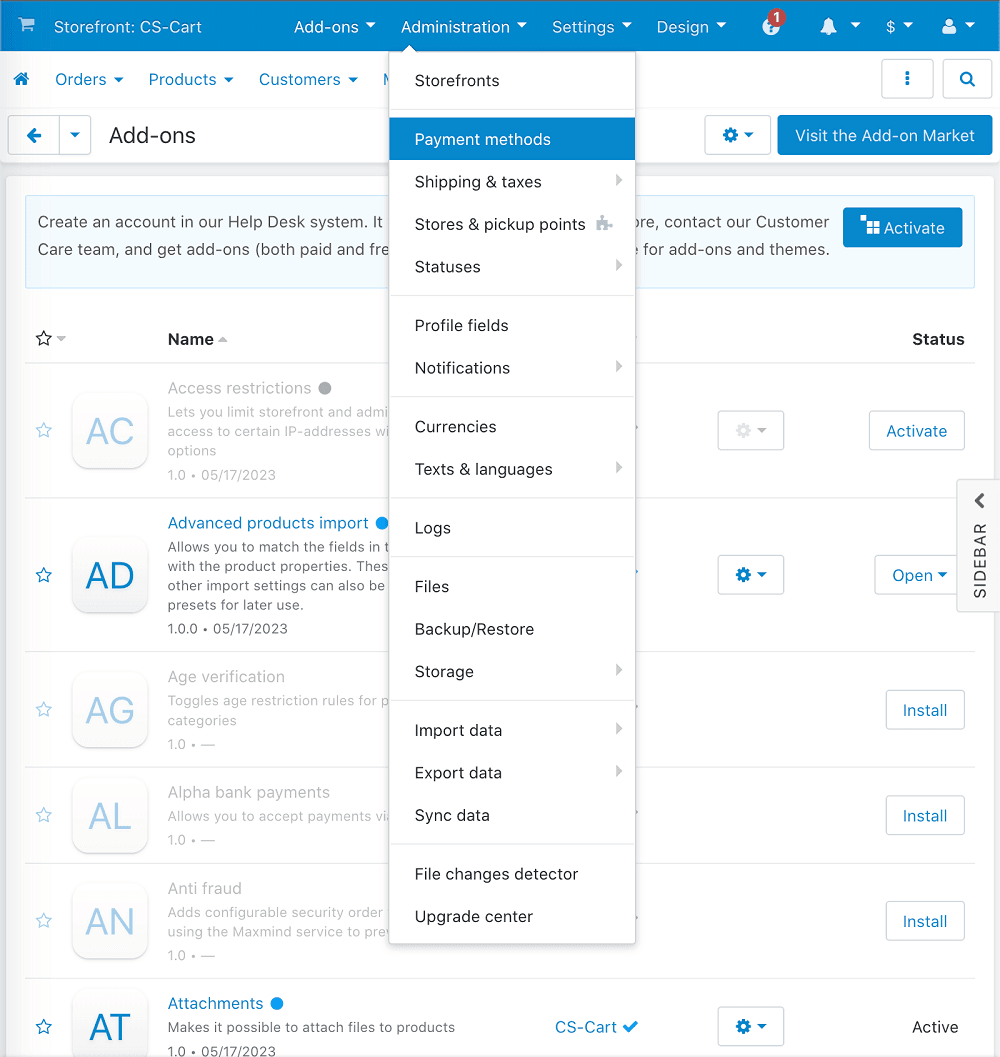
- Sur la page Méthodes de paiement, cliquez sur
 (Ajouter une méthode de paiement).
- Dans l'onglet Général, définissez les paramètres en vous guidant du tableau ci-dessous.
| Paramètre | Description |
|---|---|
| Nom | Définissez un nom pour la méthode de paiement. |
| Processeur | Sélectionnez BPC dans la liste. |
| Statut | Le bouton de commutation se trouve en bas du formulaire. Assurez-vous que la case Active est cochée. |
Après avoir sélectionné le processeur dans le champ Processeur, l'onglet Configurer apparaît à côté de l'onglet Général.

Ouvrez l'onglet Configurer et définissez les paramètres.
| Paramètre | Description |
|---|---|
| Login | Login du compte API. Si le plugin fonctionne en mode test, saisissez le login de test. Si le plugin fonctionne en mode production, saisissez le login de production. |
| Mot de passe | Mot de passe du compte API. Si le plugin fonctionne en mode test, saisissez le mot de passe de test. Si le plugin fonctionne en mode de production, saisissez le mot de passe de production. |
| Mode Test/Production | Définit le mode de fonctionnement du plugin : test ou production. |
| Caractère échelonné des paiements | Active/désactive les paiements en deux étapes. |
| Statut de commande réussie | Permet d'indiquer quel statut sera attribué à la commande lors de sa finalisation par le système CS-Cart. |
| Journalisation | L'activation ou la désactivation de la journalisation des événements. |
Puis cliquez sur Enregistrer.
PrestaShop
Avec ce plugin pour PrestaShop, vos clients pourront effectuer des achats via notre page de paiement.
| Version PrestaShop | Lien de téléchargement |
|---|---|
| 1.7.x, 8.x |
Télécharger le plugin pour PrestaShop 2.9.4
Oct. 17, 2025
|
Installation
Pour installer le plugin de paiement, effectuez les actions suivantes :
- Connectez-vous au panneau d'administration PrestaShop et dans le menu latéral, sélectionnez Modules > Modules et Services.
- Sur la page qui s'ouvre, cliquez sur le bouton Ajouter un module dans le coin supérieur droit.
- Faites glisser l'archive téléchargée dans la zone indiquée de l'écran (ou cliquez sur Choisir un fichier et naviguez vers celui-ci dans la boîte de dialogue standard de sélection de fichier). Cliquez sur Télécharger ce module.
- Attendez la fin du processus d'installation.
- Pour accéder immédiatement à la configuration du module, cliquez sur Configuration. Vous pouvez également le faire plus tard. La procédure de configuration est décrite dans la section suivante.
Configuration
Pour configurer le plugin de paiement, effectuez les actions suivantes :
- Connectez-vous au panneau d'administration PrestaShop et dans le menu latéral, sélectionnez Modules > Modules et services.
-
Trouvez le module
BPCet cliquez sur le bouton Configuration à côté de celui-ci.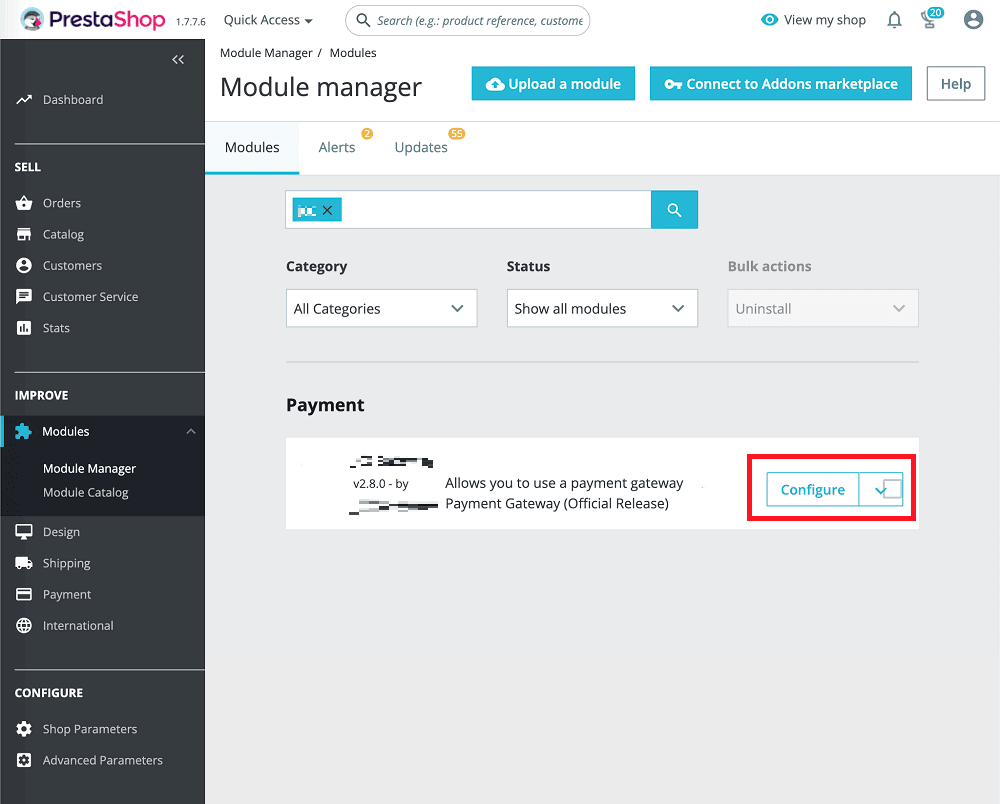
La page de configuration du module s'affichera.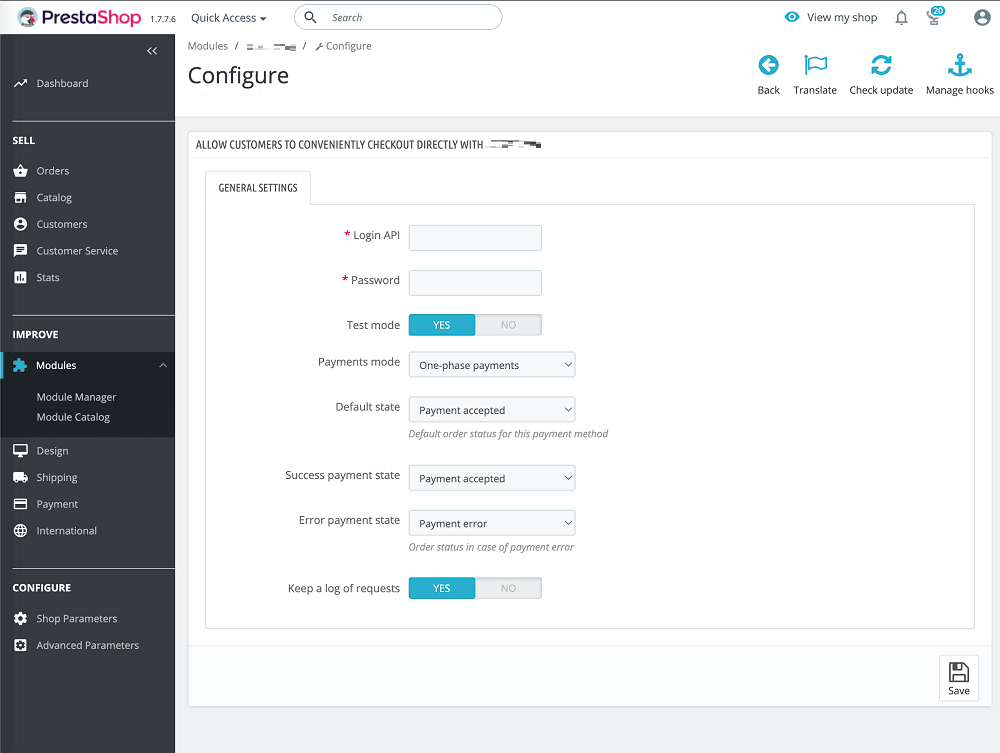
Définissez les paramètres en vous guidant du tableau ci-dessous.
| Paramètre | Description |
|---|---|
| Login | Login pour l'API fourni par la banque. |
| Mot de passe | Mot de passe API fourni par la banque. |
| Mode test | Détermine si le plugin fonctionne en mode test (OUI) ou en mode production (NON).Notez que le login et le mot de passe pour les modes test et production peuvent différer. |
| Activer le paiement en deux étapes | Détermine le nombre d'étapes des paiements : cliquez sur OUI pour utiliser les paiements en deux étapes. |
| Statut par défaut | Statut de commande à afficher dans PrestaShop et aux acheteurs par défaut. |
| Statut de commande payée | Statut de commande à afficher dans PrestaShop et aux acheteurs en cas de paiement réussi (pour le mode une étape) ou de rétention de fonds (pour le mode deux étapes). |
| Statut d'erreur | Statut de commande à afficher dans PrestaShop et aux acheteurs en cas d'erreur de paiement. |
| Tenir un journal des requêtes et réponses de la passerelle de paiement | Détermine si le journal des requêtes sera conservé (OUI) ou non (NON). Les journaux sont sauvegardés dans le dossier des journaux PrestaShop et ne sont accessibles qu'à l'administrateur. |
Shopify
Shopify - plateforme de commerce électronique qui permet aux utilisateurs de créer et de personnaliser des boutiques en ligne, ainsi que de les gérer. Elle fournit des outils pour créer une liste de produits, traiter les paiements, etc. En substance, c'est une solution universelle pour mener des affaires en ligne.
Avec ce plugin pour Shopify, vos clients pourront effectuer des achats via notre page de paiement.
Installation
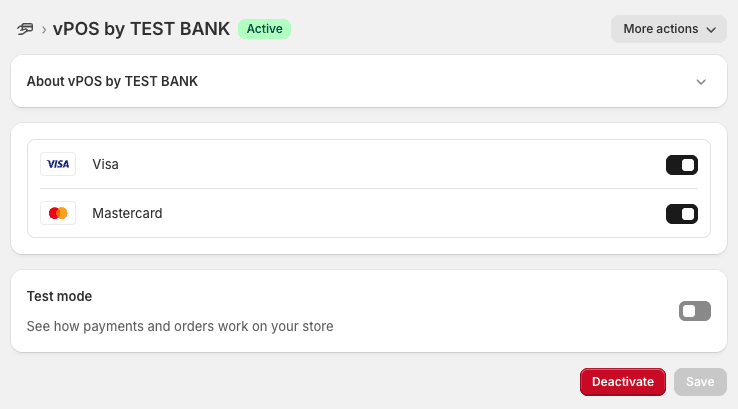
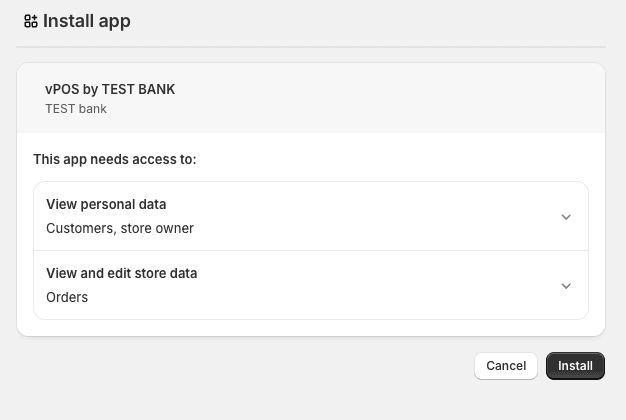
Pour installer le plugin de paiement Shopify, contactez l'équipe de support. Exemple de ce à quoi ressemblera l'écran d'installation :
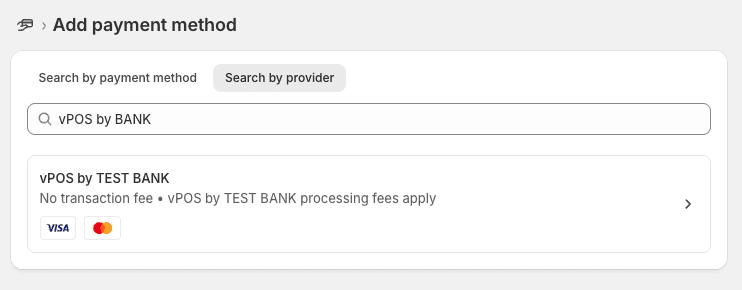
Pour activer l'extension, suivez ces étapes :
- Allez dans les paramètres de votre boutique
- Ensuite, accédez à la section Payments
- Puis dans le bloc Additional payment methods, cliquez sur le bouton Add payment method
- Dans la barre de recherche, sélectionnez Search by provider
- Trouvez vPOS by Bank
Configuration
Pour configurer le plugin Shopify, suivez ces étapes :
1. Enregistrement du domaine dans le Portail vendeur (UAT)
- Connectez-vous au compte personnel du Portail Vendeur. Voir plus de détails ici.
- Allez dans la section Paramètres/Intégration Shopify.
- Assurez-vous que dans le champ Boutique Shopify actuelle s'affiche le nom du domaine de la boutique Shopify. Par exemple, si votre boutique se trouve à l'adresse example-store.myshopify.com, le champ doit afficher la valeur example-store.
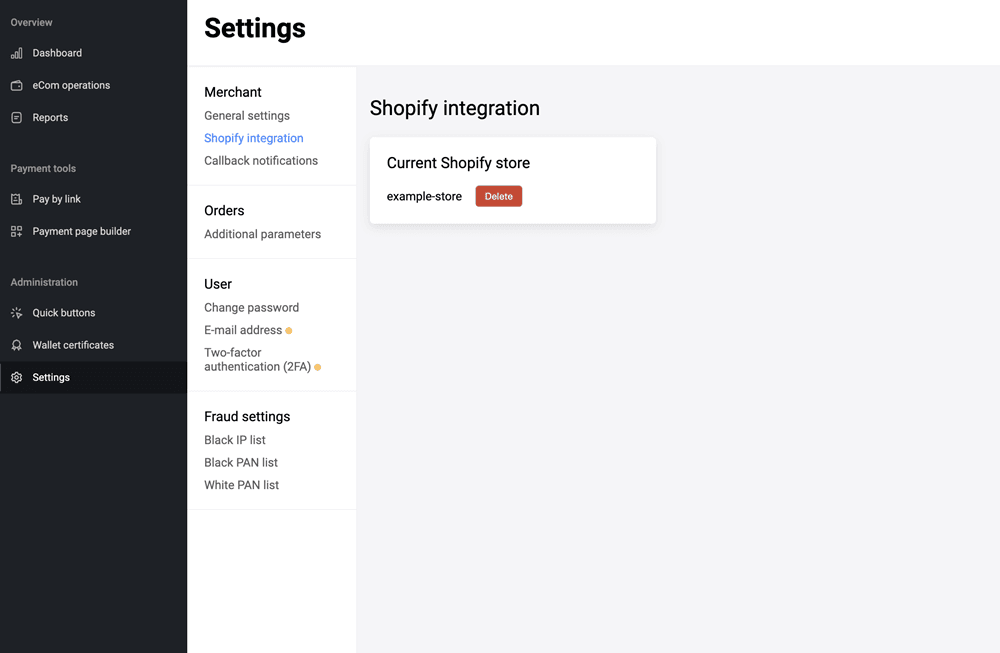
Si ce champ est vide :
- Ne remplissez pas ce champ manuellement !
- Dans la console d'administration Shopify, allez dans les paramètres du plugin installé, cliquez sur Plus > Gérer, puis connectez-vous au compte approprié du Portail Vendeur.
Si par la suite, quand l'acheteur sélectionne l'extension bancaire pour le paiement dans Shopify et clique sur le bouton Payer, des erreurs se produisent, il faut faire ce qui suit :
- Connectez-vous au compte personnel du Portail Vendeur. Voir plus de détails ici.
- Allez dans la section Paramètres/Intégration Shopify.
- Supprimez manuellement la valeur affichée dans le champ Boutique Shopify actuelle en cliquant sur le bouton Supprimer.
- Dans la console d'administration Shopify, allez dans les paramètres du plugin installé, cliquez sur Plus > Gérer, puis connectez-vous au compte approprié du Portail Vendeur.
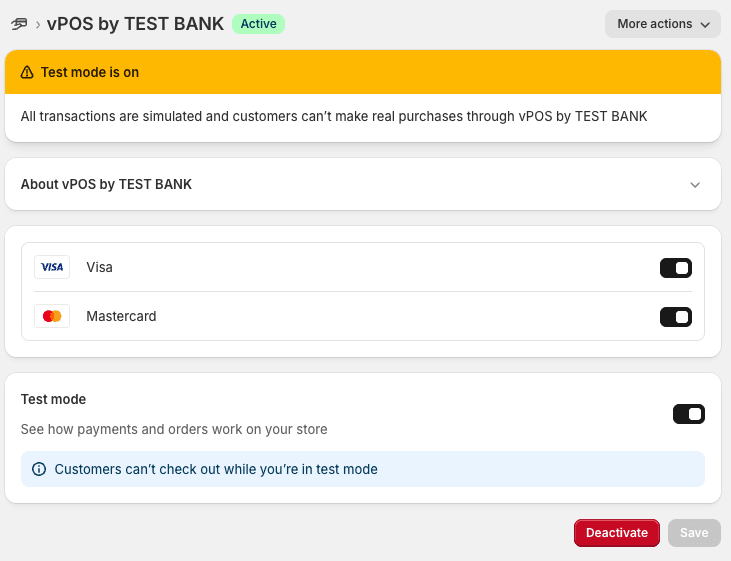
2. Basculement en mode test et test
- Dans la console d'administration Shopify, allez dans les paramètres du plugin installé.
- Sélectionnez Mode test pour activer le mode test pour le plugin.
- Effectuez plusieurs paiements et remboursements de test. Ils passeront par l'environnement de test (UAT).
3. Accès à l'environnement de production
Contactez la Banque et demandez l'accès à l'environnement de production. Lien d'onboarding : [TODO]
4. Enregistrement du domaine dans le Portail vendeur (environnement de production)
- Connectez-vous au compte personnel de production du Portail vendeur. Vous pouvez accéder au compte personnel de production via le bouton Gérer dans les paramètres du plugin dans la console administrative Shopify.
- Allez dans la section Paramètres/Intégration Shopify.
- Assurez-vous que dans le champ Boutique Shopify actuelle s'affiche le nom du domaine de la boutique Shopify. Par exemple, si votre boutique se trouve à l'adresse example-store.myshopify.com, le champ doit afficher la valeur example-store.
Si ce champ est vide :
- Ne remplissez pas ce champ manuellement !
- Dans la console d'administration Shopify, allez dans les paramètres du plugin installé, cliquez sur Plus > Gestion, puis connectez-vous au compte approprié du Portail Vendeur.
Si par la suite, quand l'acheteur sélectionne l'extension bancaire pour le paiement dans Shopify et clique sur le bouton Payer, des erreurs se produisent, il faut faire ce qui suit :
- Connectez-vous au compte personnel de production du Portail vendeur. Vous pouvez accéder au compte personnel de production via le bouton Gérer dans les paramètres du plugin dans la console administrative Shopify.
- Allez dans la section Paramètres/Intégration Shopify.
- Supprimez manuellement la valeur affichée dans le champ Boutique Shopify actuelle en cliquant sur le bouton Supprimer.
- Dans la console d'administration Shopify, allez dans les paramètres du plugin installé, cliquez sur Plus > Gérer, puis connectez-vous au compte approprié du Portail Vendeur.
5. Début de l'acceptation des paiements réels
- Dans la console d'administration Shopify, allez dans les paramètres du plugin installé.
- Désactivez le Mode test pour passer à l'environnement de production.
- Commencez à accepter les paiements réels.