Autorisation
Pour vous connecter à l'espace personnel, effectuez les actions suivantes.
1. Ouvrez la page de l'espace personnel.
TEST: https://dev.bpcbt.com/mp3
PROD:
Si la connexion n'a pas été effectuée, un formulaire de saisie de login et mot de passe s'affichera (voir image ci-dessous).
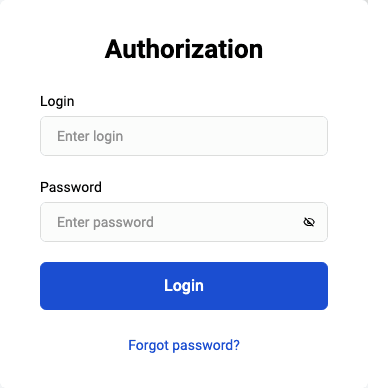
2. Dans les champs Login et Mot de passe saisissez respectivement votre login et mot de passe opérateur.
3. Cliquez sur le bouton Se connecter.
Si les données sont saisies correctement, la connexion à l'espace personnel sera effectuée.
Sortie du système
Pour quitter l'espace personnel, cliquez sur le bouton  , situé dans la partie supérieure droite de l'interface de l'espace personnel.
Changement de langue d'interface
Pour changer la langue d'affichage de l'interface de l'espace personnel, procédez comme suit :
- Connectez-vous à l'espace personnel.
- Dans la partie supérieure du panneau de contrôle de l'espace personnel cliquez sur l'icône représentant un globe.
Une liste des langues d'interface disponibles s'affichera (voir image ci-dessous).

- Cliquez sur l'icône de la langue souhaitée.
La page de l'espace personnel s'affichera automatiquement dans la langue choisie.
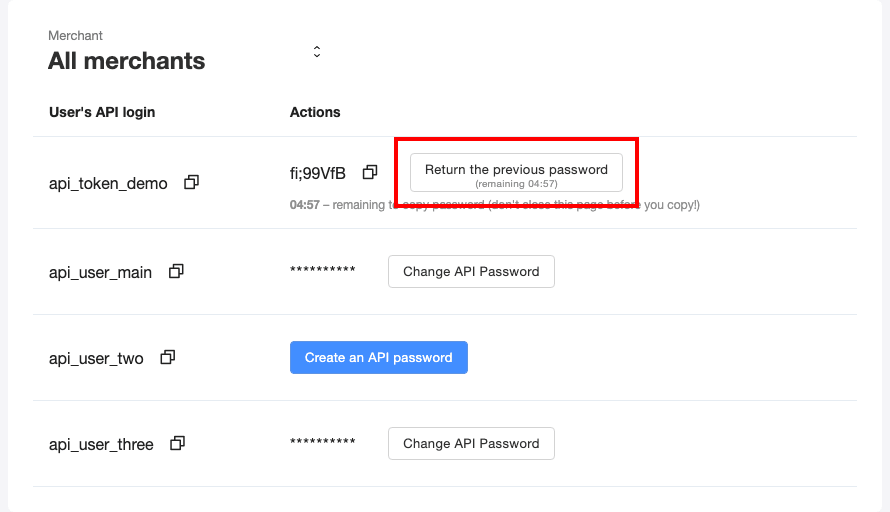
Travail avec l'API
Avec l'API, vous pouvez créer des intégrations de paiement uniques. Par exemple, connecter le paiement depuis une page de paiement spécialement créée. Des informations supplémentaires sur l'API sont disponibles ici. Lors de la création du Marchand, vous recevez un e-mail avec l'identifiant et le mot de passe à usage unique. Après cela, vous pouvez générer vous-même le mot de passe API sur la page Travail avec l'API du Portail vendeur.
Pour afficher la page Travail avec l'API, cliquez sur ![]() dans le panneau latéral gauche.
dans le panneau latéral gauche.
La page suivante s'affichera.
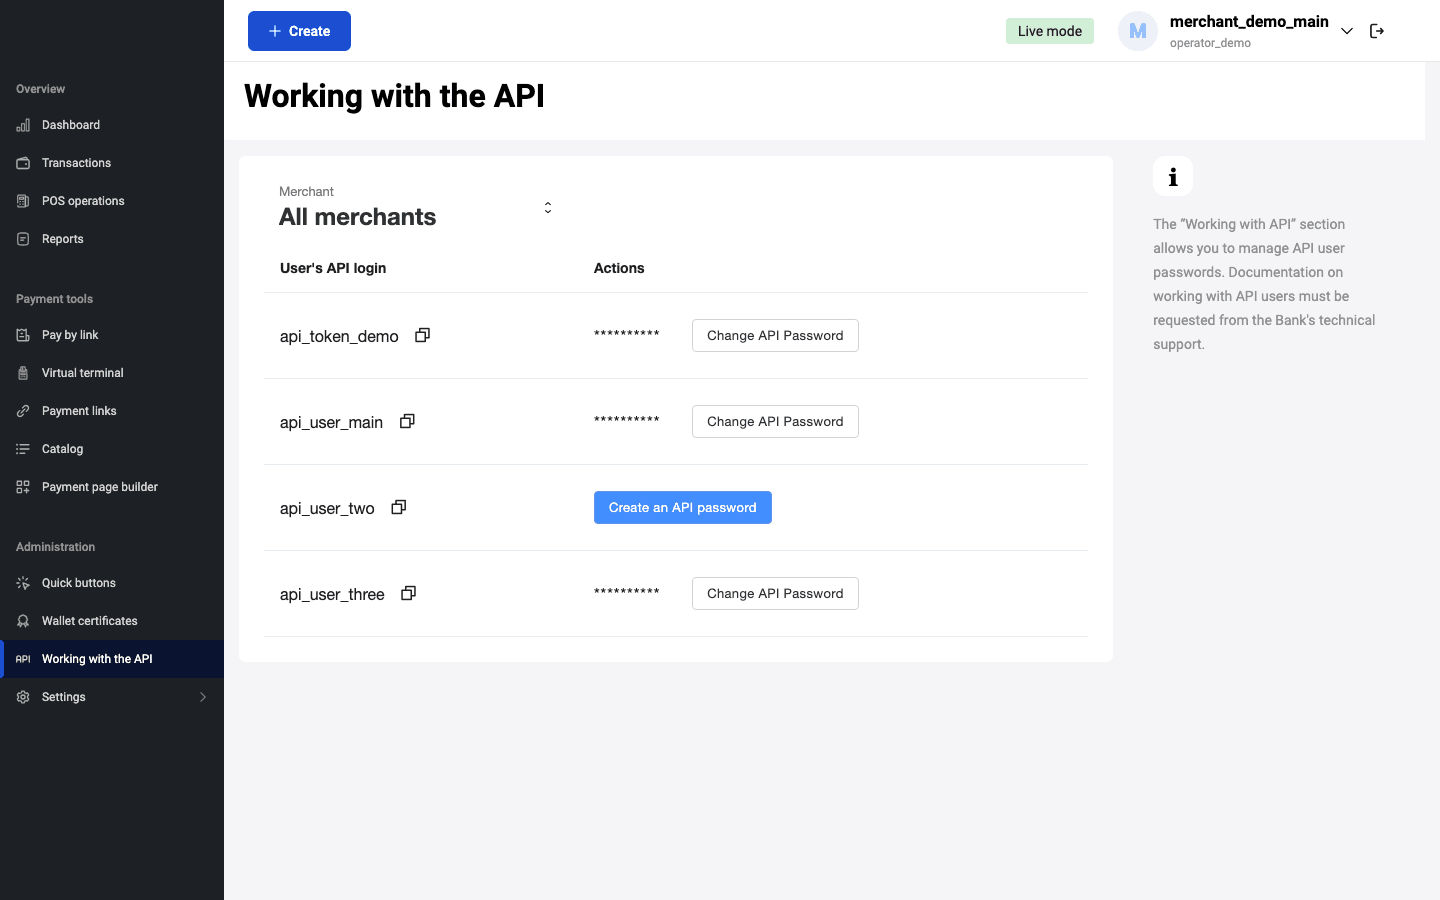
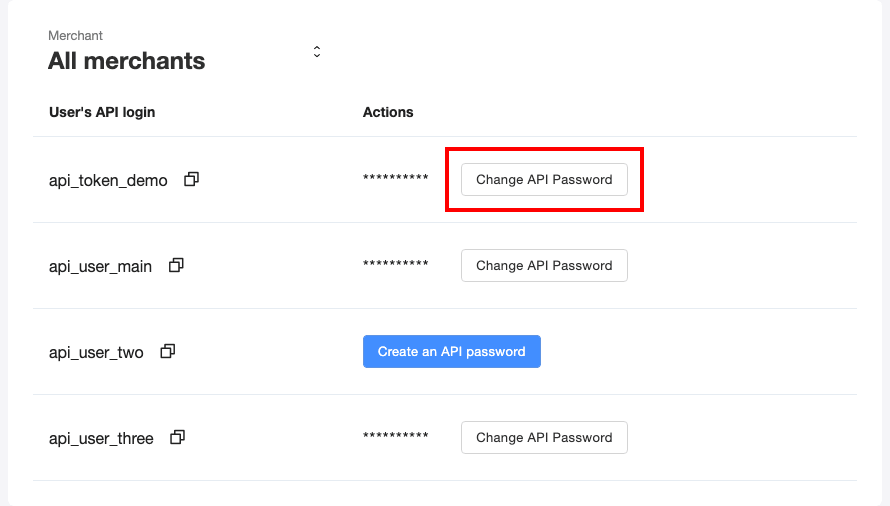
Les actions suivantes sont disponibles :
Création du mot de passe API. Pour cela, cliquez sur Créer le mot de passe API.

Modification du mot de passe API. Pour cela, cliquez sur Modifier le mot de passe API et confirmez l'action dans la fenêtre qui s'ouvre :
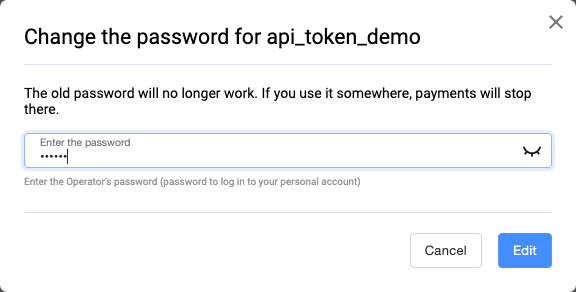
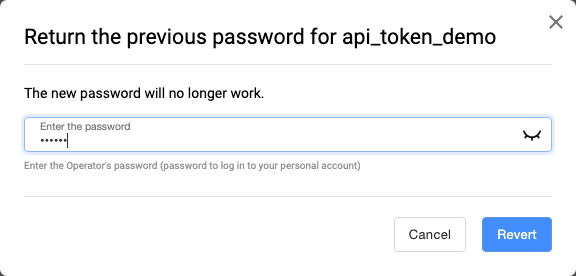
Après le changement de mot de passe, vous pouvez restaurer le mot de passe précédent dans les 5 minutes. Cliquez sur Restaurer le mot de passe précédent et confirmez l'action dans la fenêtre qui s'ouvre :
Paramètres
Pour accéder à la section Paramètres, dans le menu de navigation de gauche de l'espace personnel, sélectionnez l'élément Paramètres (icône ![]() ).
).

La section Paramètres permet de :
- définir les paramètres principaux
- activer les notifications de rappel
- modifier le mot de passe d'accès à l'espace personnel
- indiquer l'adresse électronique pour la possibilité de récupération du mot de passe de l'espace personnel
- définir les paramètres de fonctionnement de l'espace personnel (non disponible dans la version de démonstration)
Paramètres principaux
La section Paramètres principaux permet à l'employé du magasin de configurer certains paramètres du compte et autorisations.
Pour accéder à la section Paramètres principaux, sélectionnez Paramètres dans le menu latéral, puis sélectionnez Paramètres principaux dans le bloc Marchand. La page des paramètres du compte s'affichera, comme indiqué ci-dessous.
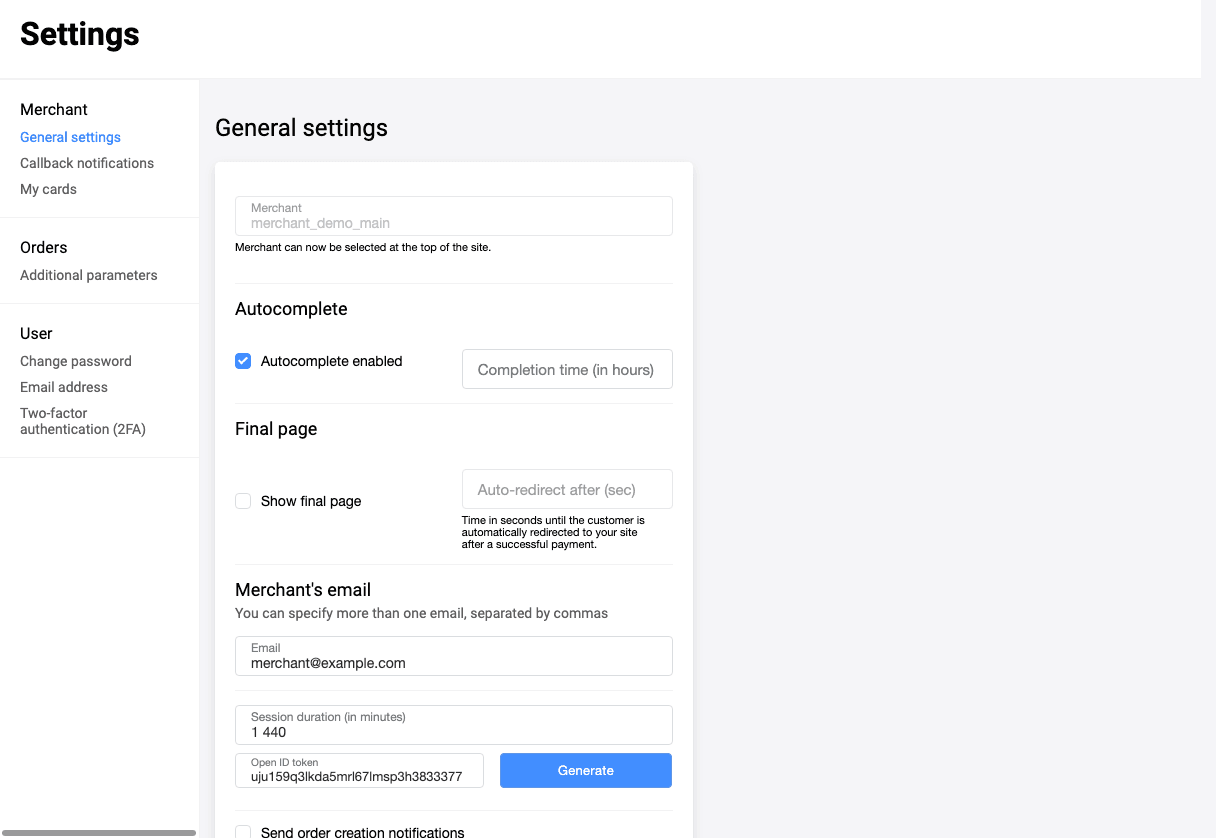
La description des paramètres est présentée dans le tableau ci-dessous :
| Champ | Description |
|---|---|
| Afficher la page finale | Si activé, permet d'afficher la page finale après la finalisation du paiement. Vous pouvez également indiquer le temps en secondes après lequel le client sera automatiquement redirigé vers votre site après un paiement réussi. |
| Finalisation automatique activée | Permet d'activer la finalisation automatique des commandes à deux étapes. |
| Délai de finalisation | Si la finalisation automatique est activée, indiquez le nombre d'heures après lesquelles les paiements à deux étapes seront automatiquement finalisés. |
| Courrier électronique | Adresse électronique du vendeur à laquelle les notifications seront envoyées. Plusieurs adresses électroniques peuvent être saisies dans ce champ (séparées par des virgules). Les déclencheurs pour l'envoi de notifications sont configurables. Peuvent être configurés pour des événements tels que le changement de statut de transaction, la création de données de paiement sauvegardées, etc. |
| Durée de session (en minutes) | Délai alloué pour la saisie des données de carte à partir du moment de l'enregistrement du paiement. Si le paiement n'est pas effectué dans le délai indiqué, la commande passera au statut REJETÉ. Après cela, un callback sera envoyé s'il est configuré. Le changement de statut de ces commandes s'effectue selon un calendrier, des retards mineurs sont donc possibles. Si vous demandez le statut d'une telle commande et que le délai est expiré, la commande sera immédiatement transférée au statut REJETÉ. |
| Envoyer des notifications de création de commande | Si activé, le vendeur recevra une notification par courrier électronique concernant la création de commande. |
| Paiement à deux étapes | Autorisation d'utiliser le schéma de paiement à deux étapes. |
| Envoi de notifications au client par SMS | Si activé, le client recevra des notifications SMS. |
| Paiement Google Pay autorisé dans le navigateur | Autorisation des paiements Google Pay dans le navigateur. |
| Paiement Google Pay autorisé sur appareil mobile | Autorisation des paiements Google Pay sur appareil mobile. |
| Paiement par Apple Pay autorisé | Autorisation d'utiliser Apple Pay. |
| Clé publique | Vous pouvez générer une clé publique (jeton Open ID). La saisie manuelle de la clé est également disponible. Voir plus de détails ici. |
Cliquez sur le bouton Sauvegarder.
Notifications callback
Le portail vendeur permet de configurer les notifications de rappel. Cette section peut être masquée pour certains marchands. Par conséquent, si vous ne la voyez pas ou si vous avez des questions, contactez le support technique et nous serons heureux de vous aider.
Des informations supplémentaires sur les notifications de rappel sont disponibles ici. Pour configurer les notifications de rappel, allez dans la section Paramètres > Marchand > Notifications callback.
Si l'utilisateur a des vendeurs affiliés, la sélection du vendeur devient disponible dans le menu déroulant Marchand.
Pour activer les paramètres de notifications de rappel, cliquez sur l'interrupteur Notifications callback désactivées :
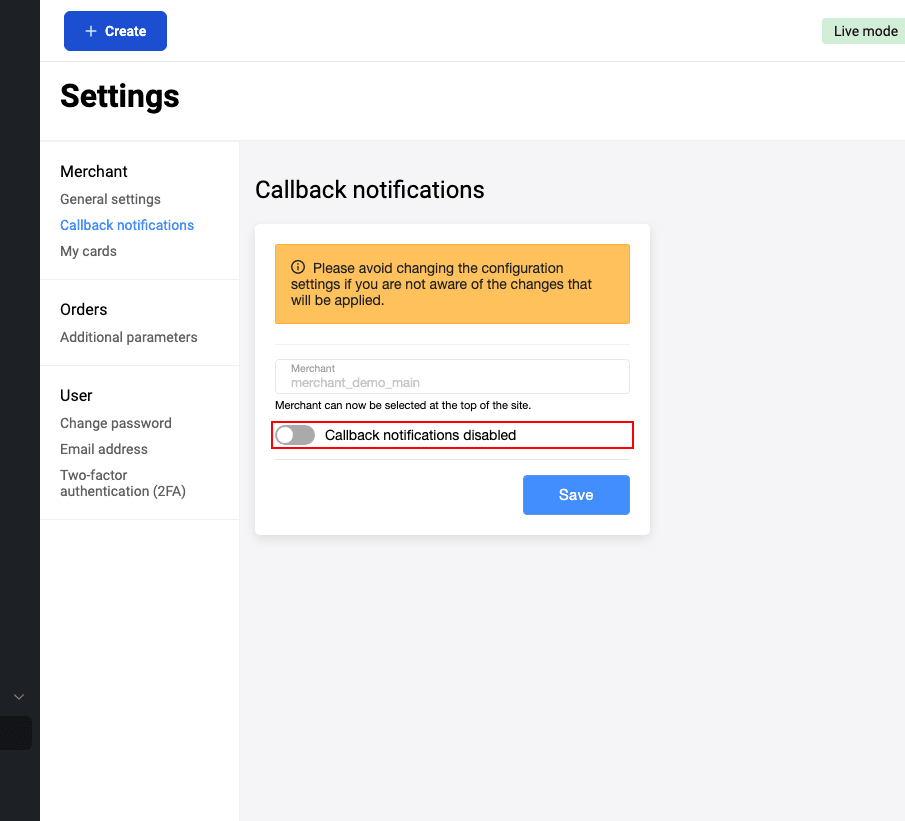
Les paramètres de notifications de rappel sont décrits ci-dessous.
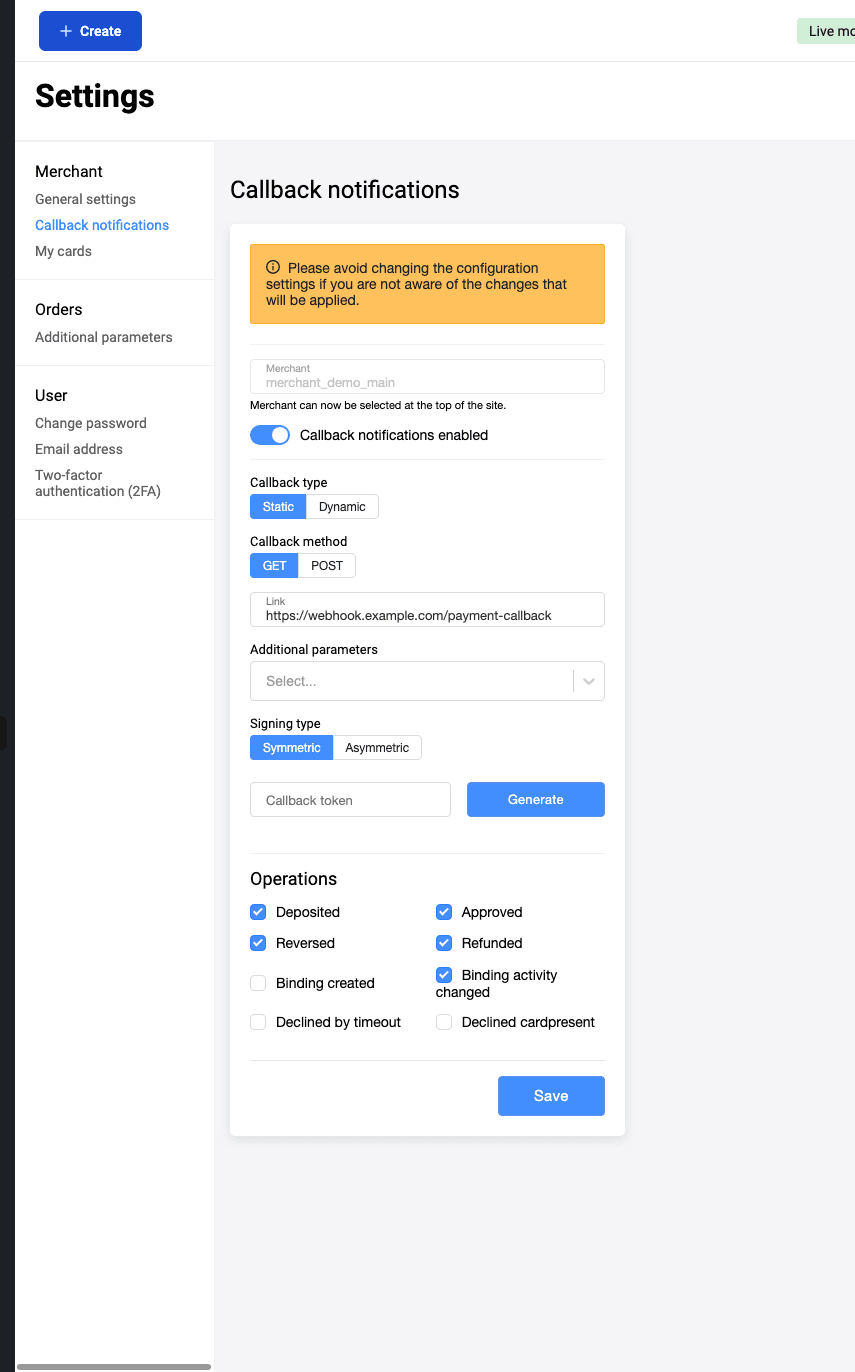
Type de notification callback
Si le vendeur a déjà configuré le type de notification Dynamique, les deux options dans la zone Type de signature ne seront pas disponibles à la sélection.

Méthode callback
Sélectionnez l'une des deux méthodes proposées : GET ou POST.
Lien
Saisissez l'URL vers laquelle les notifications seront envoyées, par exemple : https://test.com. Il est possible d'indiquer plusieurs liens (séparés par des virgules et sans espaces).
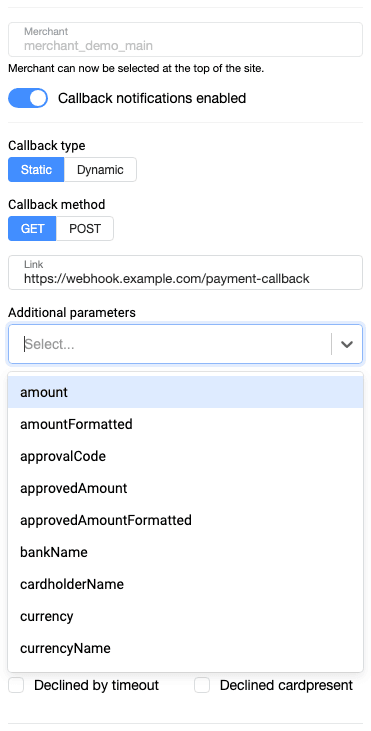
Paramètres supplémentaires
Sélectionnez les paramètres qui arriveront dans la notification callback.
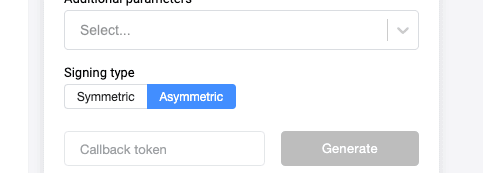
Type de signature
Sélectionnez l'un des types de signature : Symétrique ou Asymétrique. Si le type de signature symétrique est sélectionné, il est possible de générer un jeton de notification callback. De plus, si le type de signature Symétrique est sélectionné, il est possible de saisir le jeton manuellement.
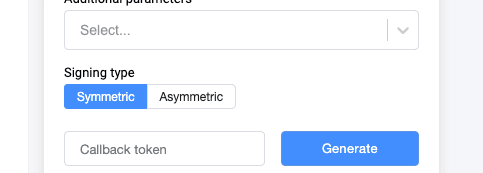
Si le type de signature asymétrique est sélectionné, le bouton Générer sera inactif. La clé pour la signature asymétrique peut être obtenue auprès du support technique.
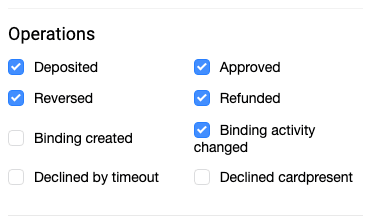
Opérations
Sélectionnez les événements pour lesquels une notification de rappel sera envoyée. La notification sera envoyée aussi bien en cas d'exécution réussie de l'opération qu'en cas d'erreur.
Changement de mot de passe
Pour modifier le mot de passe d'accès à l'espace personnel, effectuez les actions suivantes.
- Connectez-vous à l'espace personnel.
- Dans le panneau de gestion à gauche, allez dans la section Paramètres en cliquant sur l'icône
 .
. - Sur la page affichée, sélectionnez l'onglet Changement de mot de passe. La page prendra l'aspect suivant.
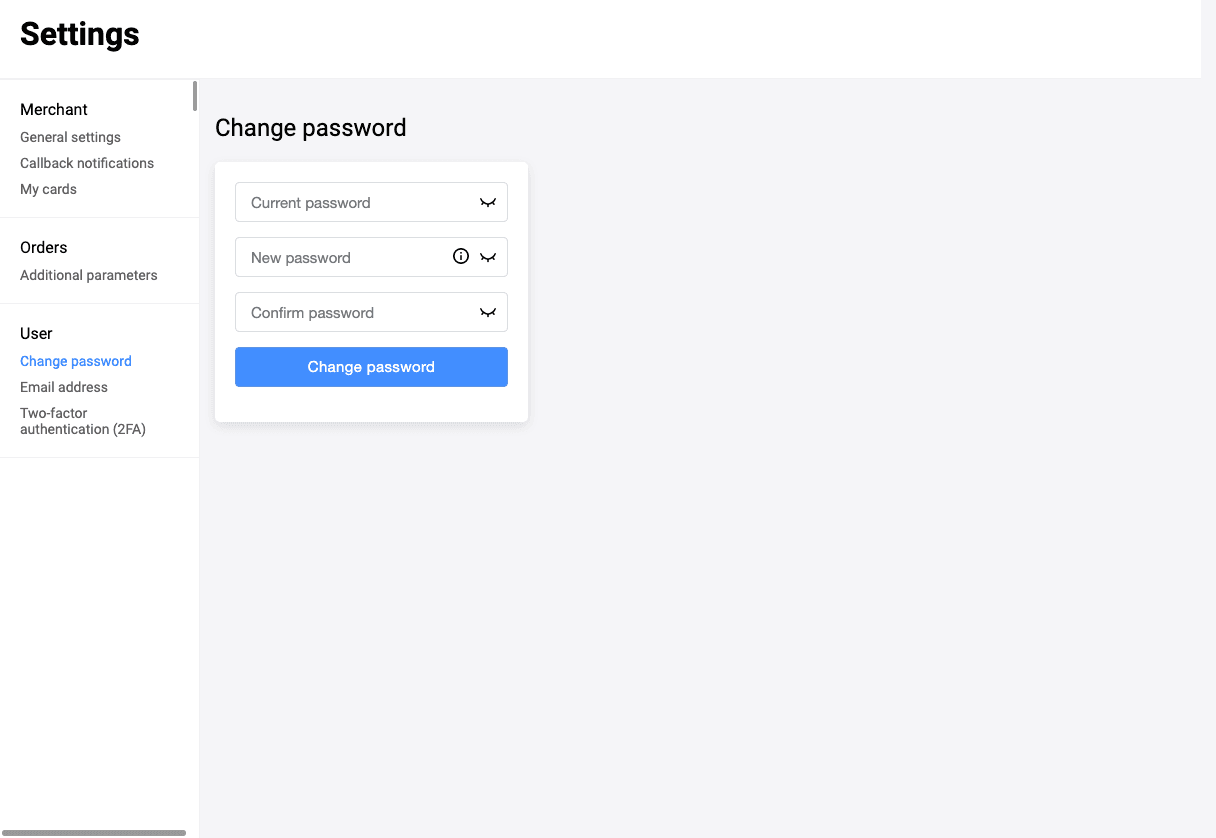
- Dans le champ Mot de passe actuel, saisissez votre mot de passe actuel.
-
Dans les champs Nouveau mot de passe et Nouveau mot de passe encore une fois, saisissez le nouveau mot de passe.
Le mot de passe doit répondre aux exigences suivantes :
- Le mot de passe ne doit pas contenir le nom du magasin ou le login d'un des utilisateurs liés au marchand auquel appartient l'utilisateur qui change le mot de passe (y compris le changement de casse).
- Le mot de passe saisi par l'utilisateur doit obligatoirement contenir des symboles des groupes énumérés ci-dessous :
- lettres majuscules de l'alphabet latin (A-Z)
- lettres minuscules de l'alphabet latin (a-z)
- chiffres (0-9)
- caractères spéciaux (! "#;:? * () + = < > , . { } )
- La longueur du mot de passe doit être d'au moins 8 caractères.
Cliquez sur le bouton Changer le mot de passe.
Adresse e-mail
Définissez l'adresse e-mail qui sera utilisée pour la récupération de l'accès à l'espace personnel.
- Connectez-vous à l'espace personnel.
- Dans le panneau de gestion à gauche, allez dans la section Paramètres en cliquant sur l'icône .
- Dans la section Adresse e-mail, saisissez l'adresse qui sera utilisée pour la récupération de l'accès.
- Cliquez sur Enregistrer.
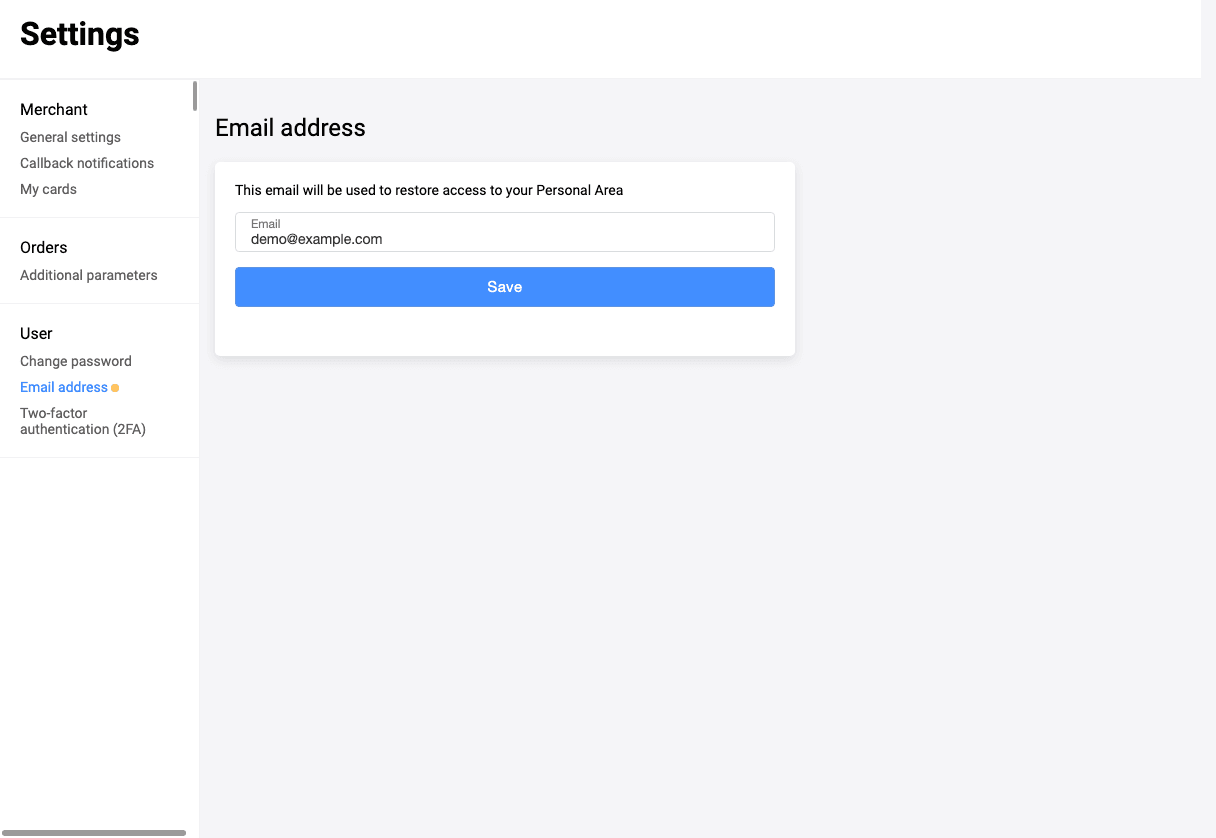
Un e-mail de confirmation sera envoyé à l'adresse e-mail indiquée. Une fois l'adresse e-mail confirmée, la modification de l'adresse sur cette page ne sera plus disponible. Si vous devez changer l'adresse e-mail encore une fois, contactez l'équipe de support.
Authentification à deux facteurs
Vous pouvez configurer l'authentification à deux facteurs pour assurer un niveau de sécurité supplémentaire garantissant que vous seul pourrez avoir accès à votre Espace personnel. Dans ce cas, lors de la connexion à l'Espace personnel, il faut saisir non seulement le login et le mot de passe, mais aussi le code d'authentification généré par l'application Google Authenticator ou envoyé à votre adresse e-mail (selon la méthode d'authentification activée).
Pour configurer l'authentification à deux facteurs, dans le panneau de gestion à gauche, allez dans la section Paramètres > Authentification à deux facteurs. Deux méthodes d'authentification sont proposées au choix :

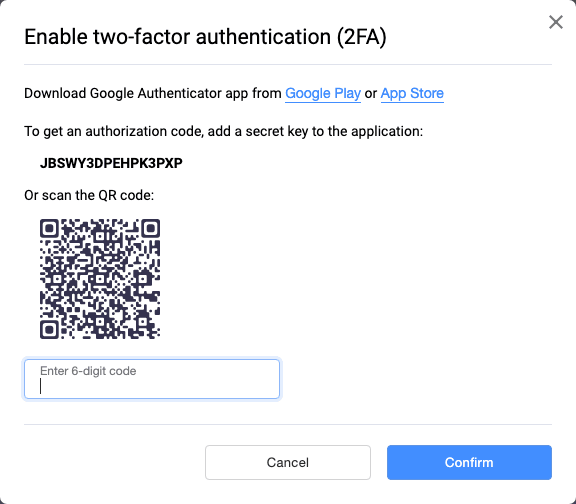
Google Authenticator (recommandé)
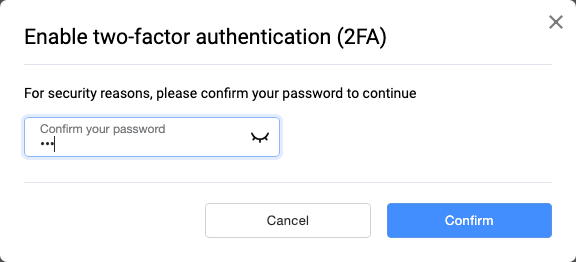
- Dans la liste proposée, sélectionnez Google Authenticator (recommandé) et cliquez sur le bouton Activer.
- Un formulaire apparaît où vous devez confirmer votre mot de passe de connexion à l'Espace personnel :
- Téléchargez/ouvrez l'application Google Authenticator sur votre appareil. Saisissez la clé secrète ou scannez le code QR pour ajouter votre compte dans l'application Google Authenticator. L'application génèrera un code. Saisissez le code généré dans le champ Saisissez le code à 6 chiffres.
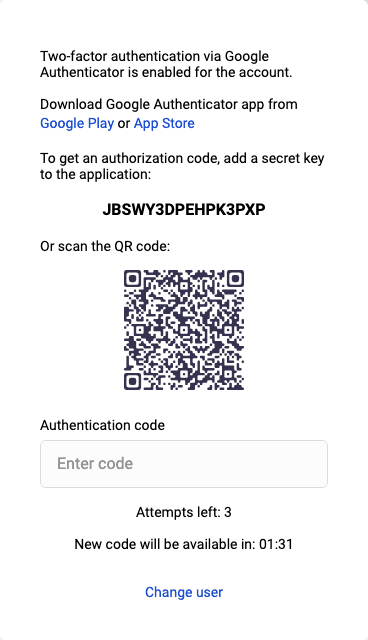
- Après avoir configuré l'authentification à deux facteurs via Google Authenticator, lors des prochaines connexions à votre Espace personnel, le code Google Authenticator sera demandé :
Code de confirmation par e-mail
- Dans la liste proposée, sélectionnez Code de confirmation par e-mail et cliquez sur le bouton Activer.
- Si votre adresse e-mail n'est pas indiquée dans les paramètres et n'est pas confirmée, veuillez d'abord procéder à cette étape. Si tout est configuré, suivez les étapes suivantes ci-dessous.
- Un formulaire apparaît où vous devez confirmer votre mot de passe de connexion à l'Espace personnel :
- Pour finaliser la configuration de l'authentification à deux facteurs, veuillez saisir le code à 4 chiffres qui vous a été envoyé à votre adresse e-mail :
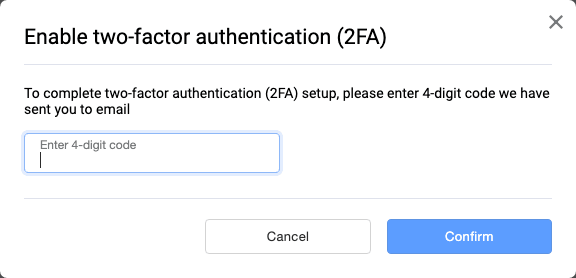
- Après avoir configuré l'authentification à deux facteurs par e-mail, lors des prochaines connexions à votre Espace personnel, un code sera demandé qui sera envoyé à votre adresse e-mail.
Analytique
Pour afficher la page Analytique, cliquez sur l'icône ![]() dans le panneau latéral gauche.
dans le panneau latéral gauche.
La page affichera les informations sur les transactions :
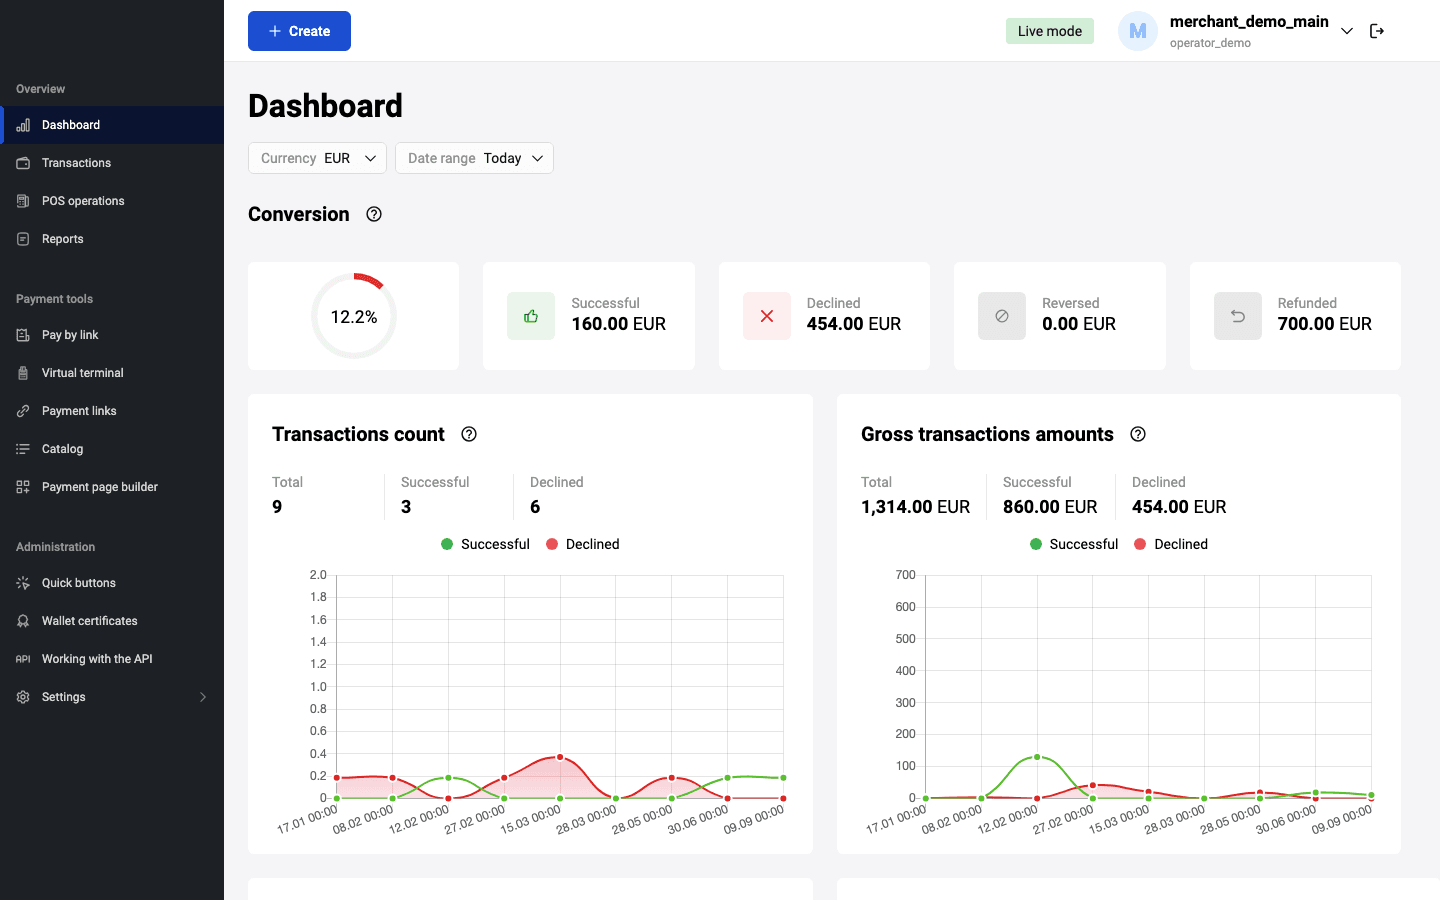
Le menu supérieur permet de sélectionner la devise et la période pour laquelle les informations sur les transactions seront affichées. Vous pouvez choisir une période (par exemple, "Aujourd'hui", "Cette semaine") ou définir un intervalle de temps en sélectionnant dans le calendrier les dates de début et de fin.
Le graphique Conversion affiche le rapport en pourcentage des transactions réussies par rapport au nombre total de transactions.
![]()
Le graphique Nombre de transactions affiche les informations sur les transactions pour la période sélectionnée.
![]()
Le graphique affiche les champs suivants :
- Total des transactions — nombre total de transactions ;
- Réussies — nombre de transactions réussies ;
- Non réussies — nombre de transactions lors du traitement desquelles une erreur s'est produite.
Le graphique Chiffre d'affaires affiche les informations sur les montants des transactions réussies et rejetées.
![]()
Le graphique Chiffre d'affaires confirmé affiche les informations sur les montants confirmés des transactions réussies et remboursées/rejetées.
![]()
Le graphique Codes de refus (voir image ci-dessous) affiche les principales causes d'erreurs lors du traitement des commandes.
![]()
Factures de paiement
Vous pouvez envoyer une facture à l'acheteur pour le paiement de marchandises ou services par courrier électronique. Pour cela, utilisez la section Factures de paiement de l'espace personnel. Après l'émission de la facture, l'acheteur reçoit un courrier et suit le lien qu'il contient vers la page de paiement.
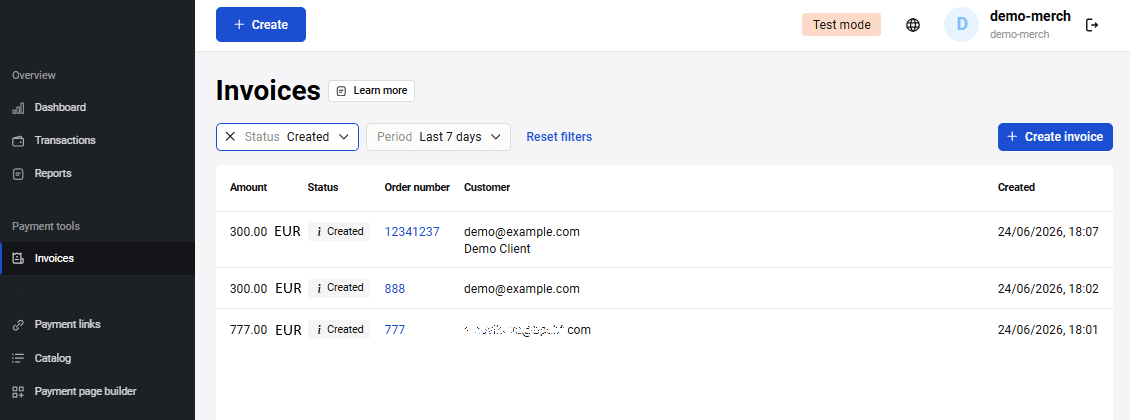
Sur cette page, vous pouvez faire ce qui suit :
- envoyer une facture au client
- effectuer un paiement de test
- rechercher des factures par filtre
- consulter les informations sur la facture
- annuler une facture
- dupliquer une facture
- renvoyer une facture
Envoi de facture
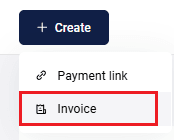
Pour émettre une facture au client et lui envoyer le lien vers la page de paiement par courrier électronique, allez dans la section Factures de paiement de l'espace personnel et cliquez sur Créer une facture.
Vous pouvez également le faire en cliquant sur le bouton Créer dans la partie supérieure de l'espace personnel et en sélectionnant Facture.
La page de saisie des paramètres d'envoi s'affichera :
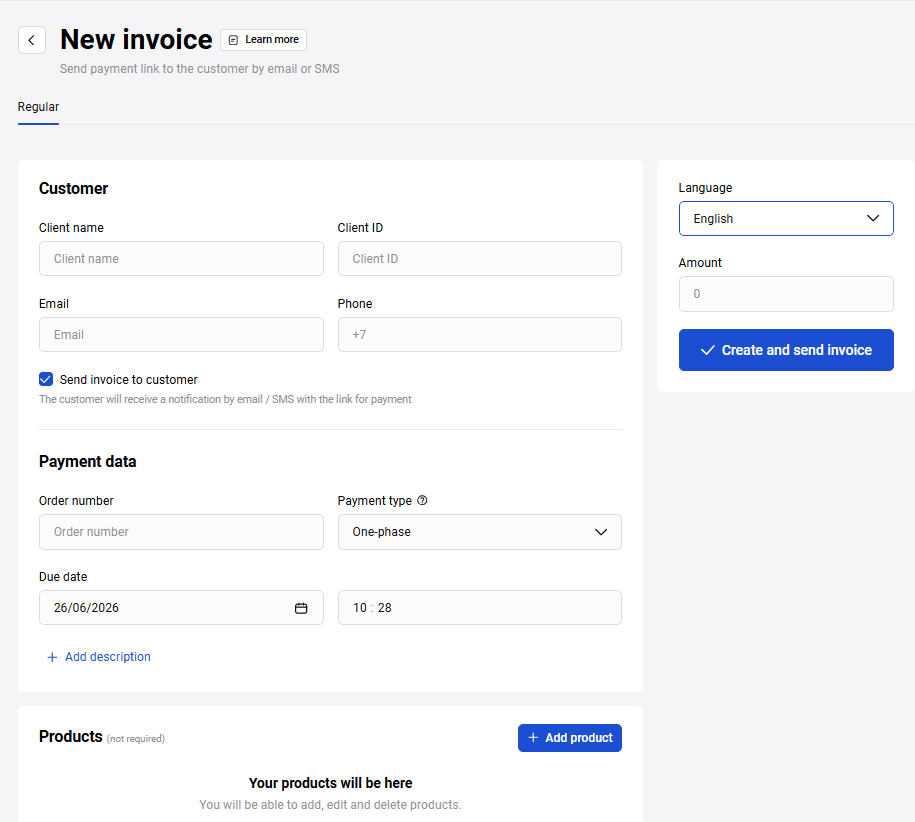
Configurez les paramètres en vous guidant du tableau ci-dessous.
| Paramètre | Description |
|---|---|
| Nom complet du client | Nom de famille, prénom et patronyme du client. Les données saisies dans ce champ s'affichent dans le courrier contenant le lien vers la page de paiement. |
| ID client | Numéro du client dans le système de la boutique. |
| Courrier électronique | Adresse de courrier électronique à laquelle sera envoyé le lien de paiement. |
| Numéro de téléphone | Numéro de téléphone du client auquel sera envoyé un SMS avec le lien de paiement. |
| Envoyer la facture au client | Si cette case est cochée, le client recevra une notification par courrier électronique / SMS avec un lien pour le paiement. |
| Numéro de commande | Numéro de commande dans le système du vendeur. |
| Mode de finalisation du paiement | Choisissez l'une des deux options :
|
| Payer avant | Indiquez la date et l'heure avant lesquelles la facture peut être payée. Après l'expiration de ce délai, il sera impossible de payer la facture émise. |
| Description du paiement | Description du paiement en forme libre. |
| Montant | Indiquez le montant du paiement. Si la commande contient un panier de marchandises prérempli, ce champ se remplit automatiquement. |
Cliquez sur le bouton Créer et envoyer la facture. En cas d'envoi réussi, le lien vers le formulaire de paiement s'affichera ci-dessous :

Cliquez sur Continuer pour ouvrir la page avec les informations sur la facture.
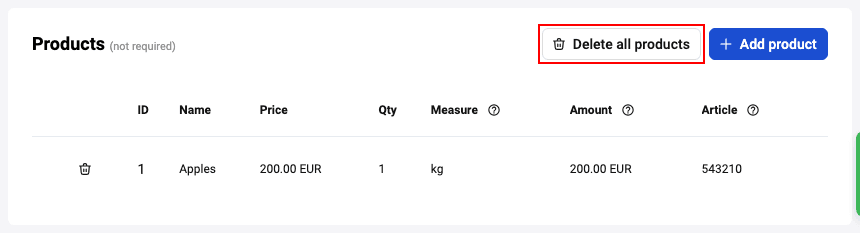
Formation du panier de marchandises
Lors de la formation d'une facture de paiement, vous pouvez indiquer un panier de marchandises pour la commande. La section Marchandises se trouve sous le formulaire de création du lien de paiement :

- Pour ajouter une marchandise au panier, cliquez sur le bouton Ajouter une marchandise et sélectionnez Nouveau produit. Le formulaire avec les paramètres de la marchandise à ajouter s'affichera.
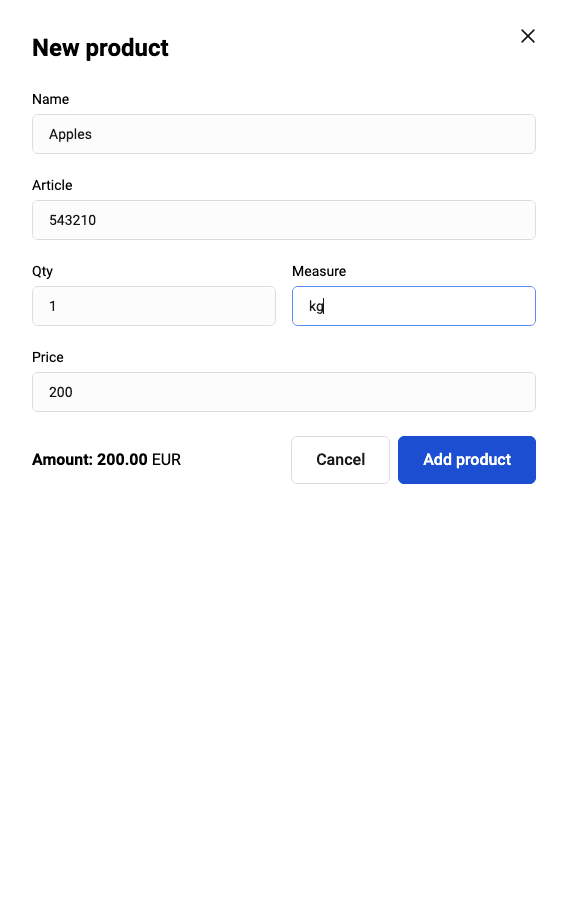
-
Remplissez les champs nécessaires en vous guidant du tableau ci-dessous.
Champ Description Dénomination Dénomination de la marchandise ou du service. Champ obligatoire. Article Article de la position de marchandise. Champ obligatoire. Quantité Quantité de marchandise pour cette position. Champ obligatoire. Unité de mes. Unités de mesure, par exemple : "l" — litres, "pcs." — pièces. Champ obligatoire. Prix Prix par unité de la position de marchandise. Champ obligatoire. Montant Montant total pour toutes les unités d'une position de marchandise. Calculé automatiquement lors du remplissage des champs Prix et Quantité. Cliquez sur Ajouter un produit.
Répétez les actions nécessaires pour chaque position du panier de marchandises. Si nécessaire, pour supprimer une position ajoutée, cliquez sur le bouton
 et confirmez l'action. Pour supprimer tous les produits, cliquez sur le bouton Supprimer tous les produits et confirmez l'action.
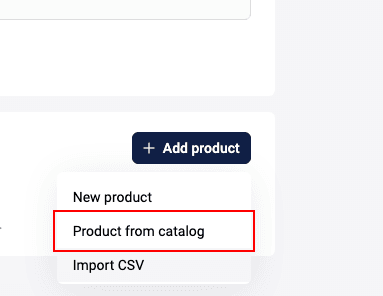
Vous pouvez ajouter des produits depuis le catalogue, pour cela cliquez sur Ajouter et sélectionnez Produit du catalogue, puis sélectionnez le produit dans la fenêtre qui s'ouvre.
Après avoir ajouté un produit, vous pouvez le modifier. Pour cela, cliquez sur la ligne du produit et modifiez les valeurs dans le formulaire de modification.
Après avoir rempli le panier de marchandises, émettez une facture au client.
Importation de fichier CSV
Vous pouvez enregistrer une commande avec un panier, et ce panier peut être automatiquement rempli depuis un fichier CSV. Pour charger le panier automatiquement, cliquez sur le bouton Ajouter un produit et sélectionnez Charger CSV. Dans la fenêtre qui s'ouvre, sélectionnez le fichier qui doit être chargé sur votre appareil.
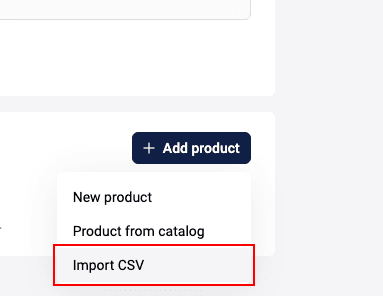
Il est possible de charger deux types de fichiers, qui contiennent :
- uniquement le panier (ORDER_BUNDLE)
- le panier (ORDER_BUNDLE) et les données de commande (ORDER_PARAMS)
Notez qu'aucun champ n'est obligatoire et que seuls certains champs peuvent être utilisés pour remplir le panier.
Champs possibles des données du panier :
-
ItemCode– code du produit dans le système du magasin. -
Price– prix par unité de position de marchandise. -
Amount– montant du paiement en unités minimales de devise (kopecks, centimes, etc.). Pas plus de 12 caractères. -
Measure– unités de mesure, par exemple : "l" — litres, "pce." — pièces. -
Quantity– quantité totale de positions de marchandises d'un même PositionId et leur unité de mesure. La description de ses attributs est présentée ci-dessous. -
Name– dénomination ou description du produit ou du service sous forme libre.
Champs possibles avec les données de commande :
-
OrderNumber– numéro de commande (ID) dans le système du marchand, doit être unique pour chaque marchand. -
TotalAmount– montant de la commande plus commission, si elle existe. -
Merchant– identifiant du vendeur dans le système de la passerelle de paiement. -
Currency– code de devise de paiement ISO 4217. -
Language– Clé de langue selon ISO 639–1. Si la langue n'est pas spécifiée, la langue par défaut spécifiée dans les paramètres du magasin est utilisée. -
AuthType– type d'authentification, valeurs possibles :0–PURCHASE,1–PRE_AUTH. -
Email– adresse électronique du client. -
Phone– Numéro de téléphone de l'acheteur. Il faut toujours indiquer le code du pays, on peut indiquer ou ne pas indiquer le signe +. -
Full name– nom complet du client. -
INN– Numéro d'identification. -
Passport– données du passeport. -
Sender– adresse e-mail de l'expéditeur. -
Description– description de la commande dans n'importe quel format. -
ClientId– numéro du client (ID) dans le système du marchand — jusqu'à 255 caractères. -
Payment period– définissez la date et l'heure avant que la commande ne soit payée. Par exemple, 5D– 5 jours, 22H – 22 heures, 10M – 10 minutes.
Exemple de fichier avec des données de panier :
ItemCode,Price,Amount,Measure,Quantity,Name
1,10,20,pieces,2,apples
Exemple de fichier avec des données de commande et de panier :
Télécharger l'exemple de fichier
Important : Pour assurer un traitement approprié du fichier, les valeurs des champs dans le fichier ne doivent pas contenir de virgules. Les virgules ne peuvent être utilisées qu'en tant que séparateurs de champs et de leurs valeurs.
Exemple de remplissage incorrect des champs dans le fichier :
ItemCode,Name,Amount,Quantity,Measure,Price
123,apples,golden,20000,1,kg,20000
Exemple de remplissage correct des champs dans le fichier :
ItemCode,Name,Amount,Quantity,Measure,Price
123,apples golden,20000,1,kg,20000
Effectuer un paiement d'essai
Vous pouvez tester indépendamment le processus de paiement au nom du client. Pour cela :
-
Créez une facture pour le client.
-
Cliquez sur Continuer pour ouvrir les détails de la facture. Ouvrez la page de paiement en suivant le lien en haut de la page.

Choisissez le mode de paiement. Lors du paiement par carte, saisissez les données d'une des cartes de test.
Cochez Sauvegarder ma carte si vous voulez créer des données de paiement sauvegardées : dans ce cas, il ne sera pas nécessaire de saisir les données de la carte la prochaine fois.
Cliquez sur le bouton Payer. Pour confirmer l'opération, utilisez le code 3–D Secure indiqué pour la carte de test.
Page finale
Il est possible de configurer l'acceptation des paiements de sorte qu'après un paiement réussi, le client soit redirigé vers la Page finale. Cette page contient les données sur le paiement et un lien de retour vers le magasin.
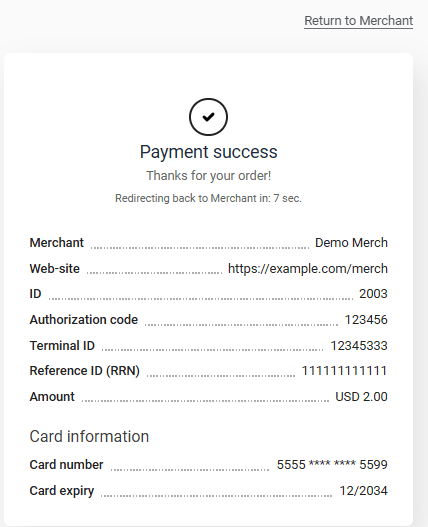
Le tableau ci-dessous décrit les données affichées sur la page finale.
| Champ | Description |
|---|---|
| Numéro de commande | Numéro de commande généré automatiquement dans le système du vendeur. |
| Code d'autorisation | Code d'autorisation du système de paiement international (6 caractères). |
| ID Terminal | Identifiant du terminal dans le système traitant le paiement. |
| Code unique d'opération (RRN) | Identifiant unique de la transaction bancaire. |
| Montant du paiement | Montant du paiement. |
| Commission de paiement | Montant de la commission pour le paiement (s'il y en a une). |
| Montant total du paiement | Montant du paiement incluant la commission. |
| Numéro de carte | Numéro masqué de la carte utilisée pour le paiement. |
| Date d'expiration de la carte | Date d'expiration de la carte utilisée pour le paiement. |
Pour retourner au magasin, le client doit cliquer sur le lien Retourner au magasin.
Vous pouvez activer ou désactiver l'affichage de la page finale en cochant la case Afficher la page finale sur la page Paramètres généraux de votre espace personnel. Pour plus de détails, consultez ici.
Recherche de factures par filtre
En haut de la page Factures de paiement se trouvent des filtres qui vous permettent de trouver la facture souhaitée. Pour définir les critères de recherche, sélectionnez les valeurs nécessaires dans la liste déroulante correspondante.
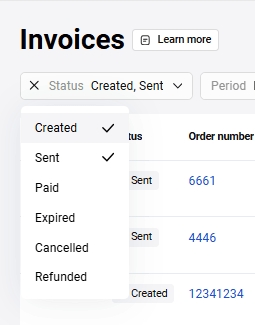
Les critères suivants sont disponibles :
-
Statut — Statut de la facture. Les statuts suivants sont disponibles (sélection multiple) :
-
Créée. La facture a été émise, mais n'a pas encore été envoyée au client.
-
Envoyée. La facture a été envoyée avec succès au client, mais n'est pas encore payée.
-
Payée. La facture est payée.
-
Expirée. Le délai de paiement de la facture a expiré. La transaction correspondante est rejetée.
-
Annulée. La facture est annulée.
- Remboursée. Un remboursement partiel a été effectué.
-
Créée. La facture a été émise, mais n'a pas encore été envoyée au client.
- Période — Indiquez l'intervalle de temps. Vous pouvez choisir une période (par exemple, "Aujourd'hui", "Cette semaine") ou définir un intervalle de temps en sélectionnant les dates de début et de fin dans le calendrier.
Actions avec la facture
Affichage des informations sur la facture
Pour voir les détails de la facture, ouvrez la page Factures de paiement et cliquez sur la ligne de la facture souhaitée.
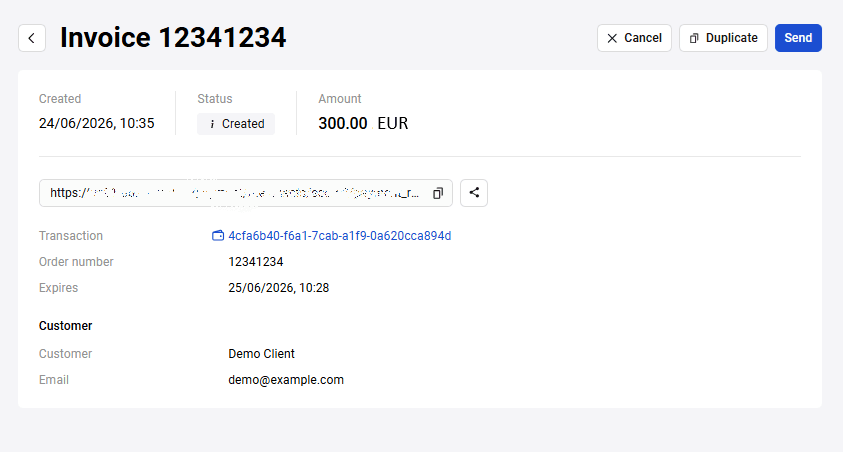
La page de détails de la facture affiche les informations suivantes :
- Date de création, statut et montant de la facture
- Lien vers la page de paiement envoyée au client
- Transaction — lien vers la page de détails de la transaction, liée à cette facture
- Numéro de commande — numéro de commande dans le système du magasin
- Envoyée — date et heure d'envoi de la facture au client
- À payer avant — date avant laquelle il faut payer la facture
- Client — nom, prénom et patronyme du client
- E-mail - adresse e-mail du client pour l'envoi de la facture
Des boutons pour annuler, dupliquer et renvoyer la facture sont également disponibles. Ces actions sont décrites ci-dessous.
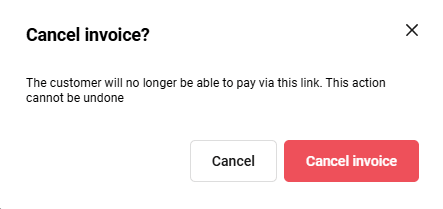
Annulation de la facture
Pour annuler une facture pas encore payée, sur la page de détails de la facture, cliquez sur le bouton Annuler. Dans la fenêtre qui s'ouvre, confirmez l'annulation.
Duplication de la facture
Vous pouvez dupliquer une facture pour créer une facture identique ou similaire sans saisir toutes les données à nouveau. Pour cela :
- Sur la page de détails de la facture, cliquez sur le bouton Dupliquer.
- La page de création d'une nouvelle facture s'ouvrira, où tous les champs seront déjà remplis avec les données de la facture originale. Le champ Numéro de commande sera vide.
- Saisissez le nouveau numéro de commande. Si nécessaire, modifiez certaines données.
- Cliquez sur Créer et envoyer la facture.
En conséquence, la nouvelle facture sera créée et envoyée au client.
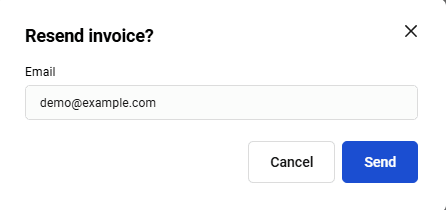
Renvoi de la facture
Pour renvoyer une facture déjà créée, sur la page de détails de la facture, cliquez sur le bouton Renvoyer. Dans la fenêtre qui s'ouvre, confirmez le renvoi de la facture.
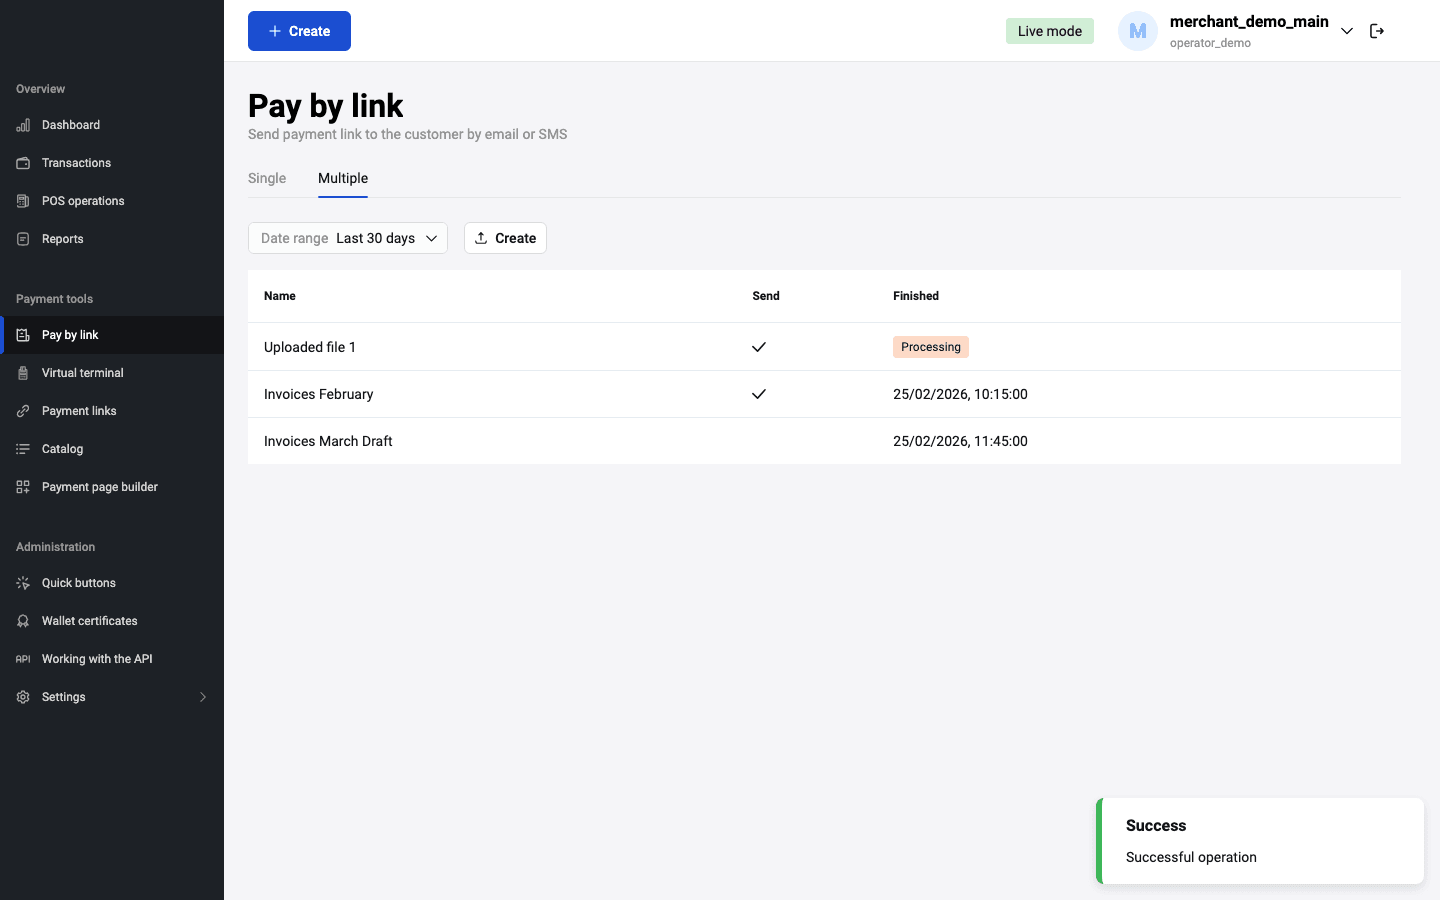
Envoi en masse de factures de paiement
Si vous avez l'autorisation correspondante, vous pouvez envoyer plusieurs factures de paiement aux clients en une fois, en téléchargeant un fichier au format CSV avec les données des factures et les adresses e-mail. Le format du fichier est déterminé par un modèle configuré par l'équipe de support.
Exemple du contenu du fichier (montant de l'opération, codes de devise, e-mail) :
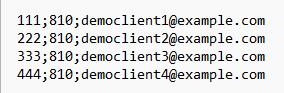
Téléchargement du fichier pour l'envoi
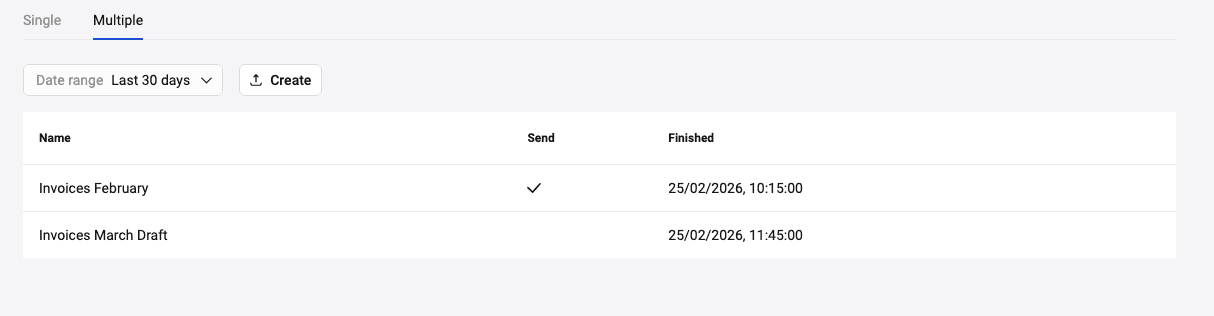
Pour télécharger un fichier pour l'envoi, allez dans la section Factures de paiement et ouvrez l'onglet Plusieurs. La page affiche la liste des fichiers téléchargés précédemment (s'il y en a).
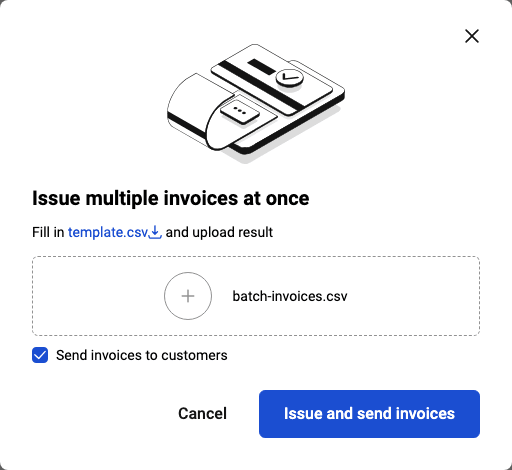
Cliquez sur Créer. Une boîte de dialogue s'ouvrira où vous pouvez télécharger le modèle pour créer le fichier. Téléchargez le modèle et remplissez-le avec les valeurs nécessaires.
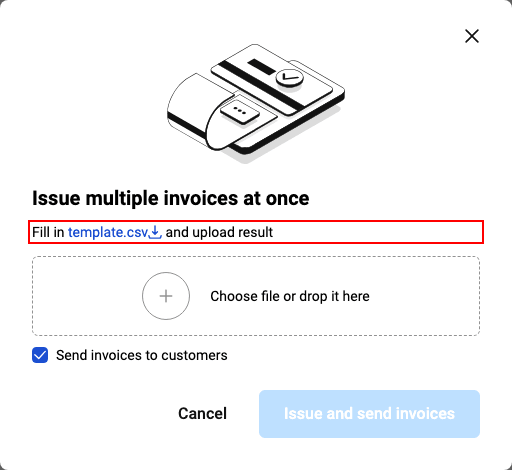 Sélectionnez ou glissez dans le champ correspondant le fichier à télécharger. Si vous souhaitez que les liens de paiement soient envoyés aux clients immédiatement après le téléchargement, cochez la case Envoyer les factures aux clients, puis cliquez sur Créer et envoyer les liens. Si vous souhaitez simplement créer les liens sans les envoyer, décochez la case Envoyer les factures aux clients et cliquez sur Créer les liens.
Une nouvelle ligne avec le fichier téléchargé apparaîtra dans la liste des fichiers traités. Pendant que le fichier est en cours de formation, la colonne Terminé affiche le statut "En cours". Lorsque le fichier sera traité, cette colonne affichera la date et l'heure de fin du traitement du fichier. Dans la colonne Envoyé s'affiche une coche si les liens de paiement ont été envoyés aux clients.
Visualisation des détails du fichier traité
Pour consulter le contenu du fichier traité pour l'envoi, allez dans la section Factures de paiement, ouvrez l'onglet Plusieurs et cliquez sur la ligne du fichier téléchargé. Une page avec les détails de chaque facture s'ouvrira.
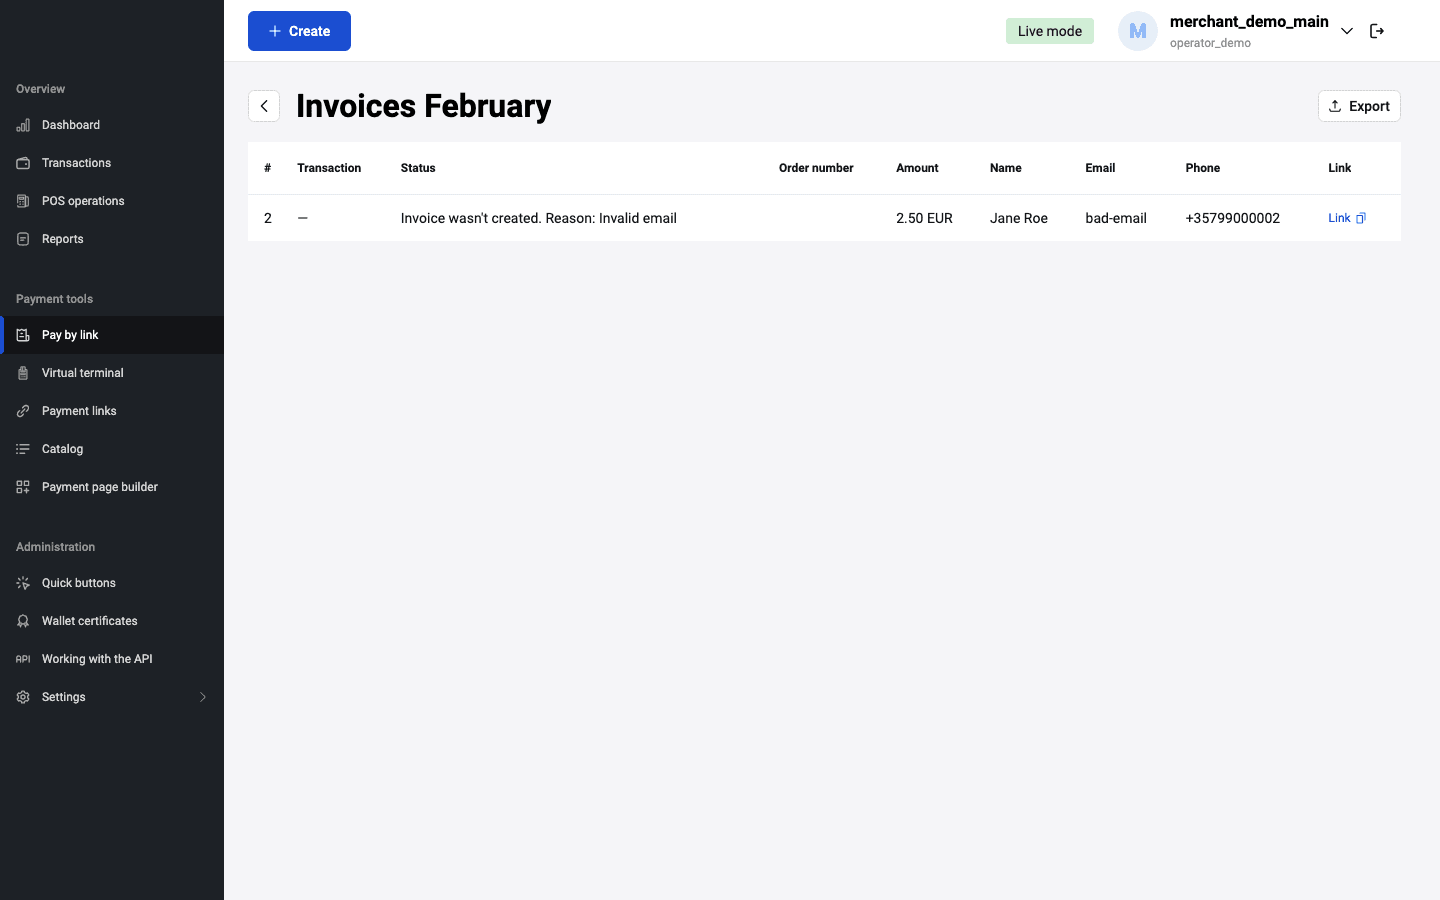
Le tableau contient les colonnes suivantes avec les détails de chaque facture :
- Transaction — lien vers la transaction pour cette facture
- Statut — statut d'envoi de la facture au client
- Montant — montant de la transaction
- E-mail — adresse e-mail pour l'envoi de la facture
- Lien — lien vers la page de paiement
Export du fichier traité
Pour exporter le fichier traité, allez dans les détails du fichier et cliquez sur le bouton Export. Le fichier sera exporté au format CSV avec les champs suivants :
-
itemId— champ obligatoire, numéro d'ordre de la ligne traitée du fichier -
successful— champ obligatoire, succès du traitement de la ligne (true / false) -
reason— champ obligatoire, description de l'erreur (si il n'y a pas d'erreurs, ce champ est vide) -
link— champ obligatoire, lien formé pour le paiement -
email— adresse e-mail qui a été indiquée lors du téléchargement (si ce paramètre a été défini dans le modèle)
Le fichier de sortie peut contenir d'autres champs s'ils ont été définis dans le modèle.
Rapports
La section Rapports permet de générer des rapports sur les transactions, basés sur de multiples paramètres au choix. Pour afficher la page Rapports, cliquez sur l'icône ![]() dans le panneau latéral gauche.
dans le panneau latéral gauche.
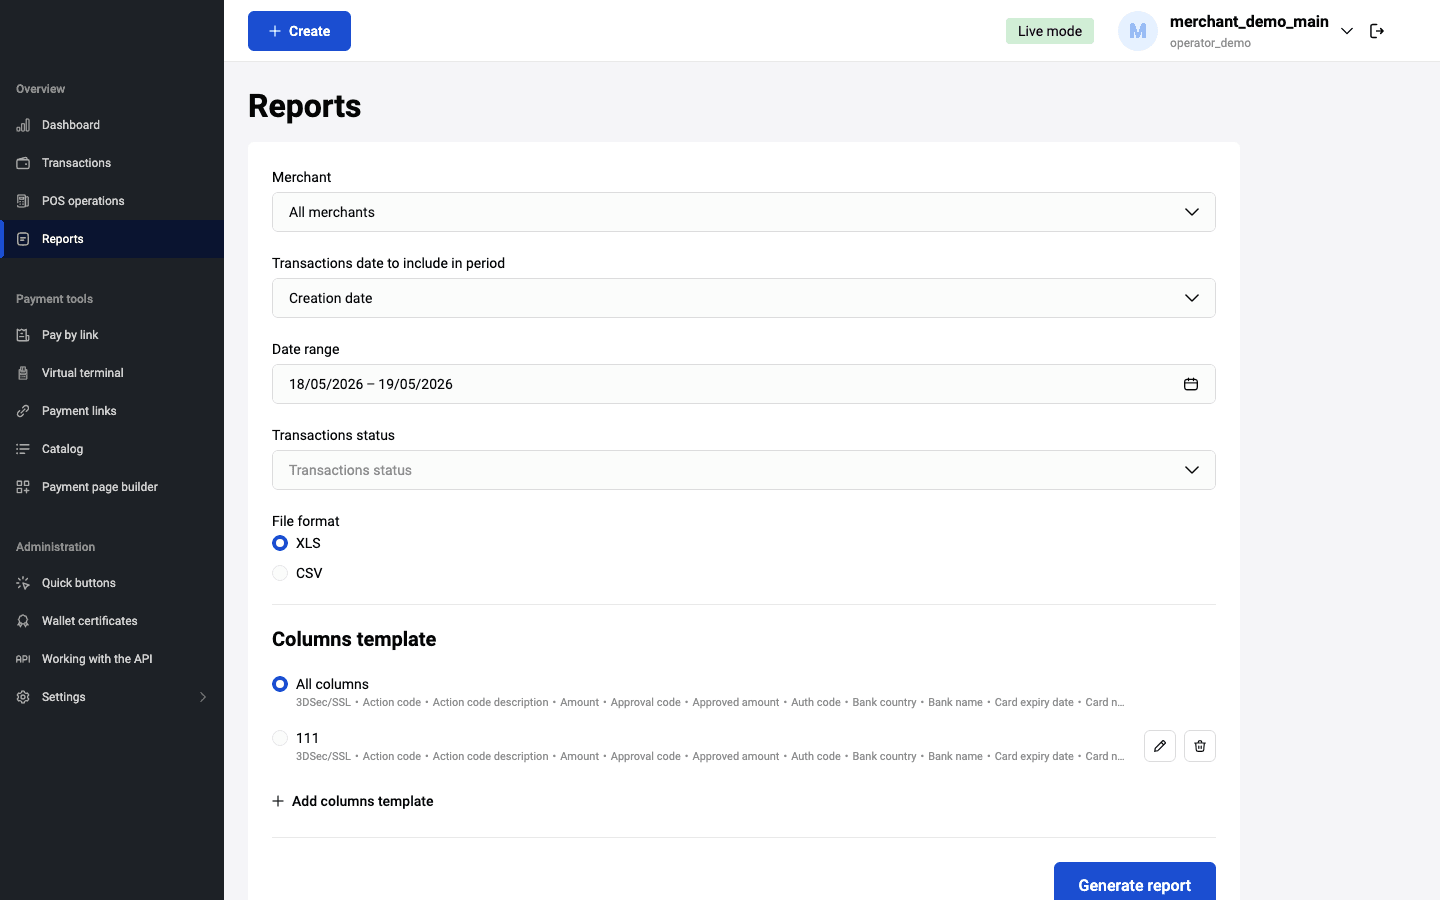
Sélectionnez le login du marchand pour lequel vous souhaitez construire un rapport sur les transactions. Plusieurs logins peuvent être disponibles si vous avez l'autorisation de consulter les transactions d'autres marchands ou si vous avez des marchands subsidiaires.
La page présente plusieurs filtres pour la génération. Vous pouvez sélectionner les transactions par date :
- Date de création
- Date de remboursement
- Date d'achèvement
- Date de paiement
- Date d'annulation
Définissez la plage de dates nécessaire ou choisissez une période spécifique avec des dates à l'aide du calendrier.

Vous pouvez également filtrer les transactions par leur statut.
Le rapport peut être exporté dans un fichier au format .xls ou .csv. Choisissez le format en cliquant sur les boutons correspondants.

En utilisant le bouton Ajouter un modèle de colonnes, vous pouvez créer un modèle de champs pour une utilisation ultérieure dans les rapports. Après avoir cliqué sur le bouton, un formulaire de configuration des colonnes apparaîtra. Saisissez le nom du modèle et cochez les colonnes qui doivent être affichées dans le rapport. Certaines colonnes sont interconnectées pour la commodité de l'utilisateur :
- Devise : automatiquement cochée lors de la sélection de tout montant (y compris le montant de remboursement, le montant à confirmer, le montant de commission, le montant de confirmation, le montant de pré-autorisation).
- Statut : automatiquement coché lors de la sélection de certaines dates (annulation, dernier remboursement, débit).
Après avoir sélectionné les colonnes, cliquez sur Créer.
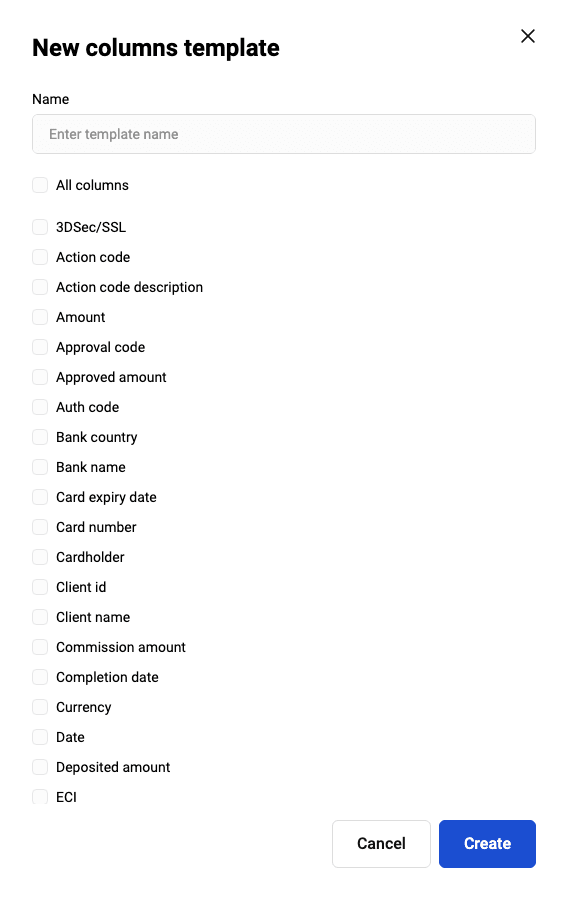
Le modèle sauvegardé sera disponible pour sélection dans la liste Modèle de colonnes.
Après avoir défini les paramètres souhaités, cliquez sur le bouton Générer le rapport. La formation du rapport dans le format spécifié commencera. Selon les paramètres de votre navigateur, le fichier de rapport sera sauvegardé ou une boîte de dialogue pour sauvegarder le fichier apparaîtra.
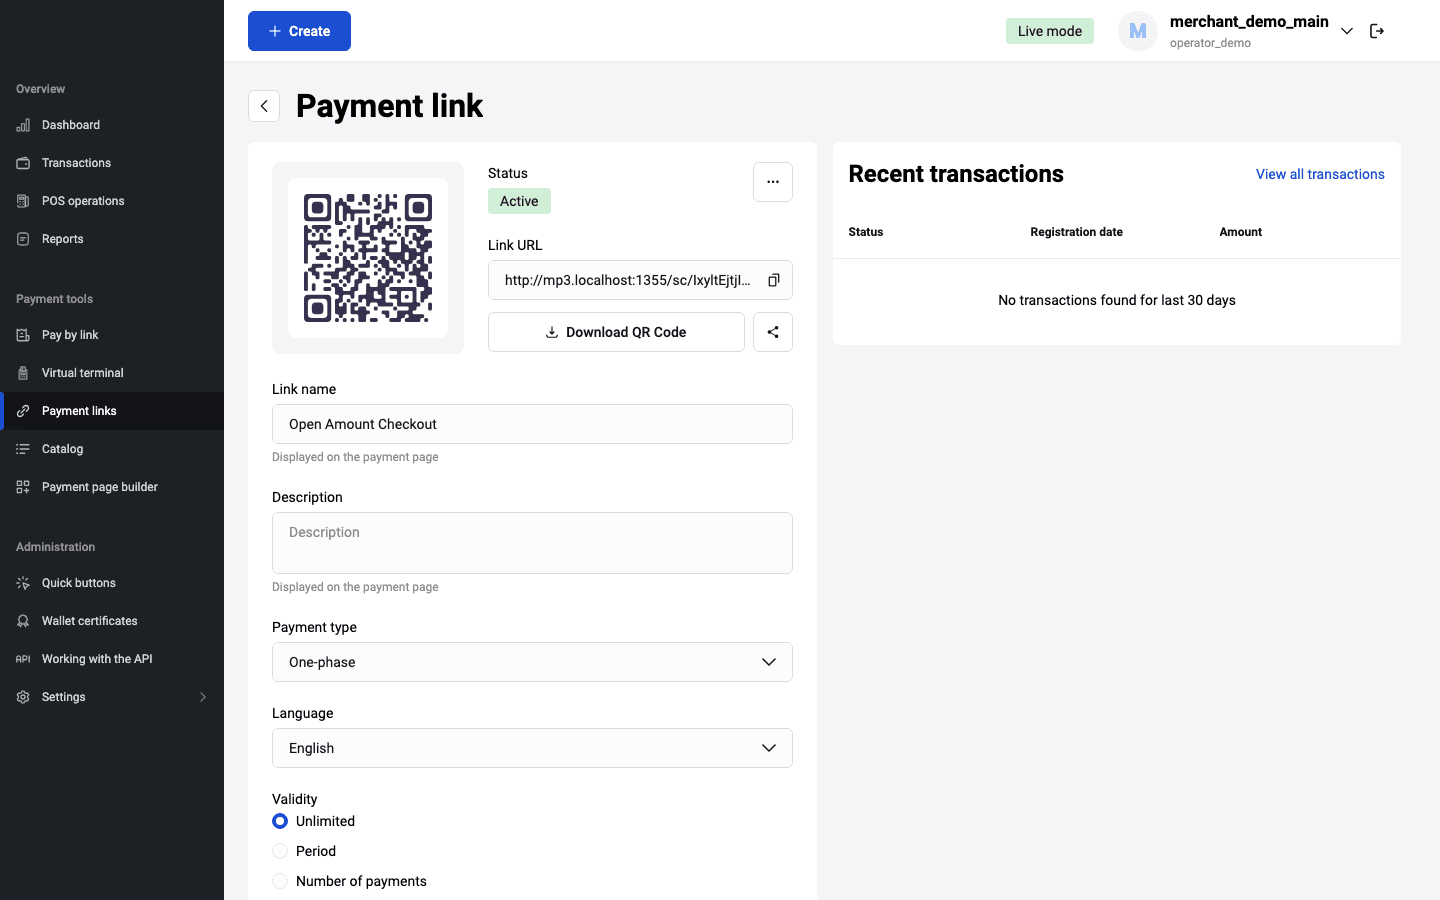
Liens de paiement
Vous pouvez créer des modèles de liens de paiement qui redirigeront le client vers la page de paiement.
Création d'un lien de paiement
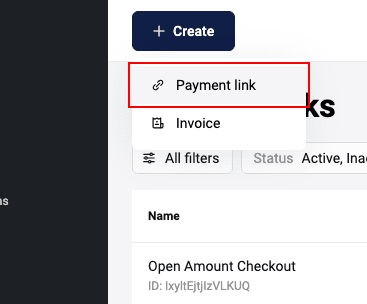
Pour créer un lien vers la page de paiement, accédez à votre espace personnel, dans le panneau latéral gauche sélectionnez Liens de paiement, puis cliquez sur Créer :

Vous pouvez également créer un lien de paiement en cliquant sur le bouton Créer en haut de votre espace personnel et en sélectionnant Lien de paiement.
Un formulaire à remplir apparaîtra :
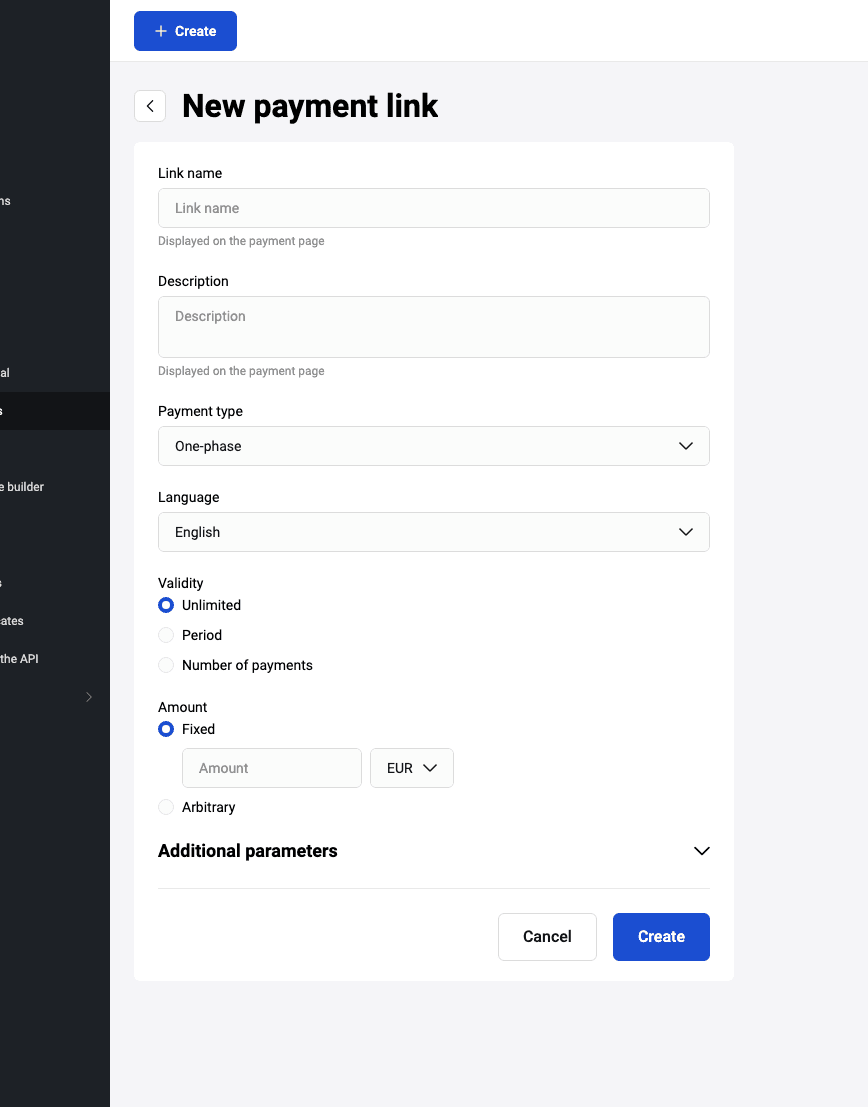
Remplissez les champs nécessaires en vous guidant avec le tableau ci-dessous.
| Obligatoire | Champ | Description |
|---|---|---|
| Obligatoire | Nom | Nom du lien, qui n'est accessible qu'au vendeur. |
| Facultatif | Description | Description de la commande, qui n'est visible que par le vendeur. |
| Par défaut | Type de paiement | Type d'opération de paiement. Valeurs disponibles : Une étape, Deux étapes. Par défaut, le paiement en une étape est sélectionné. Pour que le champ s'affiche, le paiement en deux étapes doit être activé (contactez le support technique). |
| Par défaut | Langue | Langue de la page de paiement. Valeurs disponibles : "FR", "EN". |
| Facultatif | Limitation | Spécifiez une limitation sur l'action du lien. Vous pouvez choisir Période et indiquer les dates de début et de fin souhaitées du lien depuis le calendrier déroulant. Vous pouvez également limiter le nombre de paiements en choisissant Nombre de paiements. Si l'option Sans limitations est sélectionnée, ce champ n'est pas disponible pour modification. |
| Facultatif | Montant | Saisissez le montant à payer. En sélectionnant l'option "N'importe quel" l'acheteur peut spécifier le montant à payer sur la page de paiement. |
| Par défaut | Devise | Défini par défaut, la valeur est établie selon les paramètres du marchand. |
Si nécessaire, remplissez les paramètres supplémentaires dans la section Paramètres supplémentaires.
| Champ | Description |
|---|---|
| Adresse | Afficher ou non le champ d'adresse de livraison sur la page de prépaiement. |
| Afficher ou non le champ de saisie d'e-mail du client sur la page de prépaiement. | |
| Nom complet | Afficher ou non le champ de saisie du prénom et nom du client sur la page de prépaiement. |
| Téléphone | Afficher ou non le champ de saisie du numéro de téléphone du client sur la page de prépaiement. |
Il est également possible d'ajouter vos propres paramètres. Pour cela, cliquez sur Ajouter un paramètre et remplissez les champs :
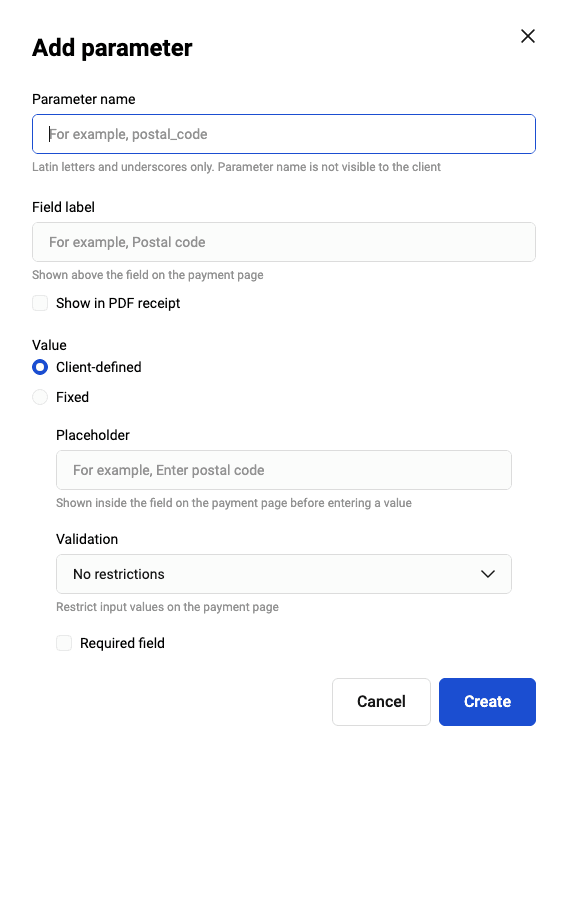
| Champ | Description |
|---|---|
| Nom du paramètre | Requis pour la passerelle de paiement. Seuls les caractères latins et les caractères de soulignement sont autorisés. Par exemple : size, items_count, etc. |
| Titre du champ | Nom du paramètre que le client voit sur la page de paiement. |
| Afficher dans le reçu PDF | Case à cocher qui doit être cochée si le nouveau paramètre s'affiche dans le reçu PDF. |
| Valeur | Valeur du paramètre. Si Fixe est sélectionné, saisissez la valeur dans le champ Valeur du champ — le client ne pourra pas modifier cette valeur. Si Défini par le client est sélectionné, le client peut définir la valeur du paramètre. Dans ce cas, saisissez une indication avec un exemple de remplissage dans le champ Indication textuelle et définissez la condition de vérification de la valeur dans le champ Validation (Sans restrictions, Chiffres uniquement, Expression régulière). |
| Champ obligatoire | Case à cocher qui doit être cochée si le nouveau paramètre est obligatoire pour le client |
Après avoir rempli tous les champs nécessaires, cliquez sur Créer en bas du formulaire. Après cela, le lien s'affichera sur la page principale avec le statut Actif :
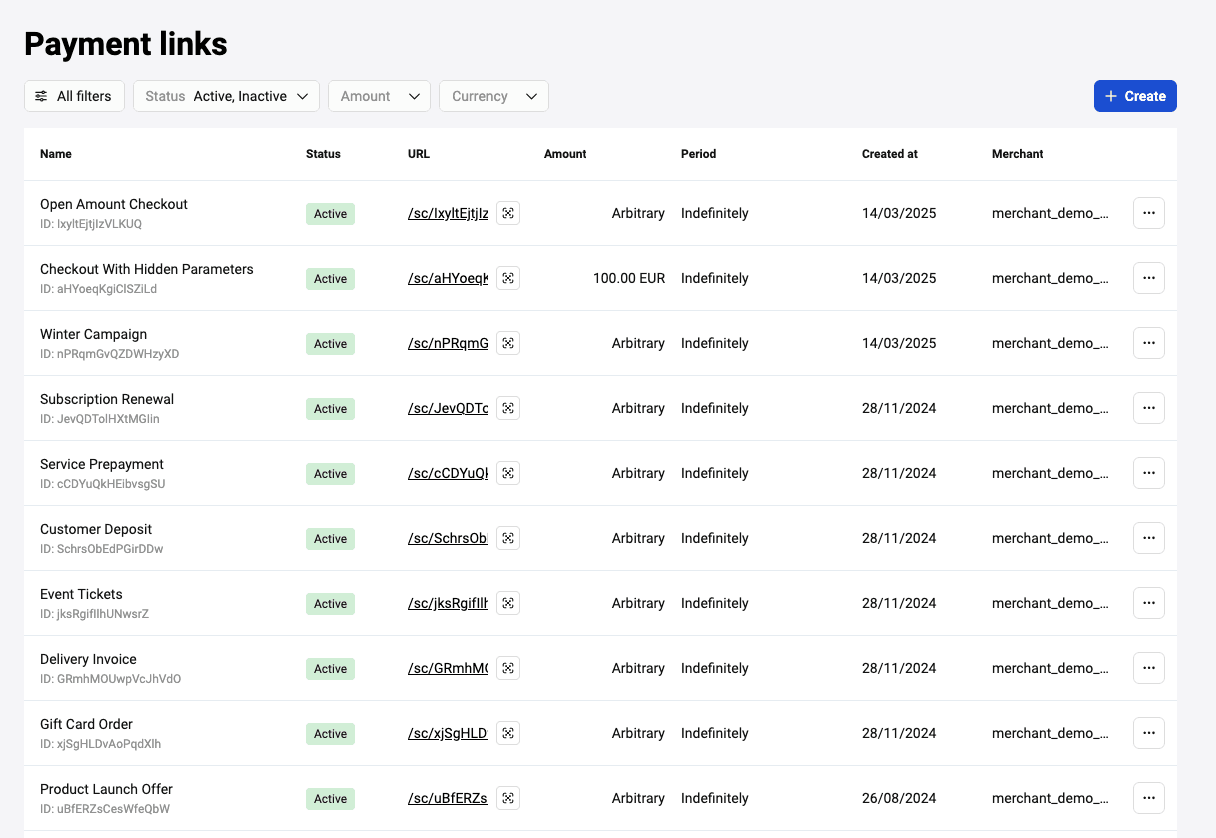
Actions possibles avec le modèle de lien de paiement
En cliquant sur l'icône ![]() les actions suivantes sont disponibles avec le lien de paiement :
les actions suivantes sont disponibles avec le lien de paiement :
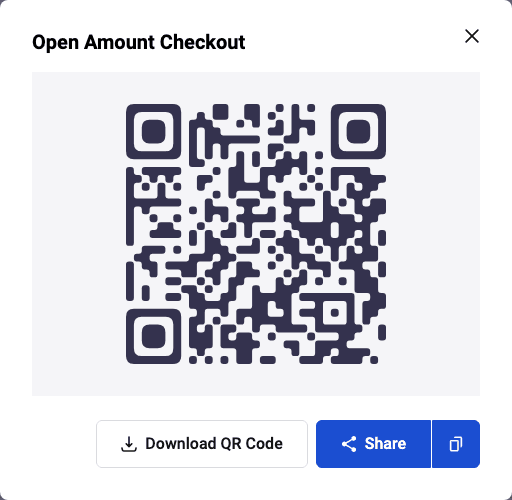
- Partager — en appuyant sur ce bouton, vous pourrez partager le lien dans d'autres applications.
- Copier — après avoir appuyé sur l'icône correspondante, une notification apparaîtra indiquant que le lien a été copié avec succès.
- Télécharger le code QR — vous verrez le code QR généré et pourrez également télécharger son image dans le format choisi (PNG/SVG/JPEG).
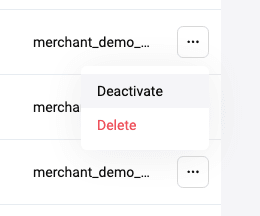
En outre, les actions suivantes sont disponibles :
-
Désactivation/activation et suppression — disponibles en appuyant sur l'icône avec trois points dans la ligne du lien.
Modification — cliquez sur le lien souhaité pour voir les détails du lien créé et le modifier. Pour effectuer les actions décrites ci-dessus, vous pouvez également utiliser les boutons correspondants sur cette page.
-
Filtre — pour former une autre sélection de liens de paiement, cliquez sur Plus de filtres en haut de la page Liens de paiement. Une page pour sélectionner les filtres s'ouvrira :
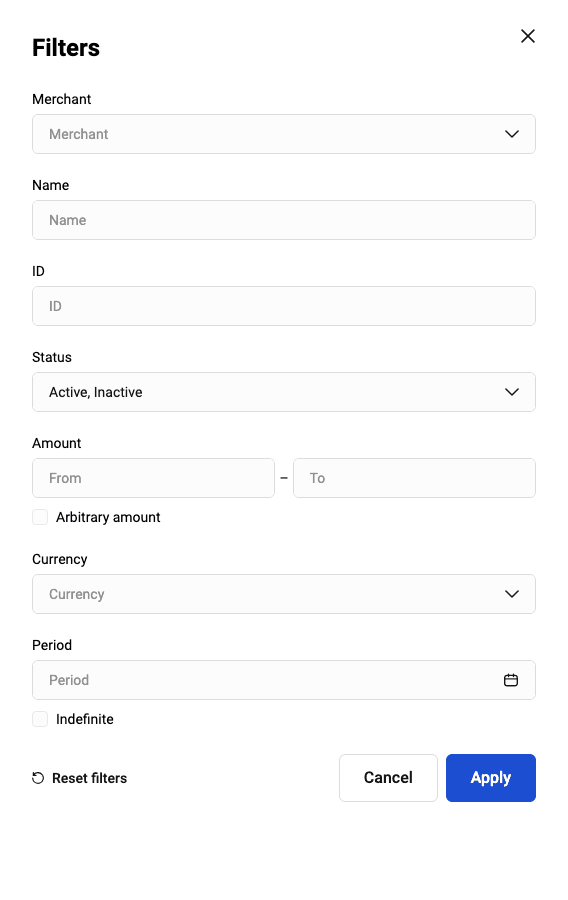
Sélectionnez les critères de recherche nécessaires et cliquez sur Appliquer dans la fenêtre du filtre. Pour effacer tous les champs du filtre, cliquez sur le bouton Réinitialiser les filtres.
Vous pouvez rechercher selon les paramètres suivants :
- Marchand — Si nécessaire, sélectionnez le vendeur dans la liste des vendeurs disponibles dont les liens de paiement doivent être sélectionnés
- Nom — nom du lien que vous avez indiqué lors de la création du lien
- Identifiant du lien — identifiant du modèle de lien de paiement
- Statut — trois statuts de lien sont possibles : "Active"/"Inactive"/"Supprimée". Notez que les liens supprimés ne s'affichent pas dans le tableau si le statut "Supprimée" n'est pas explicitement sélectionné dans le filtre
- Montant de - Montant à — Montant de la commande (ces champs ne sont pas disponibles pour modification si l'option Tout montant est activée)
- Devise — sélectionnez la devise dans la liste déroulante
- Tout montant — activez l'option si le montant comme critère de recherche n'est pas important
- Période de validité — durée de validité définie pour le lien. Cliquez sur les dates et sélectionnez dans le calendrier la date de début et la date d'expiration (champ non disponible pour modification si l'option Illimitée est activée)
- Illimitée — activez l'option si la durée de validité du lien comme critère de recherche n'est pas importante
Page de pré-paiement / Page de paiement
Si lors de la création du lien des paramètres supplémentaires ont été indiqués (E-mail/Nom et prénom/Téléphone/Adresse) ou si le champ du montant de paiement a été laissé vide, après ouverture du lien de paiement le client doit remplir les champs obligatoires sur la page de pré-paiement et seulement ensuite procéder au paiement de la commande.
Exemple de page de pré-paiement avec paramètres supplémentaires :
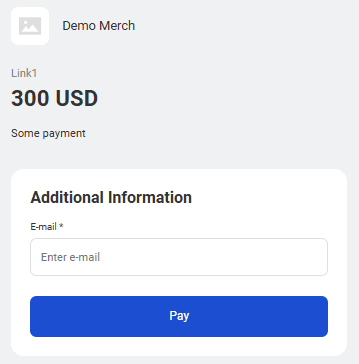
Exemple de page de paiement :

Paiement MOTO
Vous pouvez utiliser les paiements MOTO (Mail Order/Telephone Order) - paiements initiés par les clients via appel téléphonique, courrier, etc., qui permettent aux clients d'acheter à distance des biens et services en fournissant les données de leur carte.
Créez un paiement MOTO
Pour créer un paiement MOTO, effectuez les actions suivantes :
-
Accédez à la section Terminal virtuel de l'Espace personnel. La page de saisie des paramètres de facture de paiement s'ouvre :
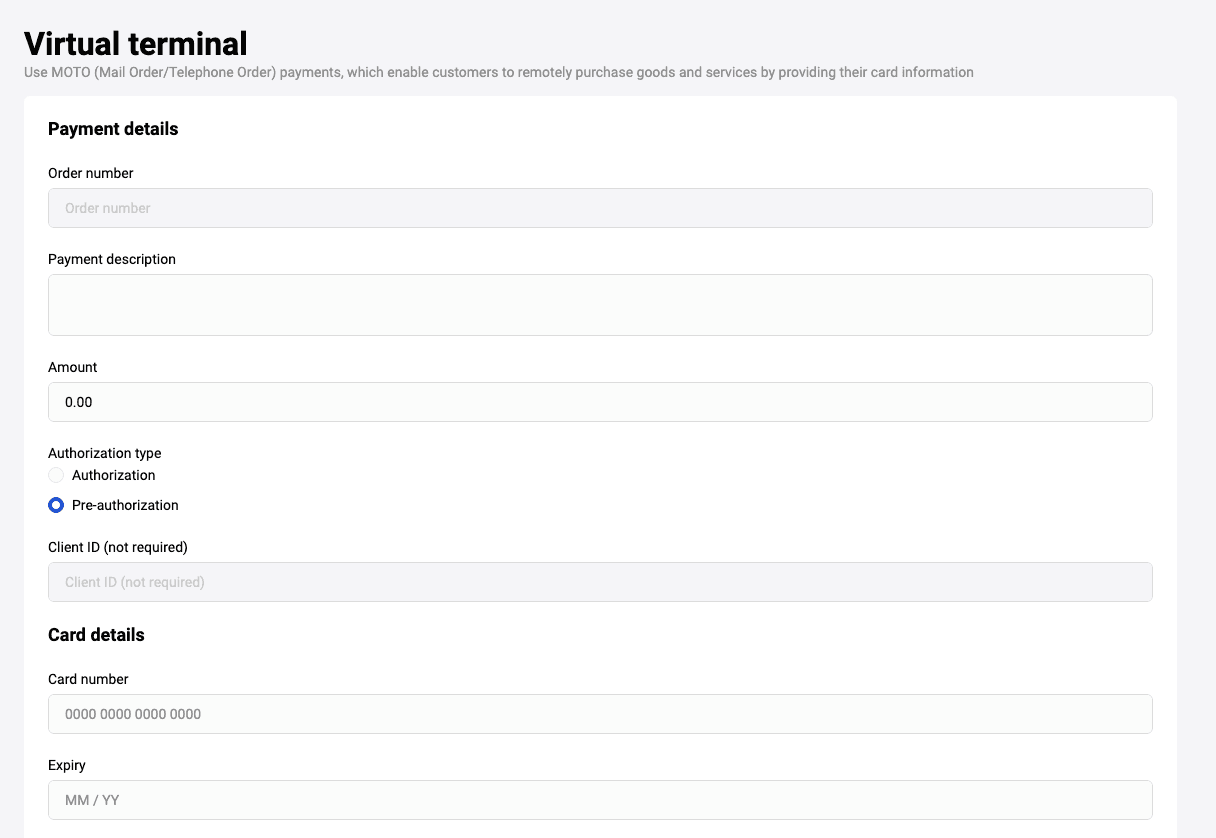
-
Remplissez les champs nécessaires en vous guidant par le tableau ci-dessous.
Paramètre Description Numéro de commande Numéro de commande dans le système du magasin (champ non disponible pour modification si le vendeur a l'autorisation correspondante dans le système et que le système génère lui-même le numéro de commande). Description du paiement Description du paiement sous forme libre. Magasin Si nécessaire, sélectionnez le vendeur dans la liste des vendeurs disponibles. Devise Sélectionnez la devise dans la liste déroulante (champ présent si plus d'une devise est définie pour le marchand). Saisissez le montant Saisissez le montant de la commande. Autorisation/Pré-autorisation Choisissez l'une des deux options. - Autorisation - Paiement en une étape : après traitement du paiement, aucune action supplémentaire de votre part n'est requise.
- Pré-autorisation - Paiement en deux étapes : après que le client a confirmé le paiement, il est nécessaire de finaliser le paiement dans l'Espace personnel. Jusqu'à ce que vous le fassiez, l'argent sera retenu sur le compte du client (en attente) jusqu'au moment de la confirmation du paiement par vous ou jusqu'à l'expiration du délai d'attente de confirmation.
En cas de confirmation du paiement par vous, l'argent est transféré sur votre compte.
En cas d'expiration du délai d'attente de confirmation, le blocage des fonds sur le compte du client est levé.
ID client Numéro du client dans le système de votre magasin. Numéro de carte Numéro masqué de la carte utilisée pour le paiement. Date d'expiration Date d'expiration de la carte du payeur. Titulaire de la carte Nom du titulaire de la carte indiqué lors de l'enregistrement de la commande. Cliquez sur le bouton Envoyer.
Dès que le paiement MOTO sera effectué, les informations détaillées à son sujet s'affichent sur la page Transactions.
Si le paiement MOTO est en deux étapes, vous devez le finaliser. Comment procéder est décrit ici.
Travail avec les transactions
La page Transactions contient des informations détaillées sur les commandes et les paiements. Pour accéder à la page, cliquez sur le bouton ![]() dans le panneau latéral gauche.
dans le panneau latéral gauche.
Dans la partie supérieure de la page Transactions se trouve la zone de recherche, permettant de définir les critères d'affichage des transactions. La liste sur la page contient les transactions répondant aux critères de recherche.
Recherche de transactions à l'aide du filtre
Pour travailler avec les transactions, il faut d'abord définir et appliquer les critères de recherche.
Pour définir les critères de recherche des transactions, effectuez les actions suivantes.
- Dans l'espace personnel, accédez à la page Transactions.
- Dans la zone de recherche en haut définissez les paramètres nécessaires. Pour ajouter plus de critères de recherche, cliquez sur Tous les filtres, ajoutez les filtres nécessaires et cliquez sur Appliquer.
![]()
Les transactions correspondant aux conditions s'afficheront dans la liste.
Pour répéter ultérieurement la recherche de transactions, vous pouvez copier le lien de recherche depuis la barre d'adresse ou l'ajouter aux favoris dans le navigateur.
Pour réinitialiser les filtres, cliquez sur Réinitialiser les filtres.
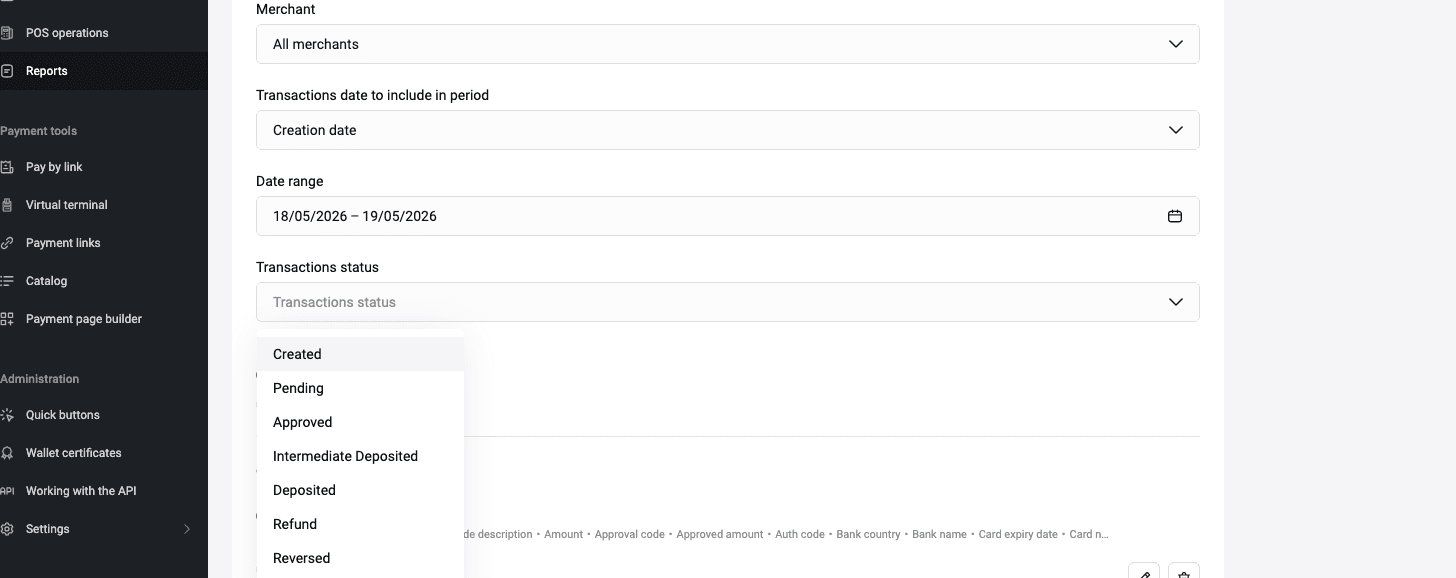
Paramètres du filtre des transactions
![]()
Le filtre permet de définir les critères de sélection des transactions effectuées.
- Période — Dans la première liste déroulante, indiquez selon quelle date effectuer la sélection. Par exemple, Date de création. Dans la deuxième liste déroulante, indiquez le type de définition de l'intervalle temporel. Vous pouvez choisir une période (par exemple, "Aujourd'hui", "Cette semaine") ou définir un intervalle temporel en sélectionnant dans le calendrier les dates de début et de fin.
- Montant — Montant de la commande. Indiquez les limites supérieure et inférieure de la plage.
-
Statut — Statut de la commande. Les statuts suivants sont disponibles (sélection multiple) :
-
Créé. Facture émise, mais pas encore payée.
-
Confirmé. Facture payée. Les fonds sont réservés sur le compte du payeur.
-
Terminé. Les fonds sont débités du compte du payeur.
-
Annulé. Tous les fonds sont restitués au payeur.
-
Rejeté. Facture émise, mais pas payée à temps.
- Remboursement. Remboursement partiel effectué.
-
Créé. Facture émise, mais pas encore payée.
- Numéro de commande — Numéro automatiquement attribué à la commande dans la boutique. Si vous devez trouver une commande spécifique, indiquez ici son numéro.
- Login utilisateur — Login du vendeur dans le système de passerelle de paiement. Indiquez votre login (affiché dans le coin supérieur droit).
- 4 derniers chiffres de la carte — Quatre derniers chiffres du numéro de carte du payeur, utilisée pour le paiement de la commande. Si vous recherchez des transactions pour une carte spécifique et connaissez son numéro, indiquez ici ses quatre derniers chiffres.
-
Autorisation partielle — statut d'autorisation partielle de la commande. Valeurs autorisées :
- Non demandé — Le commerçant n'a pas demandé d'autorisation partielle.
- Demandé — Le commerçant a demandé une autorisation partielle, mais l'autorisation n'a pas encore été effectuée.
- Montant partiel — Le commerçant a demandé une autorisation partielle. L'autorisation partielle a été exécutée avec succès en cas de solde insuffisant du client.
- Montant complet — Le commerçant a demandé une autorisation partielle, mais le solde du client était suffisant, donc l'exécution de l'autorisation partielle n'était pas nécessaire et le montant complet a été débité.
La description des autres critères de recherche voir ici.
Tableau des transactions
Le tableau des transactions se trouve sur la page Transactions. Les transactions apparaissent dans le tableau après que le filtre soit appliqué.
Par défaut, le tableau contient les colonnes suivantes avec les attributs des transactions :
- Montant — Montant de la commande.
- Autorisation partielle — Statut d'autorisation partielle.
- Statut — Statut de la commande.
- Code de réponse — Code numérique du résultat obtenu du traitement bancaire (action code). Voir la liste des codes de réponse ici.
- Numéro de commande — Numéro de commande dans le système de la boutique.
- Moyen de paiement — Moyen de paiement qui a été utilisé pour le paiement de la commande.
- Date d'enregistrement — Date à laquelle la transaction a été enregistrée.
- Description de la commande — Description arbitraire des biens et services.
Export de la liste des transactions
Dans certains cas, vous pourriez avoir besoin d'exporter vos transactions. Trois formats sont disponibles : XLS, CSV et XML. Pour cela :
- Trouvez les commandes nécessaires en indiquant les critères de recherche nécessaires à l'aide du filtre.
- Cliquez sur le bouton Export, choisissez l'un des deux formats proposés pour la sauvegarde : XLS, CSV et XML.
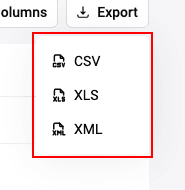
- La formation du rapport dans le format donné commencera. Selon les paramètres de votre navigateur, le fichier de rapport sera sauvegardé ou une boîte de dialogue apparaîtra pour sauvegarder le fichier prêt.
Informations détaillées sur la transaction
Dans l'espace personnel sont disponibles des informations détaillées sur chaque paiement.
Pour en savoir plus sur le paiement, en étant sur la page Transactions, cliquez sur la ligne de la transaction qui vous intéresse dans le tableau.
La page Transaction s'ouvrira. Elle contient toujours les onglets Détails et Activité.
Pour les transactions d'un certain type peut s'afficher en plus l'onglet Remboursement.
Également selon le statut et le type de transaction, peuvent s'afficher les boutons Finaliser et Remboursement.
Le bouton Finaliser permet de confirmer le paiement en deux étapes du client. Ce bouton est actif seulement quand la commande reçoit le statut Confirmé.
Le bouton Remboursement permet de rembourser complètement ou partiellement les fonds au client. La fonctionnalité du bouton dépend du statut de la commande et de la présence d'un panier de produits :
- Dans les commandes avec panier de produits au statut Confirmé, cliquer sur le bouton Remboursement ouvre l'onglet Remboursement de fonds, où il est possible de sélectionner les positions de produits à rembourser ou de rembourser toute la somme de la commande.
- Dans toutes les autres commandes, cliquer sur le bouton Remboursement ouvre la fenêtre de remboursement de fonds, où seule la valeur du montant est indiquée.
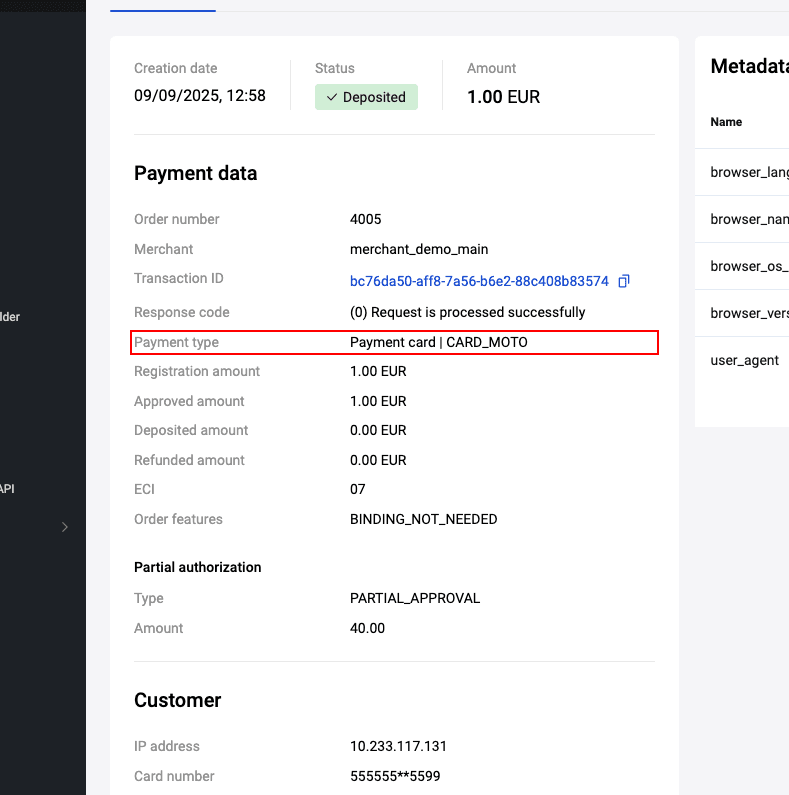
Détails
L'onglet Détails contient les sections suivantes :
- Données de paiement. Dans cette section sont présentés les attributs de paiement de la transaction.
- Client. Ici est présentée l'information sur le moyen de paiement et son propriétaire.
- Métadonnées. Paramètres techniques supplémentaires.
Produits. Information sur quels produits ou services sont payés dans le cadre de la transaction (s'affiche seulement si un panier de produits était présent dans la commande).
Événements. Suivi détaillé des actions du client sur la page de paiement.
La section Détails contient les champs suivants :
| Champ | Description |
|---|---|
| Numéro de commande | Numéro de commande dans le système du magasin. |
| Marchand | Login du marchand dans la passerelle de paiement. |
| Login utilisateur | Login de l'opérateur dans l'espace personnel. |
| ID transaction | Identifiant de la commande dans la passerelle de paiement. |
| Source | Lien vers la facture émise au client (si la facture a été émise via l'espace personnel, voir Factures de paiement). |
| Code de réponse | Code numérique du résultat obtenu du processing de la banque (action code). Voir la liste des codes de réponse ici. |
| Moyen de paiement | Moyen de paiement qui a été utilisé pour le paiement de la commande. |
| Commission | Montant de la commission, si une commission était prélevée. |
| Montant d'enregistrement | Montant de la commande. |
| Montant confirmé | Montant de réservation (pour les commandes en deux étapes). |
| Montant de débit | Montant qui a été finalement débité. |
| Montant de remboursement | Montant de remboursement, si un remboursement a été effectué. |
| Date de création | Date et heure de création de la commande. |
| ECI |
Electronic Commerce Indicator. Valeurs possibles :
|
| Description de la commande | Description arbitraire des produits et services |
La section Client contient les champs suivants :
| Champ | Description |
|---|---|
| Adresse électronique | Adresse électronique du payeur. |
| Adresse IP | Adresse IP du payeur. |
| Numéro de carte | Numéro masqué de la carte utilisée pour le paiement. |
| Date d'expiration de la carte | Date d'expiration de la carte du payeur. |
| Nom du propriétaire de la carte | Nom du propriétaire de la carte, indiqué lors de l'enregistrement de la commande. |
| Système de paiement | Nom du système de paiement international auquel appartient la carte du payeur. |
| Nom de la banque | Nom de la banque qui a émis la carte. |
| Pays de la banque | Code à deux lettres du pays de la banque qui a émis la carte. |
La section Produits contient l'information sur quels produits ou services sont payés dans le cadre de la transaction.
| Colonne | Description |
|---|---|
| ID | Numéro de position de produit dans le panier. |
| Dénomination | Dénomination de la position de produit. |
| Article | Désignation numérique ou alphabétique destinée à la classification de la position de produit. |
| Prix | Prix par unité de position de produit. |
| Qté | Quantité d'unités de position de produit. |
| Montant | Montant total pour toutes les unités d'une position de produit (calculé automatiquement). |
| Remboursement | Informations sur le remboursement de fonds. S'affiche seulement si un remboursement a été effectué. |
La section Autorisation partielle contient les champs suivants :
| Champ | Description |
|---|---|
| Type | Type d'autorisation partielle. Valeurs autorisées :
|
| Somme | Somme d'autorisation. |
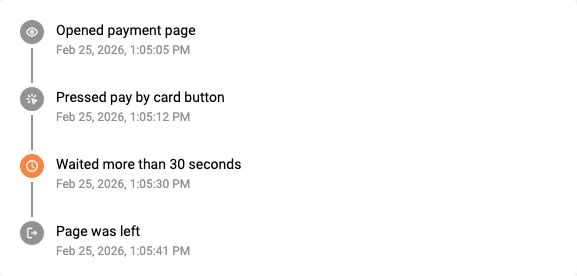
La section Événements affiche les actions que le client effectue dans le processus de paiement, par exemple "Page de paiement ouverte", "Perte de focus", "Transition vers le champ numéro de carte", etc. Cela vous permettra de comprendre le comportement du client et, ainsi, de rendre le processus de paiement plus clair et plus pratique.
Activité
L'onglet Activité contient des informations sur tous les événements de la commande : crédits de paiement, remboursements, etc.
| Colonne | Description |
|---|---|
| Type | Opérations entreprises dans le processus de travail avec la commande |
| Statut | Statut de l'opération |
| Date | Date de l'opération |
| Description | Montant de la commande |
Remboursement
L'onglet Remboursement contient des informations sur les positions de marchandises dans la commande et permet d'effectuer le remboursement des fonds au payeur.
Vous pouvez rembourser toute la somme entièrement ou effectuer un remboursement sur certaines positions de marchandises.
Remboursement complet de la transaction
Pour effectuer un remboursement complet des fonds au payeur pour la commande, effectuez les actions suivantes :
En étant sur l'onglet Remboursement des fonds, cliquez sur le bouton Remboursement complet. La commande passera au statut Annulé ou Remboursement selon le caractère échelonné du paiement et la date d'exécution du remboursement.
Remboursement par positions de marchandises
Pour le remboursement des fonds par positions de marchandises, effectuez les actions suivantes :
-
En étant sur l'onglet Remboursement, utilisez le tableau avec la composition du panier.
Colonne Description Code Numéro de la position de marchandise dans le panier. Dénomination Dénomination de la position de marchandise. Article Désignation numérique ou alphabétique destinée à la classification de la position de marchandise. Prix Prix par unité de la position de marchandise. Qté Quantité d'unités de la position de marchandise. Somme Somme totale pour toutes les unités d'une position de marchandise (calculée automatiquement). Qté à rembourser Quantité d'unités de marchandise qui doivent être remboursées. Somme à rembourser Somme qui sera remboursée. Le champ est calculé automatiquement. Dans le champ Qté à rembourser indiquez la quantité d'unités de marchandise à annuler. La somme remboursée s'affichera dans le champ Somme à rembourser.
Cliquez sur le bouton Remboursement.
Si la somme de remboursement est inférieure à la somme de la commande, la commande passera au statut Remboursement. Si la somme complète de la commande est remboursée, la commande passera au statut Annulé.
Actions disponibles sur la page de transaction
Actions principales avec les transactions dans l'espace personnel :
Ces opérations sont appelées par les boutons correspondants sur la page d'informations sur la transaction. Description détaillée de chaque opération ci-dessous.
Annulation de commande
Habituellement, une commande qui n'a pas été payée ou préautorisée est automatiquement annulée après un certain temps défini dans le système, par exemple, après 20 minutes. Mais cette opération peut aussi être effectuée manuellement depuis l'espace personnel du vendeur.
Si vous souhaitez annuler une commande avant le paiement ou l'autorisation préliminaire, vous pouvez le faire en cliquant sur le bouton Rejeter sur la page d'informations sur la transaction.

Après annulation, la commande obtient le statut Rejetée.
Finalisation de commande
Lors du paiement en deux étapes, les fonds sont d'abord gelés sur le compte du client (statut de commande — Confirmée) et seulement ensuite crédités sur le compte du vendeur (statut de commande — Finalisée). Il est possible de configurer pour que le virement final se fasse automatiquement après un certain temps défini dans le système, par exemple, après 24 heures. Mais cette opération peut être effectuée manuellement depuis l'espace personnel du vendeur.
Pour finaliser la transaction, sur la page Informations sur la transaction cliquez sur le bouton Finaliser.
![]()
Une fenêtre de confirmation s'ouvrira. Son apparence est montrée ci-dessous et dépend de l'utilisation ou non d'un panier d'articles dans la commande.
Si le panier N'a PAS été utilisé, la fenêtre de confirmation ressemble à ceci :
![]()
Vérifiez la valeur dans le champ et cliquez sur le bouton Confirmer.
Si le panier a été utilisé, la fenêtre de confirmation ressemble à ceci :
Vérifiez les données, modifiez-les si nécessaire et cliquez sur le bouton Finaliser. Après finalisation, la commande obtient le statut Finalisée.
En présence de la permission correspondante, vous pouvez apporter des modifications au panier de sorte que le montant de finalisation dépasse le montant de préautorisation. Le pourcentage de dépassement du montant de dépôt peut être quelconque — il est défini par un paramètre spécifique. Pour activer cette possibilité, contactez le service de support technique.
Par exemple, dans les paramètres est défini un pourcentage de dépassement du montant de dépôt — 100%. Dans le formulaire de paiement vous avez établi un montant de 2700 roubles. Alors il est possible de modifier le panier de sorte que le montant de commande ne dépasse pas 5400 roubles. En cas de dépassement, une erreur s'affichera et le bouton Finaliser deviendra indisponible :
Annulation de commande confirmée
Dans l'espace personnel, vous pouvez annuler les paiements pour les transactions en deux étapes au statut Confirmée (quand les fonds sont réservés sur le compte du client, mais pas encore crédités). L'annulation signifie que la transaction est annulée, et tous les fonds réservés sur le compte du client sont débloqués.
Pour annuler le paiement, sur la page d'informations sur la transaction, cliquez sur le bouton Remboursement.
![]()
La fonctionnalité du bouton dépend du statut de la commande et de la présence d'un panier d'articles dans celle-ci : Si le statut de la commande est Confirmé et qu'il n'y a pas de panier d'articles, alors la fenêtre de confirmation de remboursement s'ouvre.
![]()
Si vous saisissez seulement une partie du montant, le montant indiqué sera remboursé, et la commande restera dans le statut Confirmé. Si vous saisissez le montant complet, alors la commande passera au statut Annulé.
Dans la fenêtre de confirmation, cliquez sur Confirmer.
Remboursement de fonds
Depuis l'espace personnel, vous pouvez effectuer un remboursement de fonds pour les transactions réalisées (commandes payées par les clients qui se trouvent dans le statut Terminé). Pour les paiements en deux étapes, le statut Terminé signifie que les fonds, se trouvant sur la carte du payeur, ont déjà été débités.
Le remboursement s'effectue sur la page d'informations sur la transaction à l'aide du bouton Remboursement.
La fonctionnalité du bouton dépend du statut de la commande et de la présence d'un panier d'articles dans celle-ci :
- Dans les commandes avec panier d'articles dans le statut Confirmé, cliquer sur le bouton Remboursement ouvre l'onglet Remboursement de fonds, où vous pouvez choisir les positions d'articles à rembourser ou rembourser tout le montant de la commande. Le processus de remboursement pour de telles commandes est décrit en détail ici.
- Dans les commandes sans panier d'articles dans le statut Confirmé, cliquer sur le bouton Remboursement ouvre la fenêtre de confirmation de remboursement.
![]()
Vérifiez le montant du remboursement. Vous pouvez rembourser tout le montant ou indiquer un montant inférieur. Cliquez sur Confirmer. La commande passera au statut Remboursement. Si à l'étape précédente vous avez décidé de rembourser un montant inférieur, vous pouvez effectuer des remboursements jusqu'à ce que tout le montant soit remboursé.
Type de remboursement selon les étapes, le statut du paiement et la présence d'un panier d'articles
Le tableau ci-dessous montre toutes les variantes de remboursement selon le statut du paiement, le nombre d'étapes qu'il contient, et s'il y a un panier d'articles. Telle ou telle fonctionnalité peut être indisponible si votre utilisateur n'a pas les droits correspondants dans le système. Le principe général est tel que lorsque l'annulation de commande est possible, l'annulation est effectuée, et si cette possibilité n'existe pas, alors le remboursement de fonds est effectué.
| Avec panier | Sans panier | |
| Une étape | Terminé — remboursement par positions d'articles | Terminé — remboursement par montant, partiel possible |
| Deux étapes |
Confirmé — annulation, seulement montant complet Terminé — remboursement par positions d'articles |
Confirmé — annulation, seulement montant complet Terminé — remboursement par montant, partiel possible |
Portefeuilles électroniques et certificats
La passerelle de paiement prend en charge le paiement tokenisé à l'aide des portefeuilles électroniques Apple Pay, Google Pay et Samsung Pay.
La documentation est disponible ici
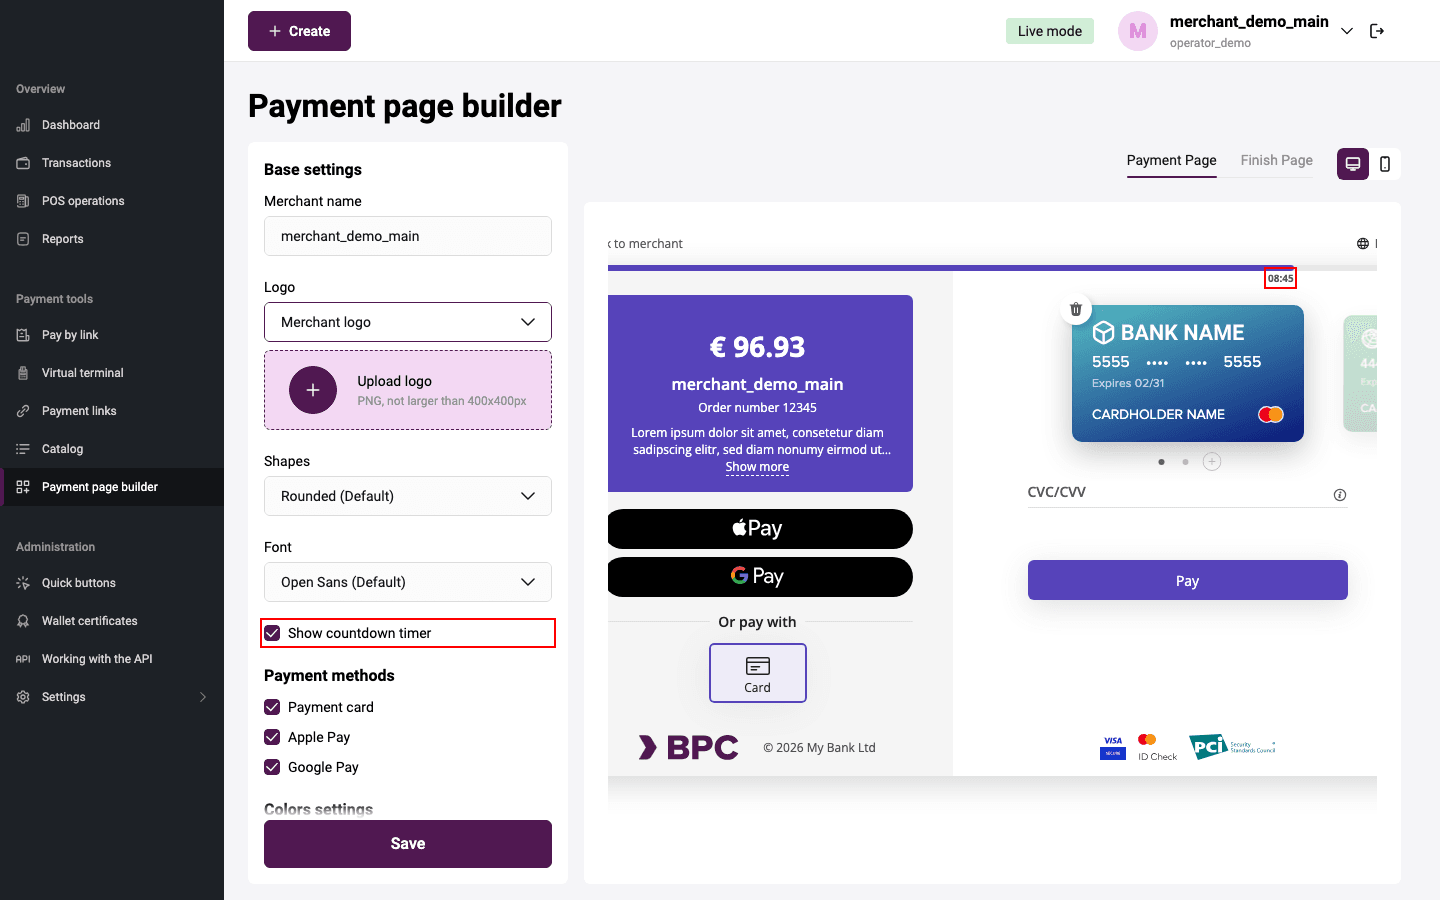
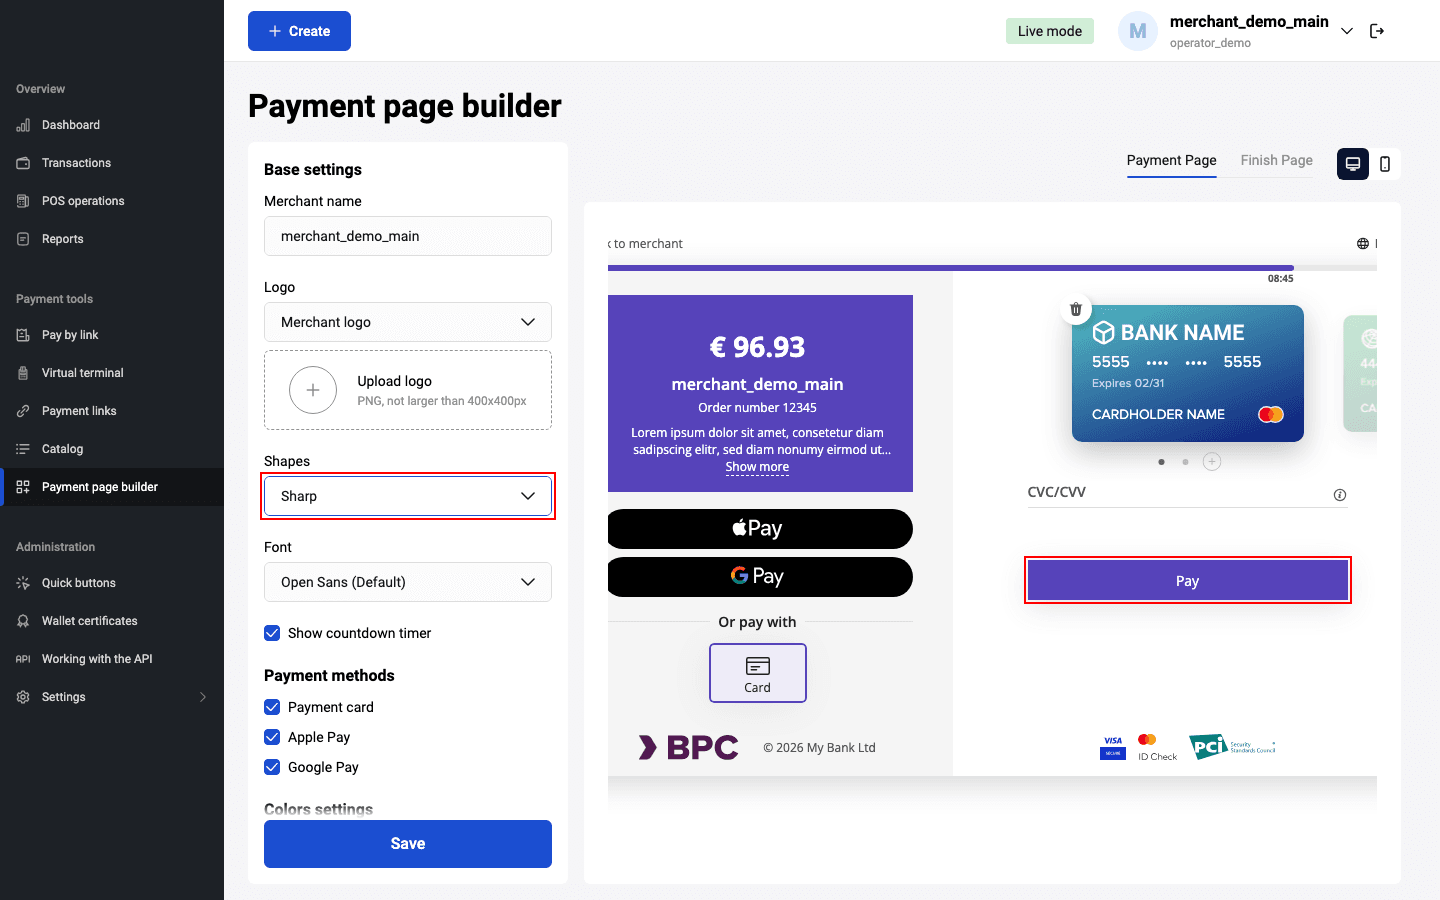
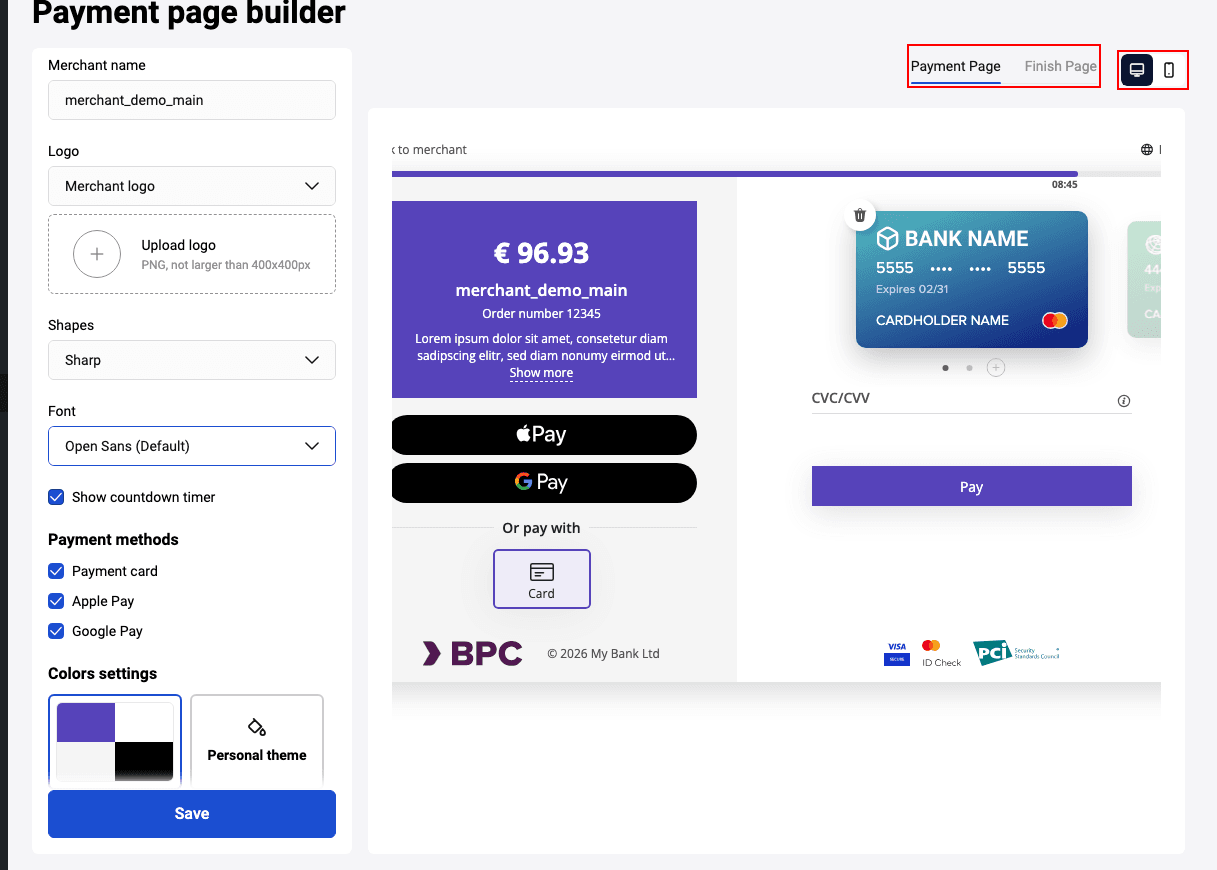
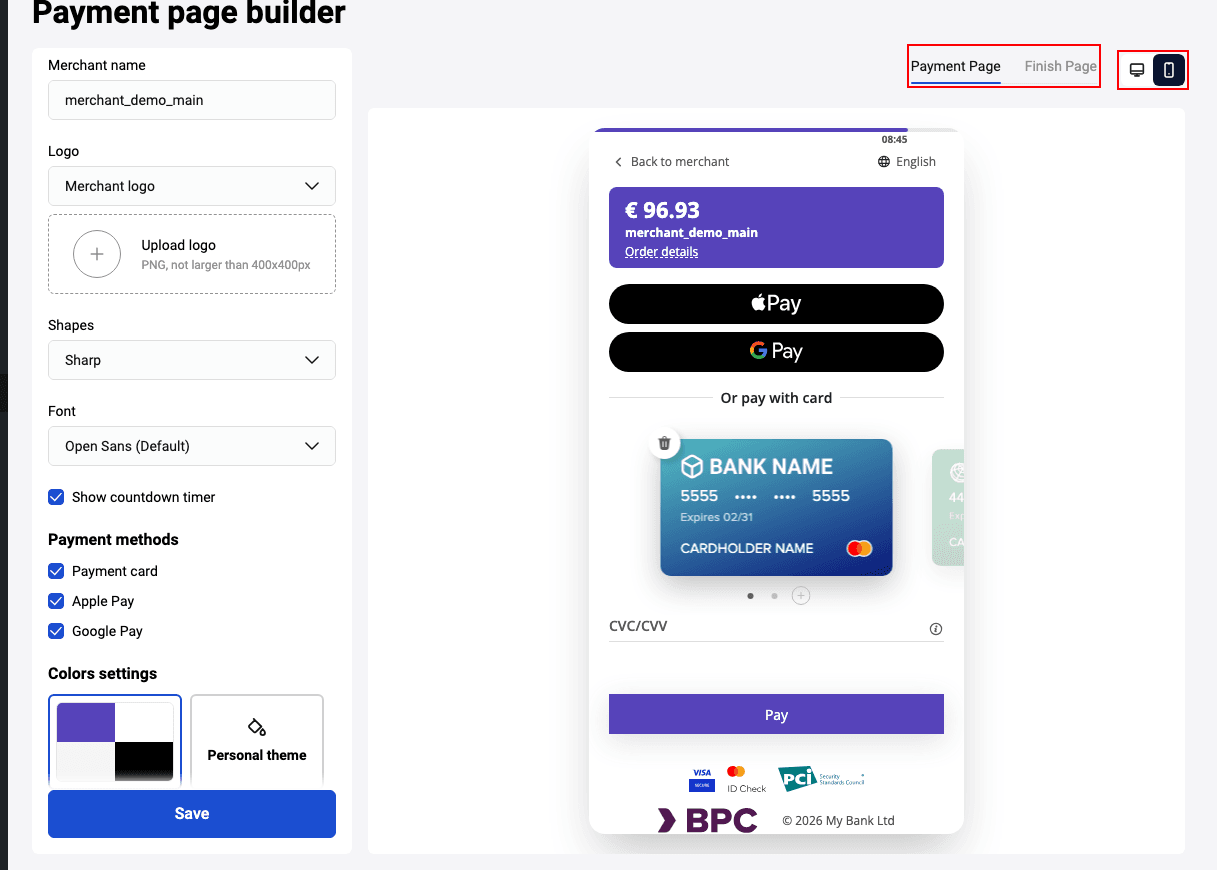
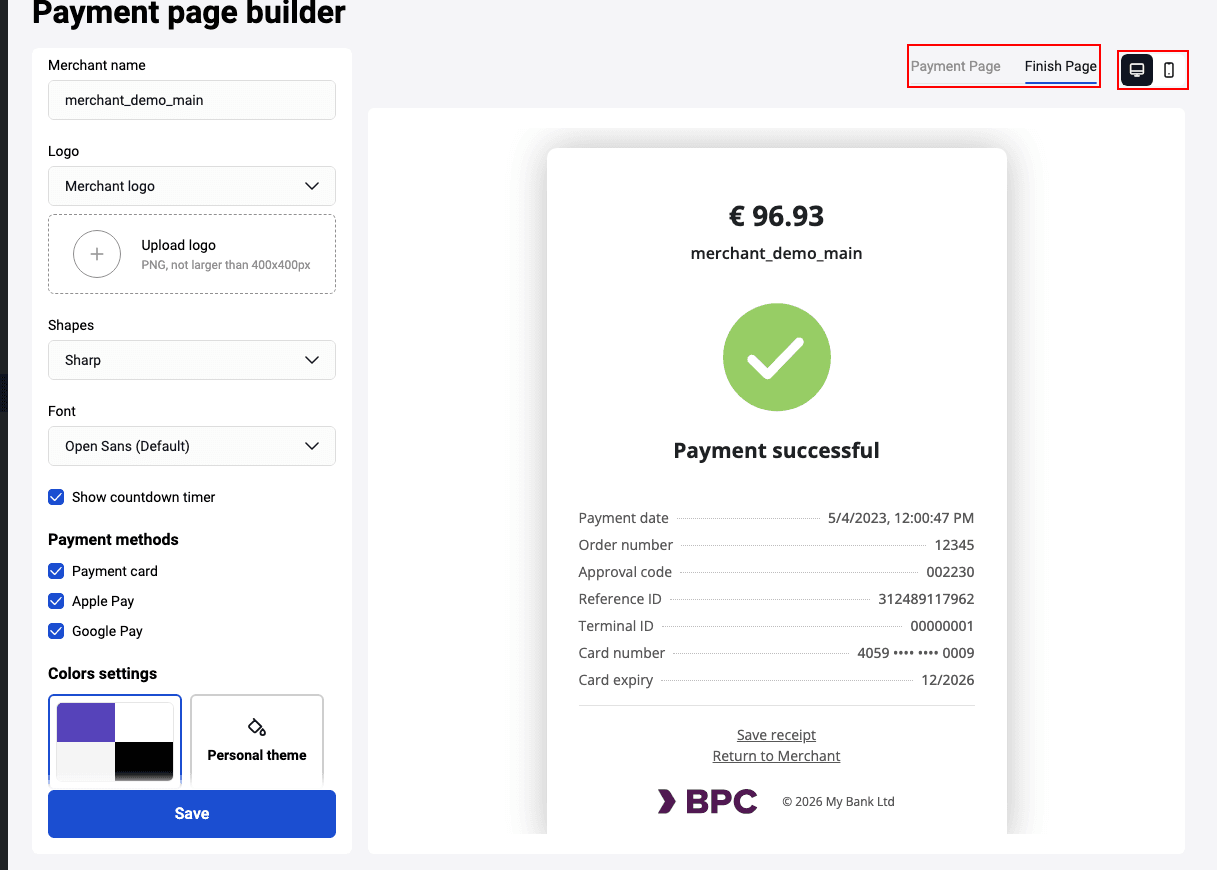
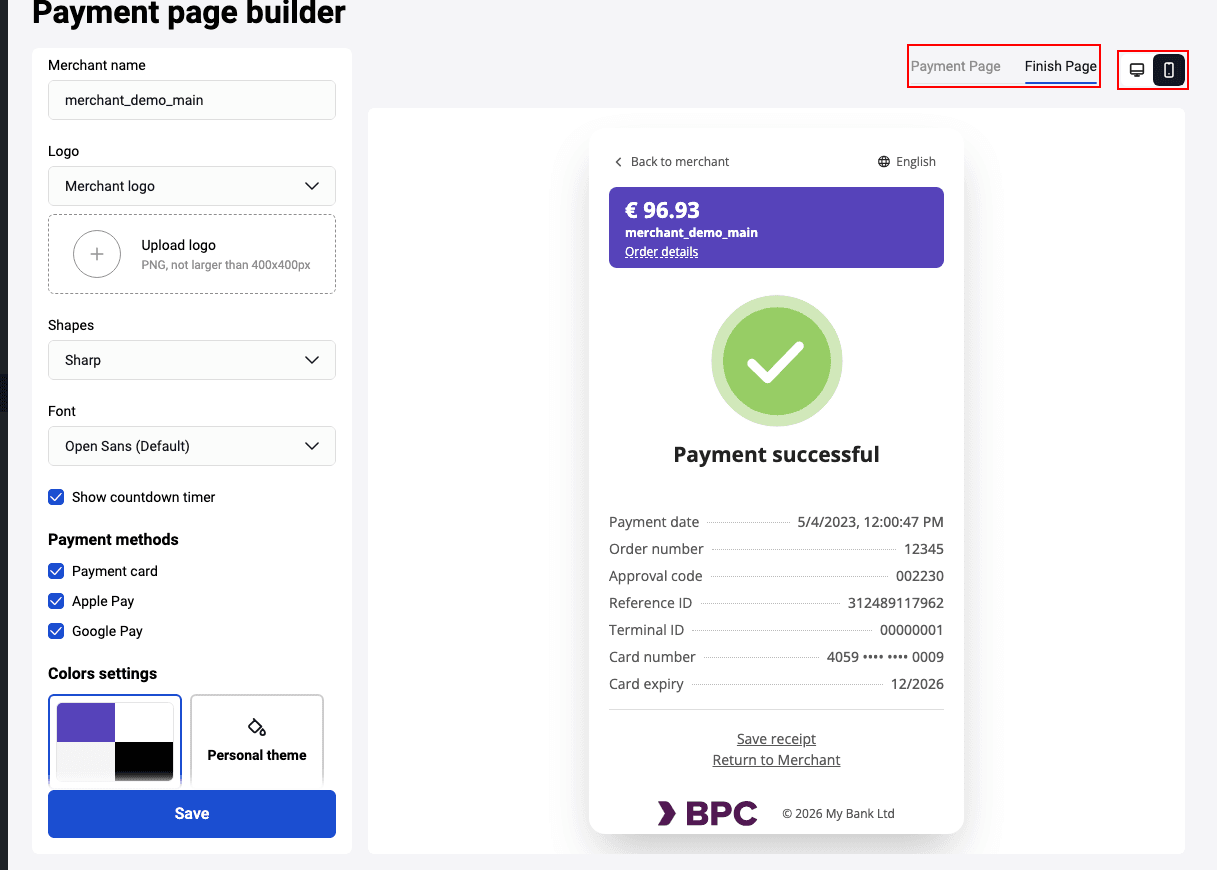
Constructeur de pages de paiement
Le constructeur permet de modifier la page de paiement sans avoir besoin d'écrire du code. Il se trouve dans la section Constructeur de l'espace personnel.
Pour accéder à la section Constructeur, dans le menu de navigation gauche de l'espace personnel, sélectionnez l'élément ![]() .
.
Aperçu
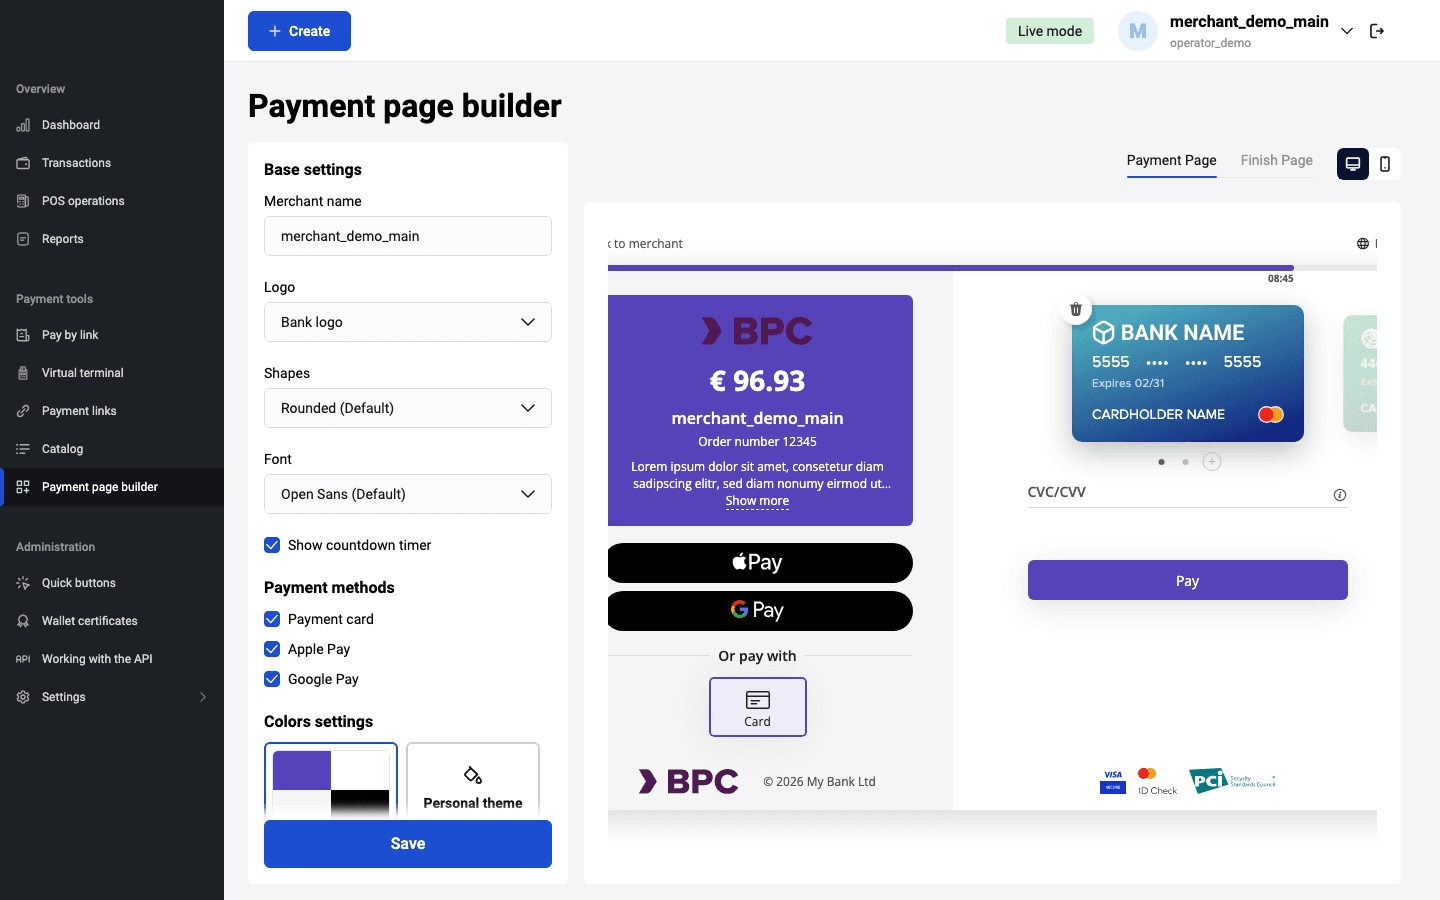
Dans cette section, la page est divisée en deux sections :
- Dans la partie gauche sont rassemblés tous les paramètres nécessaires pour l'affichage sur la page de paiement ;
- Dans la partie droite s'affiche la page de paiement configurable, que vous pouvez modifier en définissant les paramètres dans la partie gauche de la page.
Dans la section Constructeur de pages de paiement vous pouvez :
- Modifier le schéma de couleurs
- Télécharger le logo du vendeur
- Définir l'affichage du logo de la banque
- Supprimer l'affichage du minuteur
Paramètres
Nom de la boutique
D'abord, indiquez le nom de la boutique :
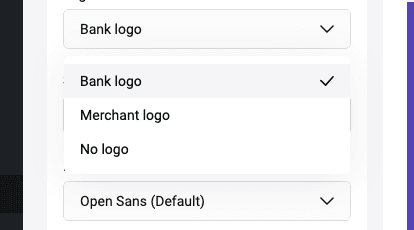
Logo
Vous pouvez télécharger le logo du vendeur et/ou choisir le logo de la banque. Pour télécharger le logo du vendeur, cliquez sur Logo et sélectionnez Logo du marchand ou Logo du marchand et de la banque, puis téléchargez le fichier du logo du vendeur.
Seul le format .png est pris en charge. Si vous téléchargez des fichiers d'autres formats, une erreur sera affichée.
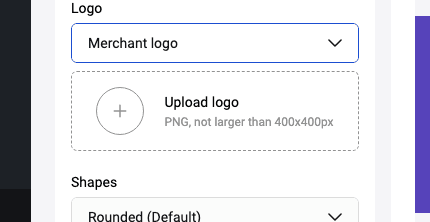
Vous pouvez renoncer à l'affichage du logo de la banque. Pour cela, sélectionnez l'option Sans logo :
Minuteur
Définissez si le minuteur de compte à rebours pour effectuer le paiement sera affiché sur la page de paiement ou non :
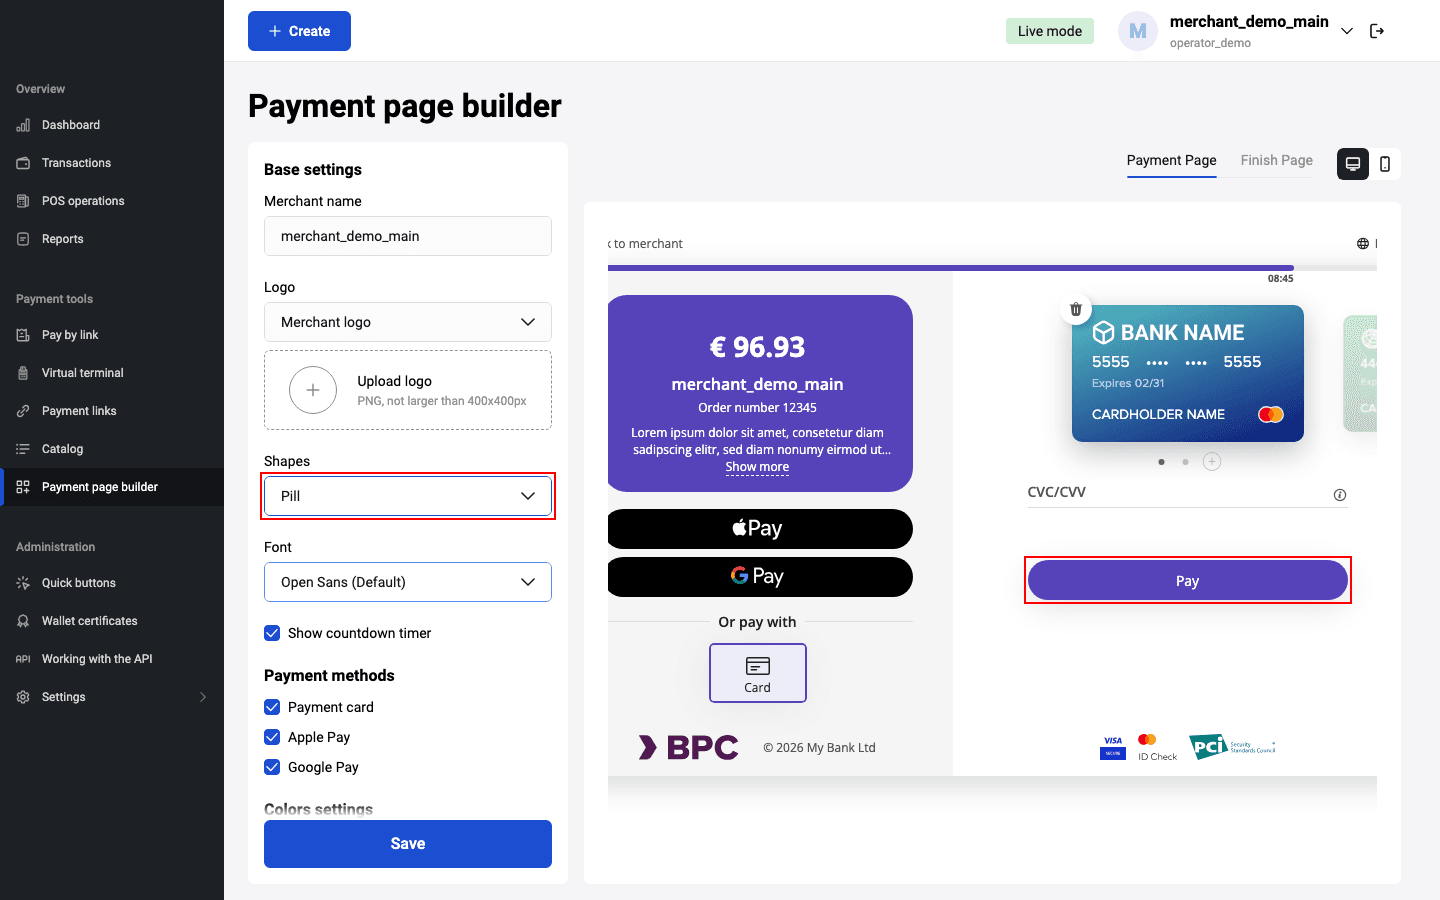
Formes
Le constructeur permet de définir les objets sur la page de paiement. Veuillez choisir dans la liste déroulante :

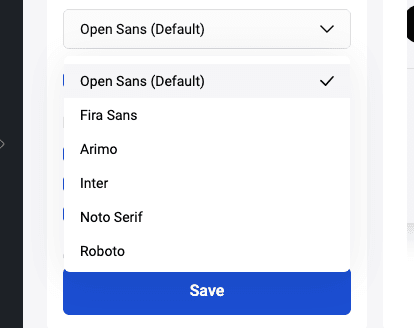
Polices
Le constructeur permet de choisir les polices sur la page de paiement. Choisissez dans la liste déroulante :
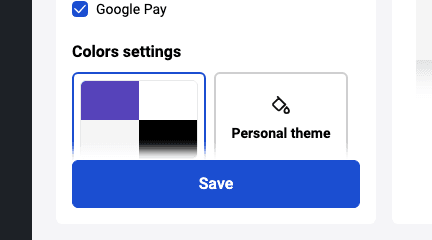
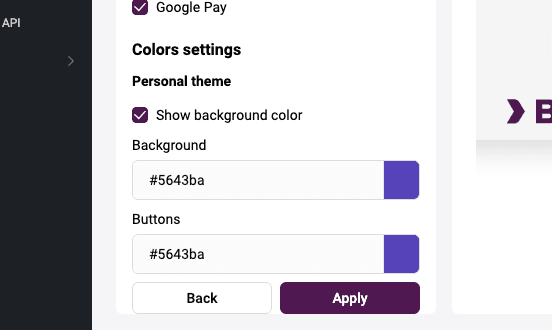
Paramètres de couleur
Le constructeur permet de définir le thème de couleur de la page. Vous pouvez choisir l'un des thèmes existants ou créer le vôtre :
Page de paiement
Dans la liste déroulante en haut de la page vous pouvez choisir Page de paiement ou Page finale.
De plus, en haut de la page vous pouvez choisir le format d'affichage de la page de paiement – desktop ou mobile.
Exemples
Page de paiement :
Page de finalisation :
Catalogue de produits
La section Catalogue de produits permet de sélectionner rapidement les produits lors de la création d'une facture de paiement. Pour accéder à la section Catalogue de produits, cliquez sur ![]() dans le menu de gauche.
dans le menu de gauche.
La page de la section se présente comme suit :

Pour commencer le travail, sélectionnez le marchand dans la liste déroulante, téléchargez le modèle de catalogue en cliquant sur le bouton Télécharger le modèle de catalogue, et remplissez les paramètres du produit :
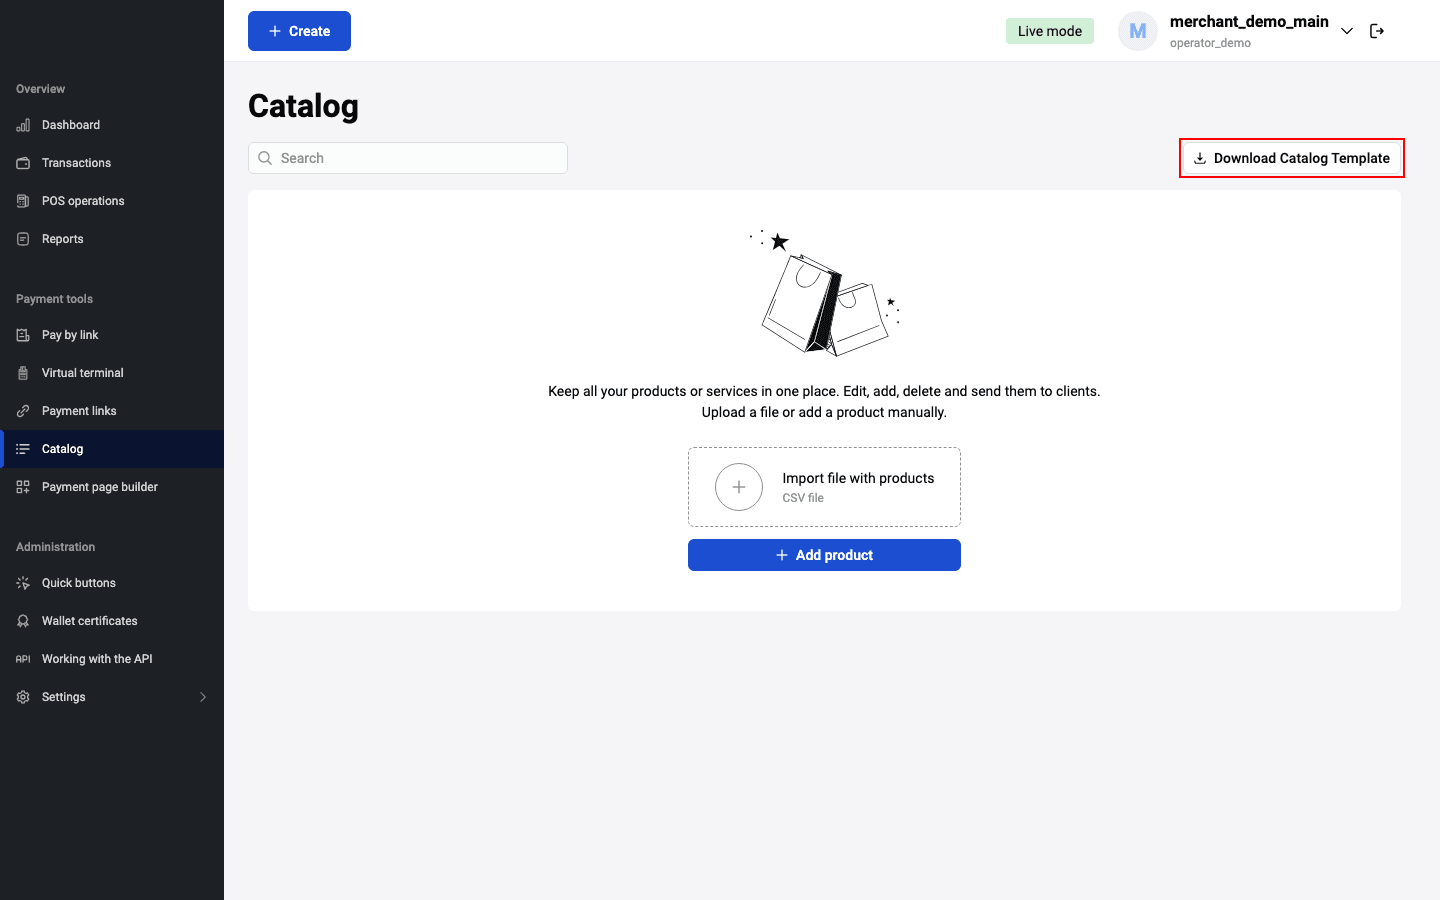
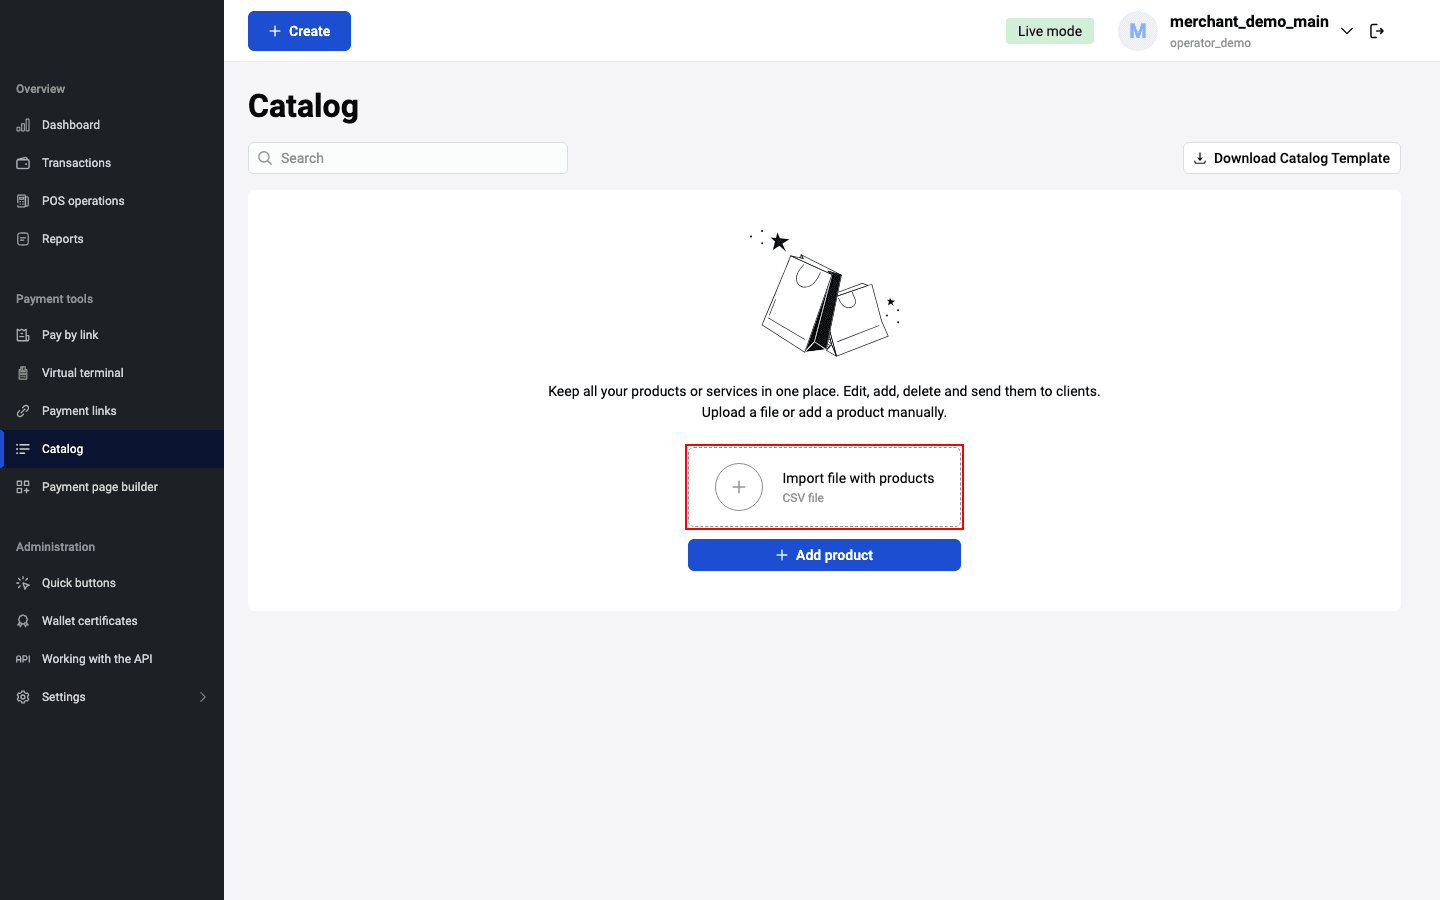
Ensuite, chargez le catalogue de produits prêt au format .CSV, en utilisant le bouton Import de fichier avec produits :
Ou bien ajoutez un produit en utilisant le bouton Nouveau.
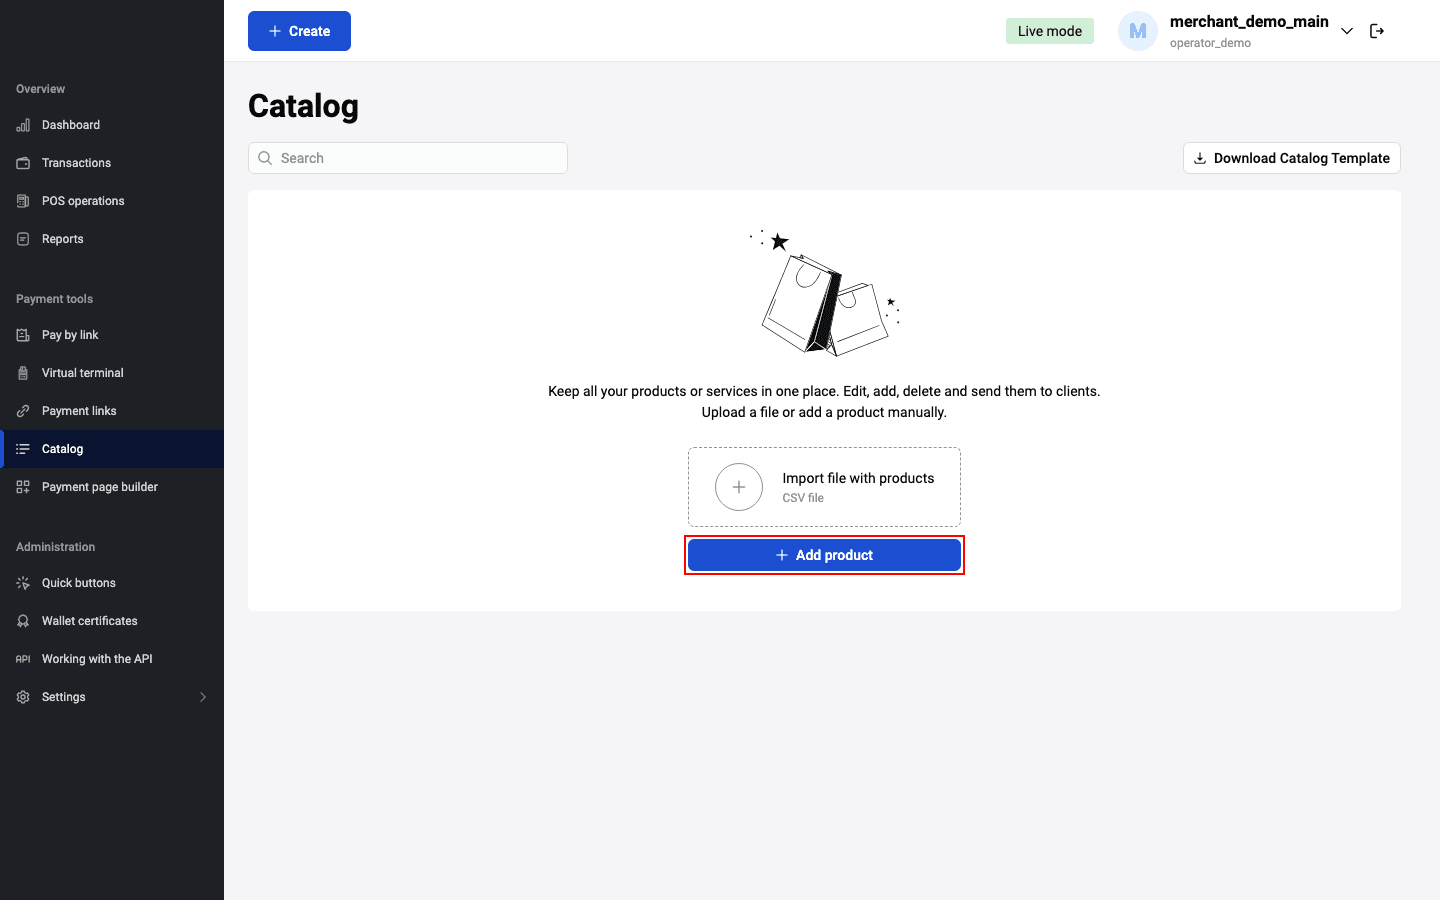
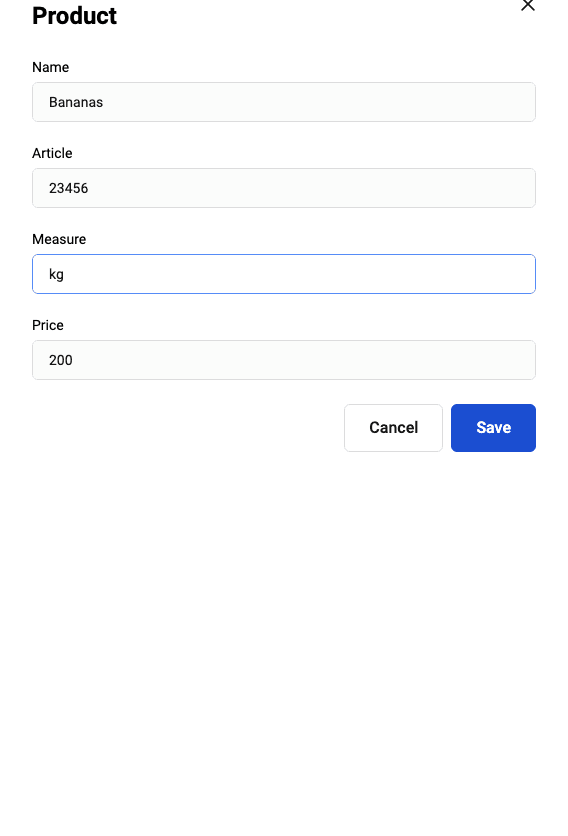
Un formulaire pour remplir les informations sur le produit s'ouvrira.
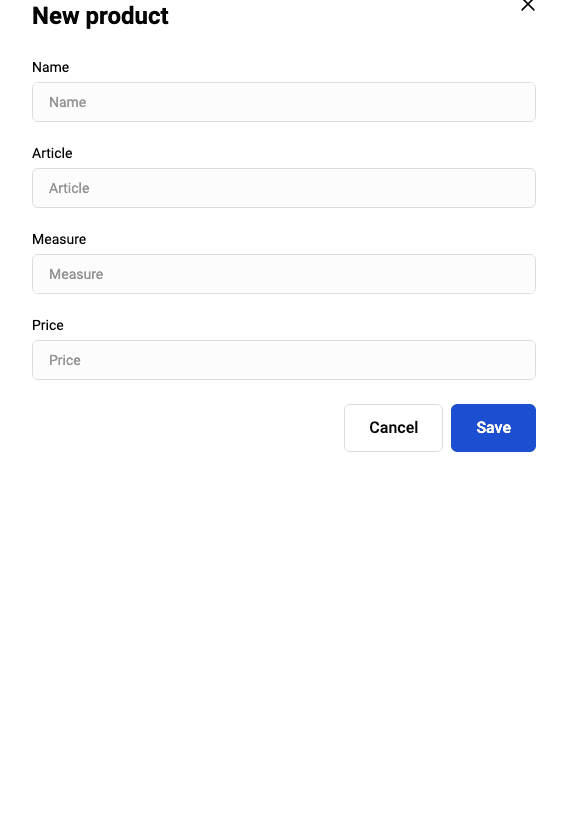
Remplissez les champs nécessaires en vous guidant avec le tableau ci-dessous.
| Champ | Description |
|---|---|
| Dénomination | Dénomination du produit ou service. |
| Prix | Prix par unité de la position de produit. |
| Unité de mesure | Unité de mesure, par exemple : "l" — litres, "pcs." — pièces. |
| Article | Article de la position de produit. |
Après le chargement du catalogue de produits ou du/des produit(s) séparément, vous pourrez ajouter des produits du catalogue lors de l'émission d'une facture de paiement. Pour plus de détails sur comment ajouter des produits du catalogue, consultez la section Facture de paiement.
En plus de l'ajout de produit au catalogue, vous pouvez, si nécessaire, apporter des modifications aux paramètres du produit ajouté, ou même le supprimer complètement du catalogue. Pour cela, il faut placer le curseur sur la ligne du produit dans la liste et appuyer sur le bouton correspondant :
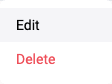
En cliquant sur le bouton d'édition, un formulaire pour modifier le produit s'ouvrira :
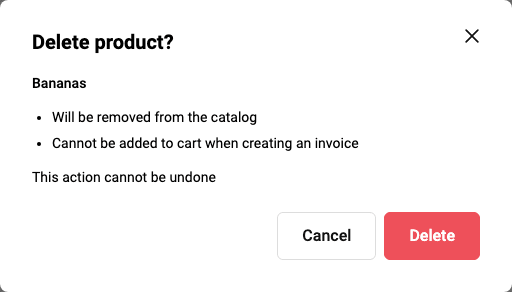
En cliquant sur le bouton de suppression du produit, une fenêtre pour confirmer ou annuler l'action s'ouvrira :
Boutons rapides
La section Boutons rapides permet de connecter rapidement des boutons pour le paiement par Apple Pay / Google Pay sur votre site. Pour ouvrir la section Boutons rapides, cliquez sur ![]() dans le panneau de navigation de gauche.
dans le panneau de navigation de gauche.
La page s'ouvrira :
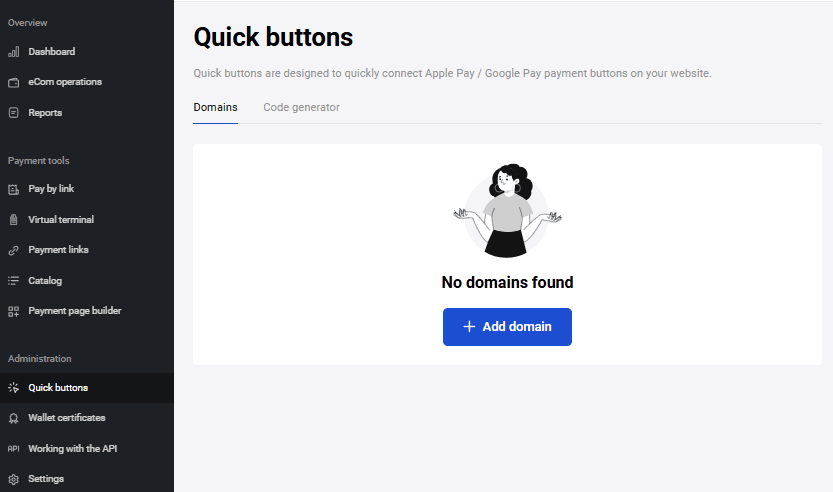
La page contient deux onglets : Domaines et Générateur de code.
Domaines
L'onglet Domaines permet d'enregistrer le domaine de votre boutique dans la Passerelle de paiement avec vérification Apple Services. Ceci est nécessaire pour commencer à recevoir des paiements par Apple Pay.
Apple Pay génère un fichier de vérification qui doit être placé dans le sous-dossier suivant de votre domaine avant l'enregistrement :
/.well-known/apple-developer-merchantid-domain-association
Pour enregistrer le domaine, cliquez sur le bouton Ajouter domaine. La fenêtre Ajouter domaine s'ouvrira.

- Dans le champ Nom de domaine, saisissez le nom du domaine de niveau supérieur (par exemple, example.com) ou de troisième niveau (par exemple, shop.example.com) que vous souhaitez utiliser pour les paiements Apple Pay.
- Téléchargez le fichier de vérification Apple Pay.
- Placez le fichier au chemin indiqué sur votre serveur web :
https://<DOMAIN NAME>/.well-known/apple-developer-merchantid-domain-association. - Cliquez sur le bouton Ajouter domaine.
Le domaine de la boutique sera enregistré dans la Passerelle de paiement avec la possibilité d'accepter les paiements Apple Pay.
Le nom de domaine sera affiché dans la liste des domaines sur l'onglet Domaines.
Générateur de code
Cet onglet contient un constructeur pour générer le code du script Payment Widget, qui est utilisé pour connecter rapidement les boutons Apple Pay et Google Pay sur la page de la boutique. Voir plus en détails ici.
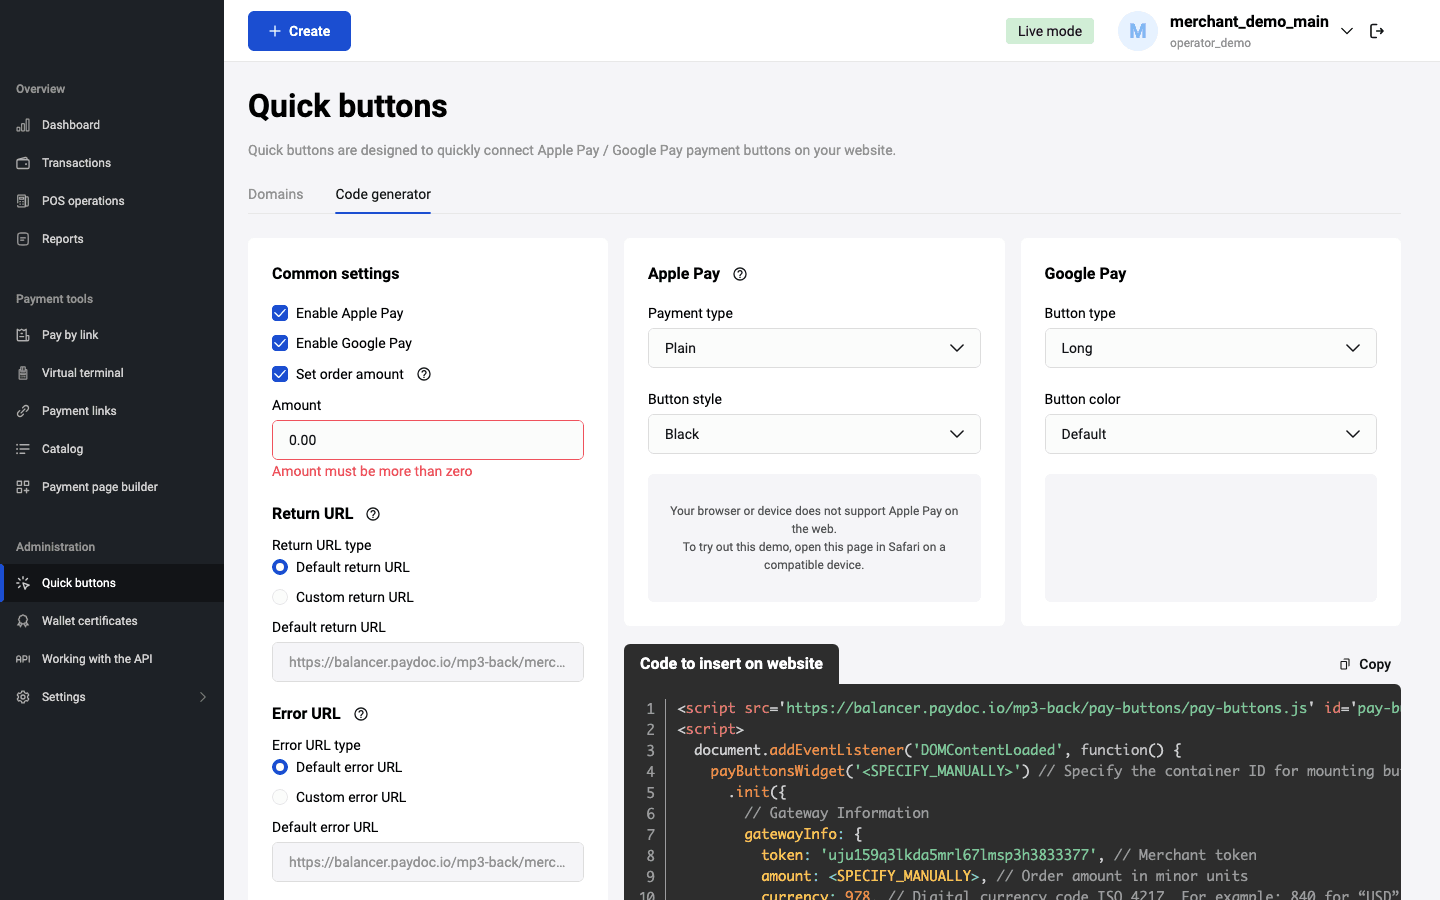

L'onglet comprend les sections suivantes pour définir les paramètres d'initialisation du script :
-
Paramètres généraux - indiquez les informations générales pour l'enregistrement de la commande dans la Passerelle de paiement :
- Activer le paiement via Apple Pay et/ou Google Pay,
- Numéro de commande,
- Montant (obligatoire),
- Devise (sélectionnez dans la liste),
- Langue (sélectionnez dans la liste),
- Environnement (test ou production)
- Page de paiement réussi et Page de paiement échoué (indiquez l'URL ou choisissez l'URL standard).
- Demande de données utilisateur - indiquez les données qui seront obligatoires pendant le paiement via PaymentRequest API pour Google Pay. Cochez les cases correspondantes : Nom, E-mail, Numéro de téléphone, Adresse postale.
- Paramètres des boutons de paiement - indiquez le type d'apparence et le style des boutons Apple Pay et Google Pay. Un aperçu du bouton est disponible sur l'onglet.
- Code à insérer sur votre page - cette section contient un aperçu du code d'initialisation du script selon les paramètres indiqués. Ce code doit être inséré sur votre page.